Campaignsuite is meer dan alleen maar een Wordpress plugin. Naast deze toevoeging op uw Wordpress installatie is Campaignsuite eigenlijk een algemene marketing oplossing voor uw organisatie. De plugin is maar een klein deel van het marketinglandschap waar Gopublic u graag mee helpt.
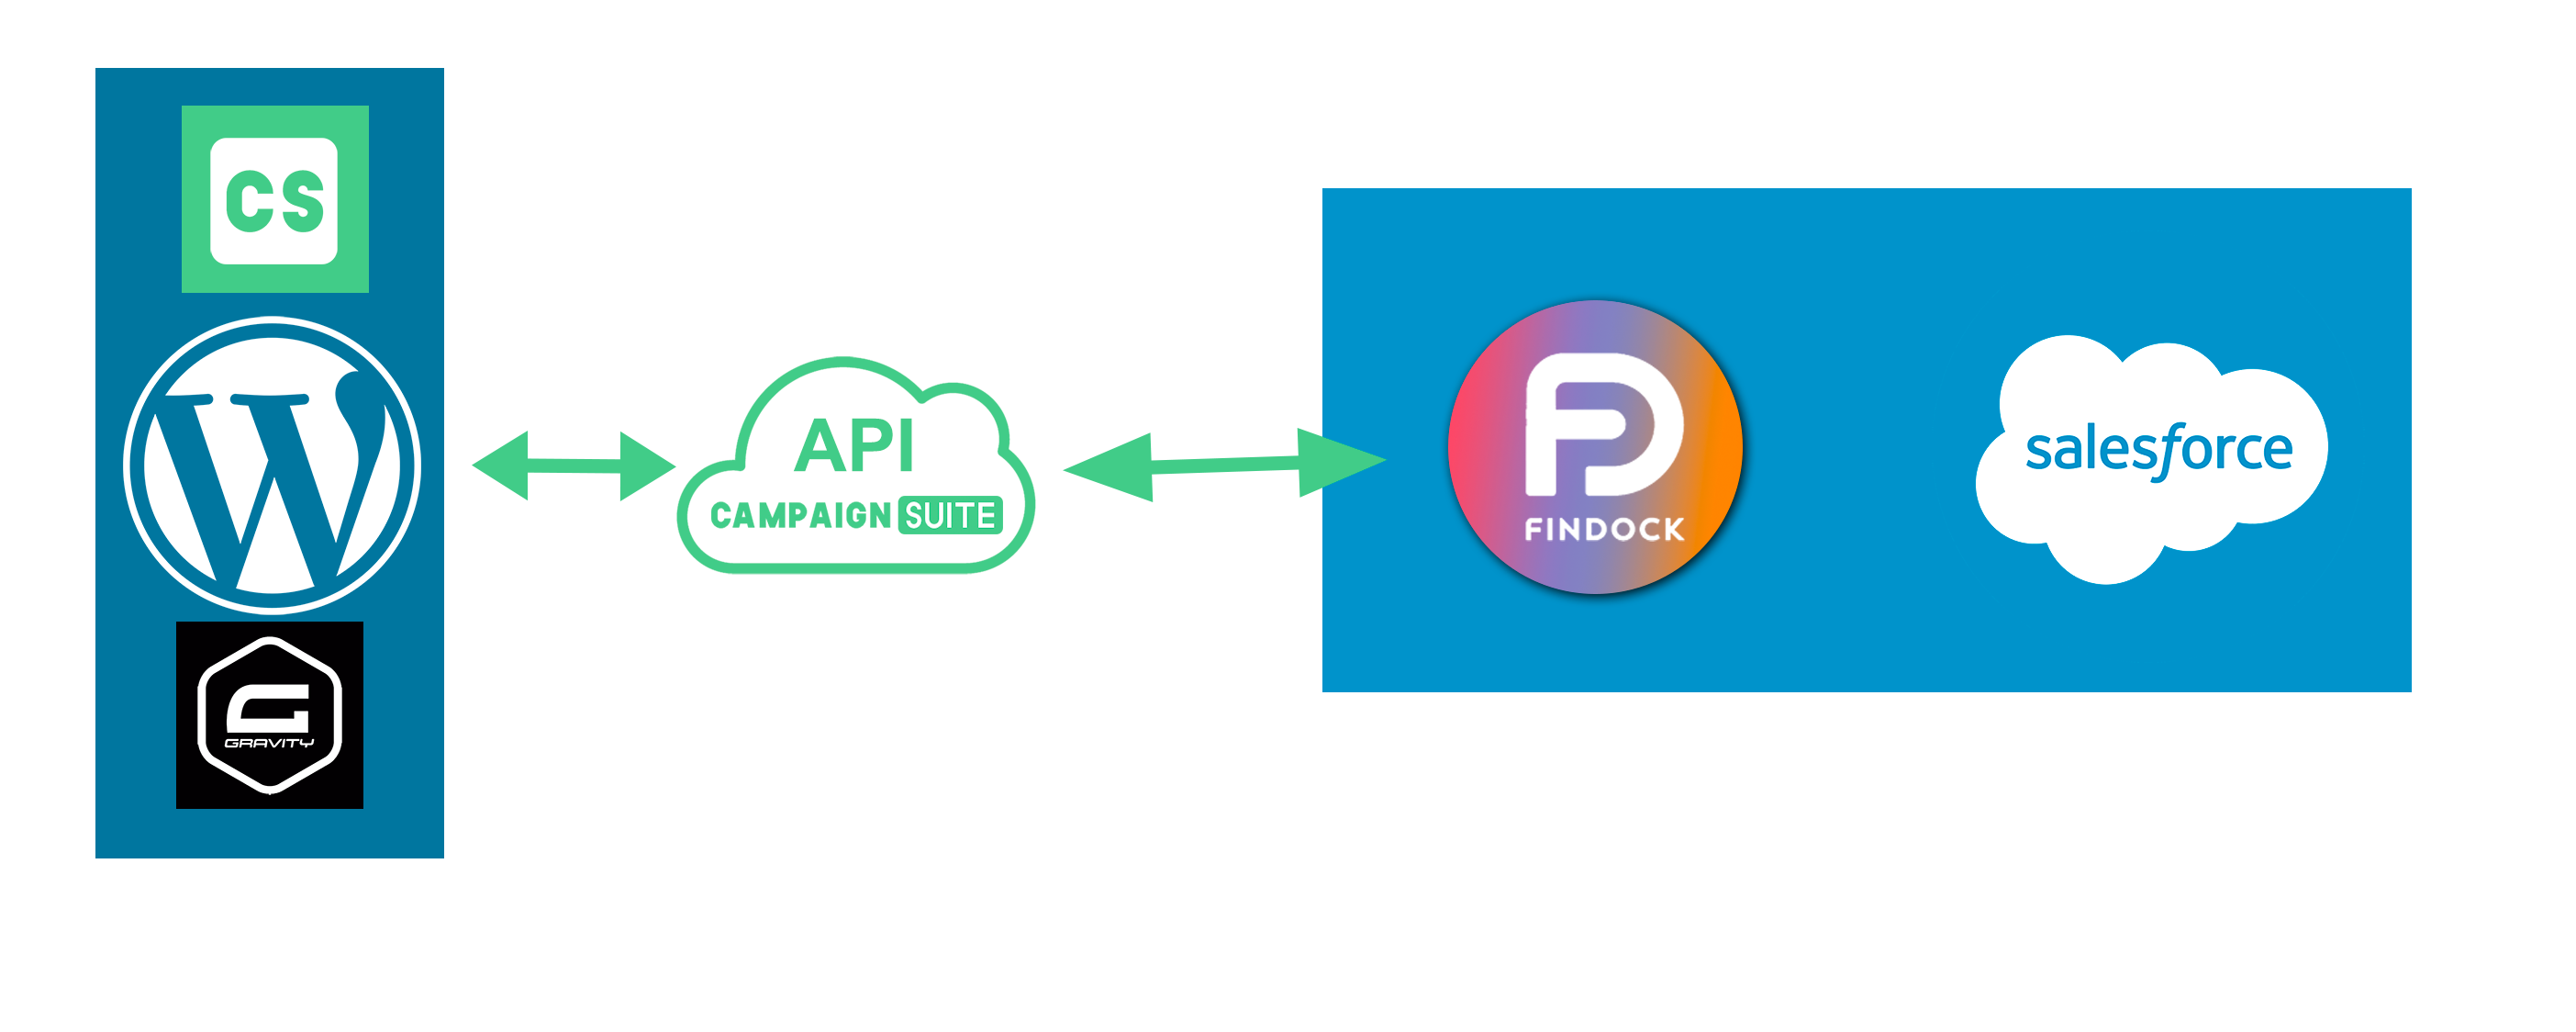
Door de installatie van de Campaignsuite plugin in Wordpress ontstaat er een groot scala aan extra mogelijkheden binnen dit CMS. Met name Gravity Forms krijgt een hoop extra koppelingsmogelijkheden voor externe partijen erbij.
CampaignSuite is meer dan alleen maar een Wordpress plugin. Naast deze toevoeging op uw Wordpress installatie is CampaignSuite eigenlijk een algemene marketing oplossing voor uw organisatie. De plugin is maar een klein deel van het marketinglandschap waar Gopublic u graag mee helpt.
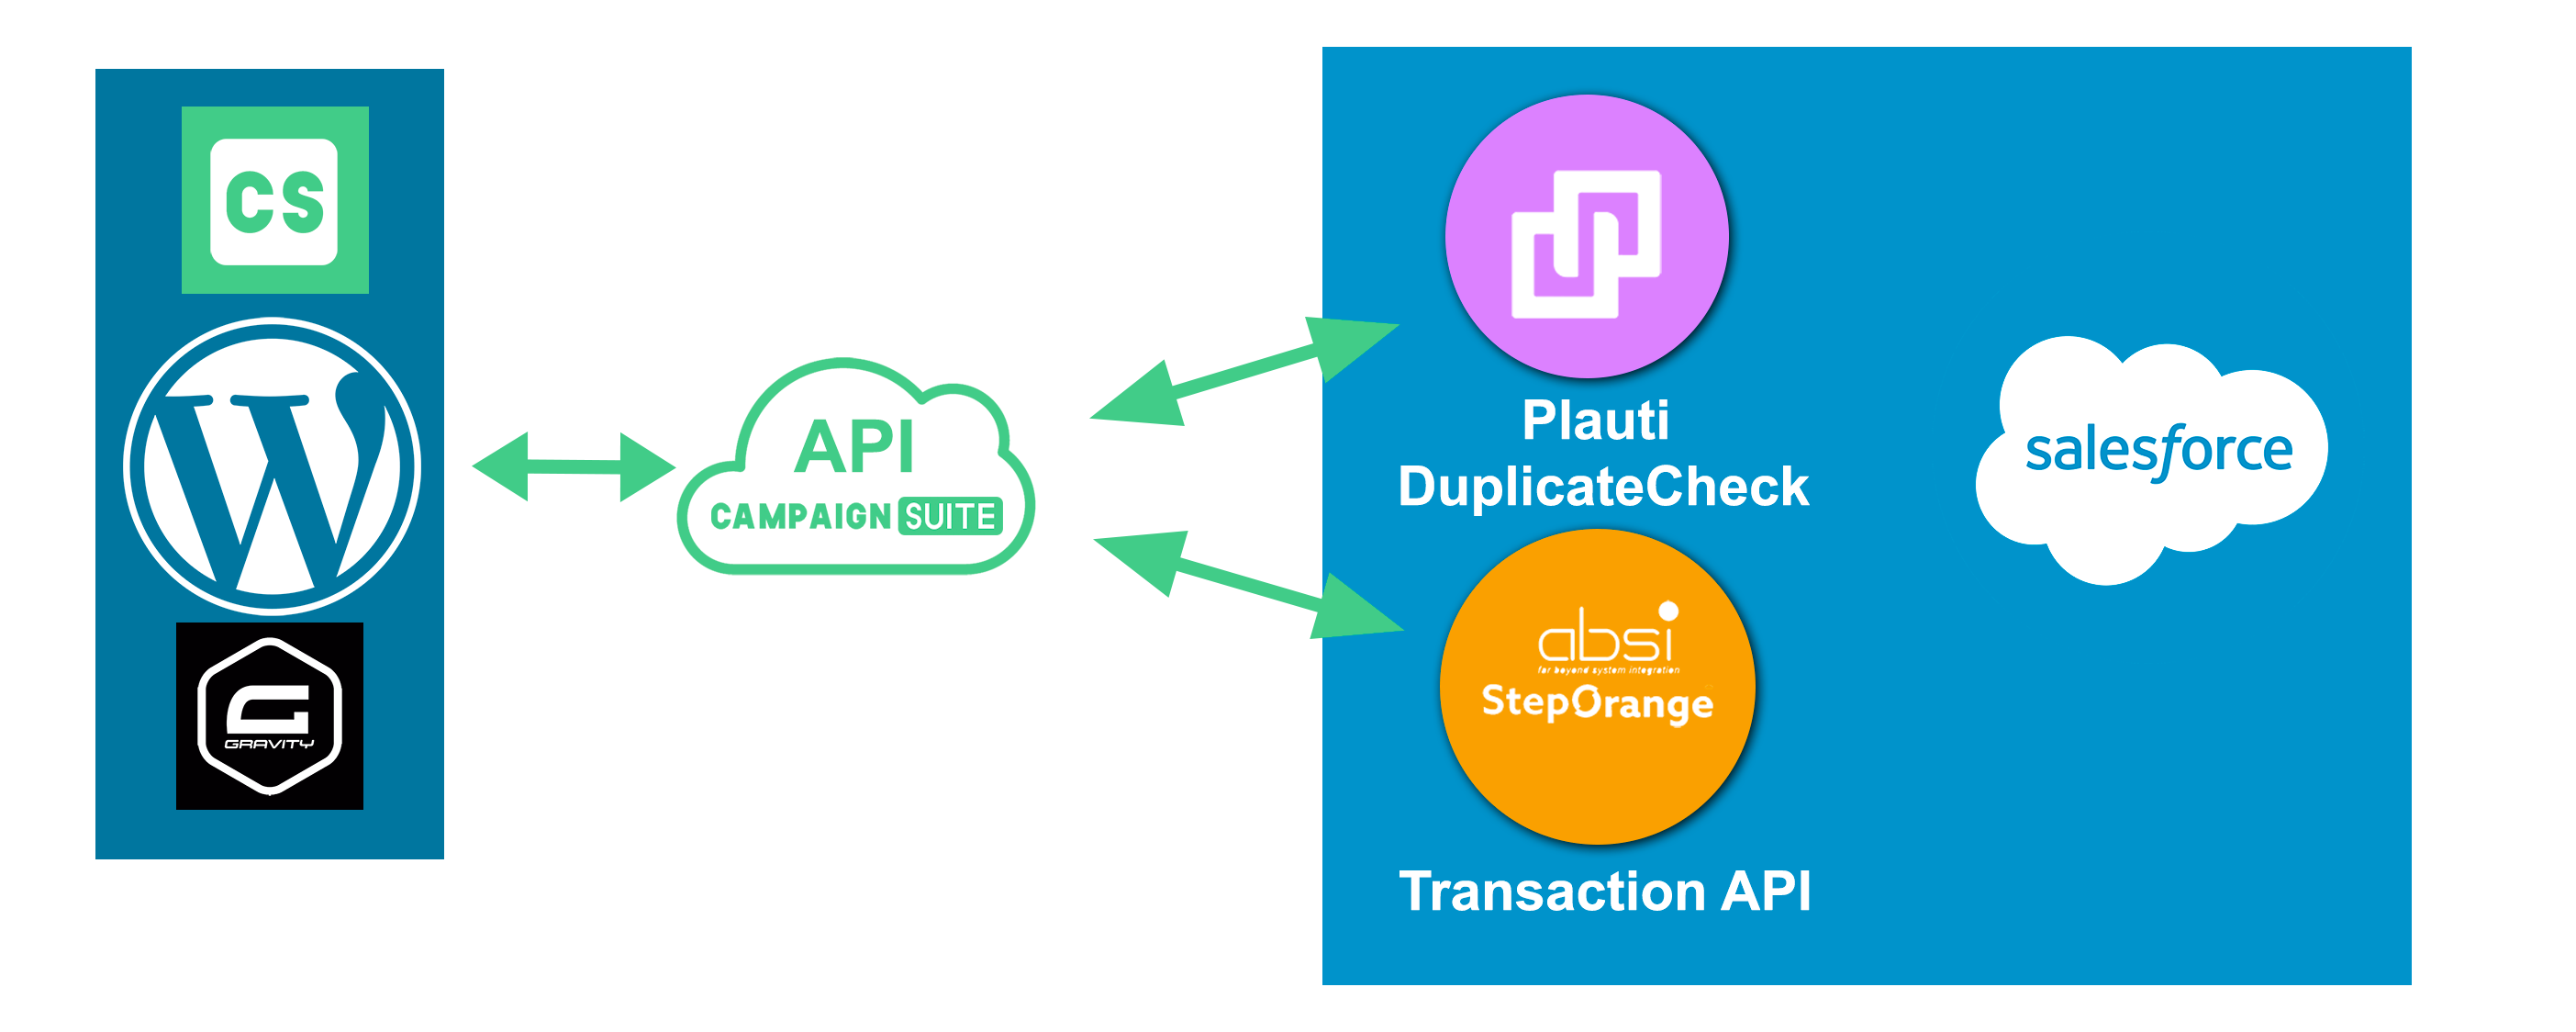
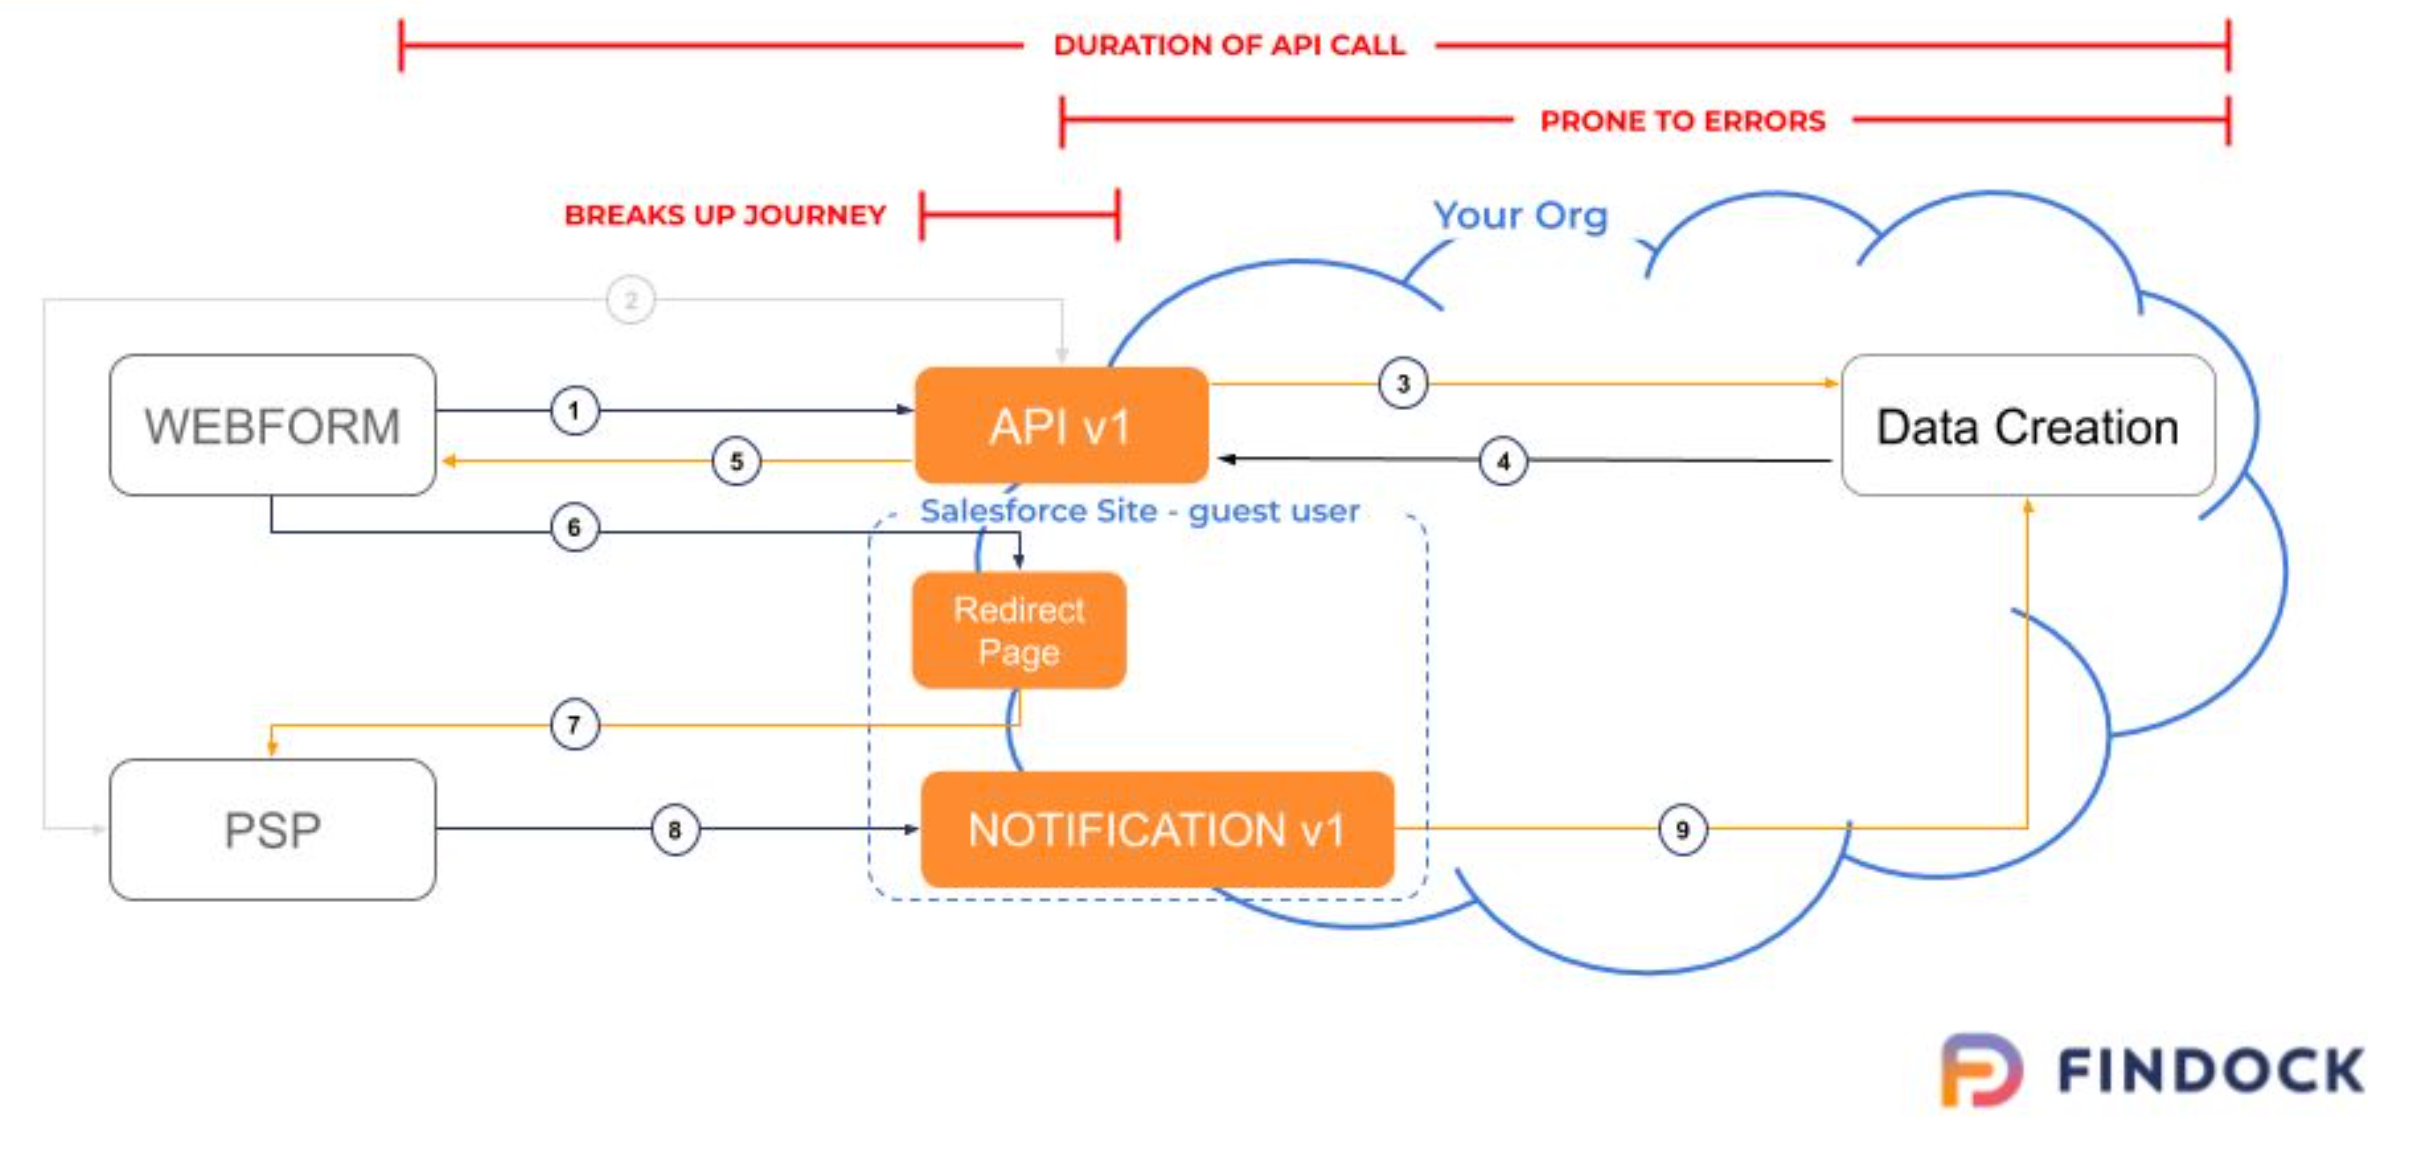
Door de installatie van de CampaignSuite plugin in Wordpress ontstaat er een groot scala aan extra mogelijkheden binnen dit CMS. Met name Gravity Forms krijgt een hoop extra koppelingsmogelijkheden voor externe partijen erbij. Onderstaande afbeelding toont een overzicht van de technische werking van CampaignSuite binnen Wordpress.
Wordpress bevat de plugins Gravity Forms en Campaignsuite
De NodeJS applicatie van Campaignsuite vormt een brug tussen de verschillende platformen.
Salesforce bevat Apps zoals Converse, Findock en Plauti DuplicateCheck. Deze werken naadloos samen met Campaignsuite.
De connectie met Mautic zorgt ervoor dat Gravity Forms inzendingen weggeschreven worden naar Mautic formulieren.
Ook kunnen Gravity Forms inzendingen naar Pardot formulieren gestuurd worden.
Schrijf direct Contacten en/of Accounts weg naar Dynamics of creëer een koppeling met iFunds Engage voor betalingen.
Wordpress moet de plugins Gravity Forms en CampaignSuite bevatten. Deze communiceren met de API van CampaignSuite welke is gemaakt is door Gopublic.
Deze API kan momenteel geautoriseerde verbindingen hebben met:
Salesforce (Converse, Findock en Plauti Duplicate Check)
Mautic
Salesforce Pardot
Dynamics 365
Marketing Cloud
Per verbinding is het mogelijk om de autorisatie in te stellen o.b.v. bijvoorbeeld oAuth2 credentials. In deze documentatie vindt u de verschillende stappen die u moet uitvoeren om een dergelijk verbinding op te zetten.
Installatie
Na activatie van de plugin zal er in de Wordpress admin een menuoptie bij komen onder Instellingen genaamd CampaignSuite. Hieronder staan alle globale instellingen van de plugin.
Vul hier uw CampaignSuite Key om uw licentie te activeren. Deze licentiekey krijgt u van ons als u CampaignSuite klant geworden bent. Zonder deze sleutel is het niet mogelijk om CampaignSuite te gebruiken binnen uw omgeving. Heeft u geen licentie key of bent u deze kwijtgeraakt? Neem dan contact op met de Gopublic Sales afdeling.
Na de activatie verschijnen er (afhankelijk van uw eigen voorkeuren) in de linkerkolom de voor u beschikbare connectie mogelijkheden. Dit kunnen zijn:
SalesForce
Mautic
Pardot
Dynamics
Gravity Forms
Debug
Creatie van database tabellen
Bij de activatie van de plugin zullen er 3 extra database tabellen worden aangemaakt in de database van Wordpress. Deze tabellen bevatten informatie van acties en inzendingen binnen CampaignSuite.
Wanneer een Gravity Forms formulier is gekoppeld aan een Mautic formulier zal bij een inzending in deze tabel Mautic informatie worden opgeslagen (bijvoorbeeld het Mautic Contact ID). Tevens zal de inzending naar Mautic verstuurd worden.
Diverse meta data m.b.t. Gravity Forms inzendingen kunnen in deze tabel worden opgeslagen (zoals een SalesForce Case ID)
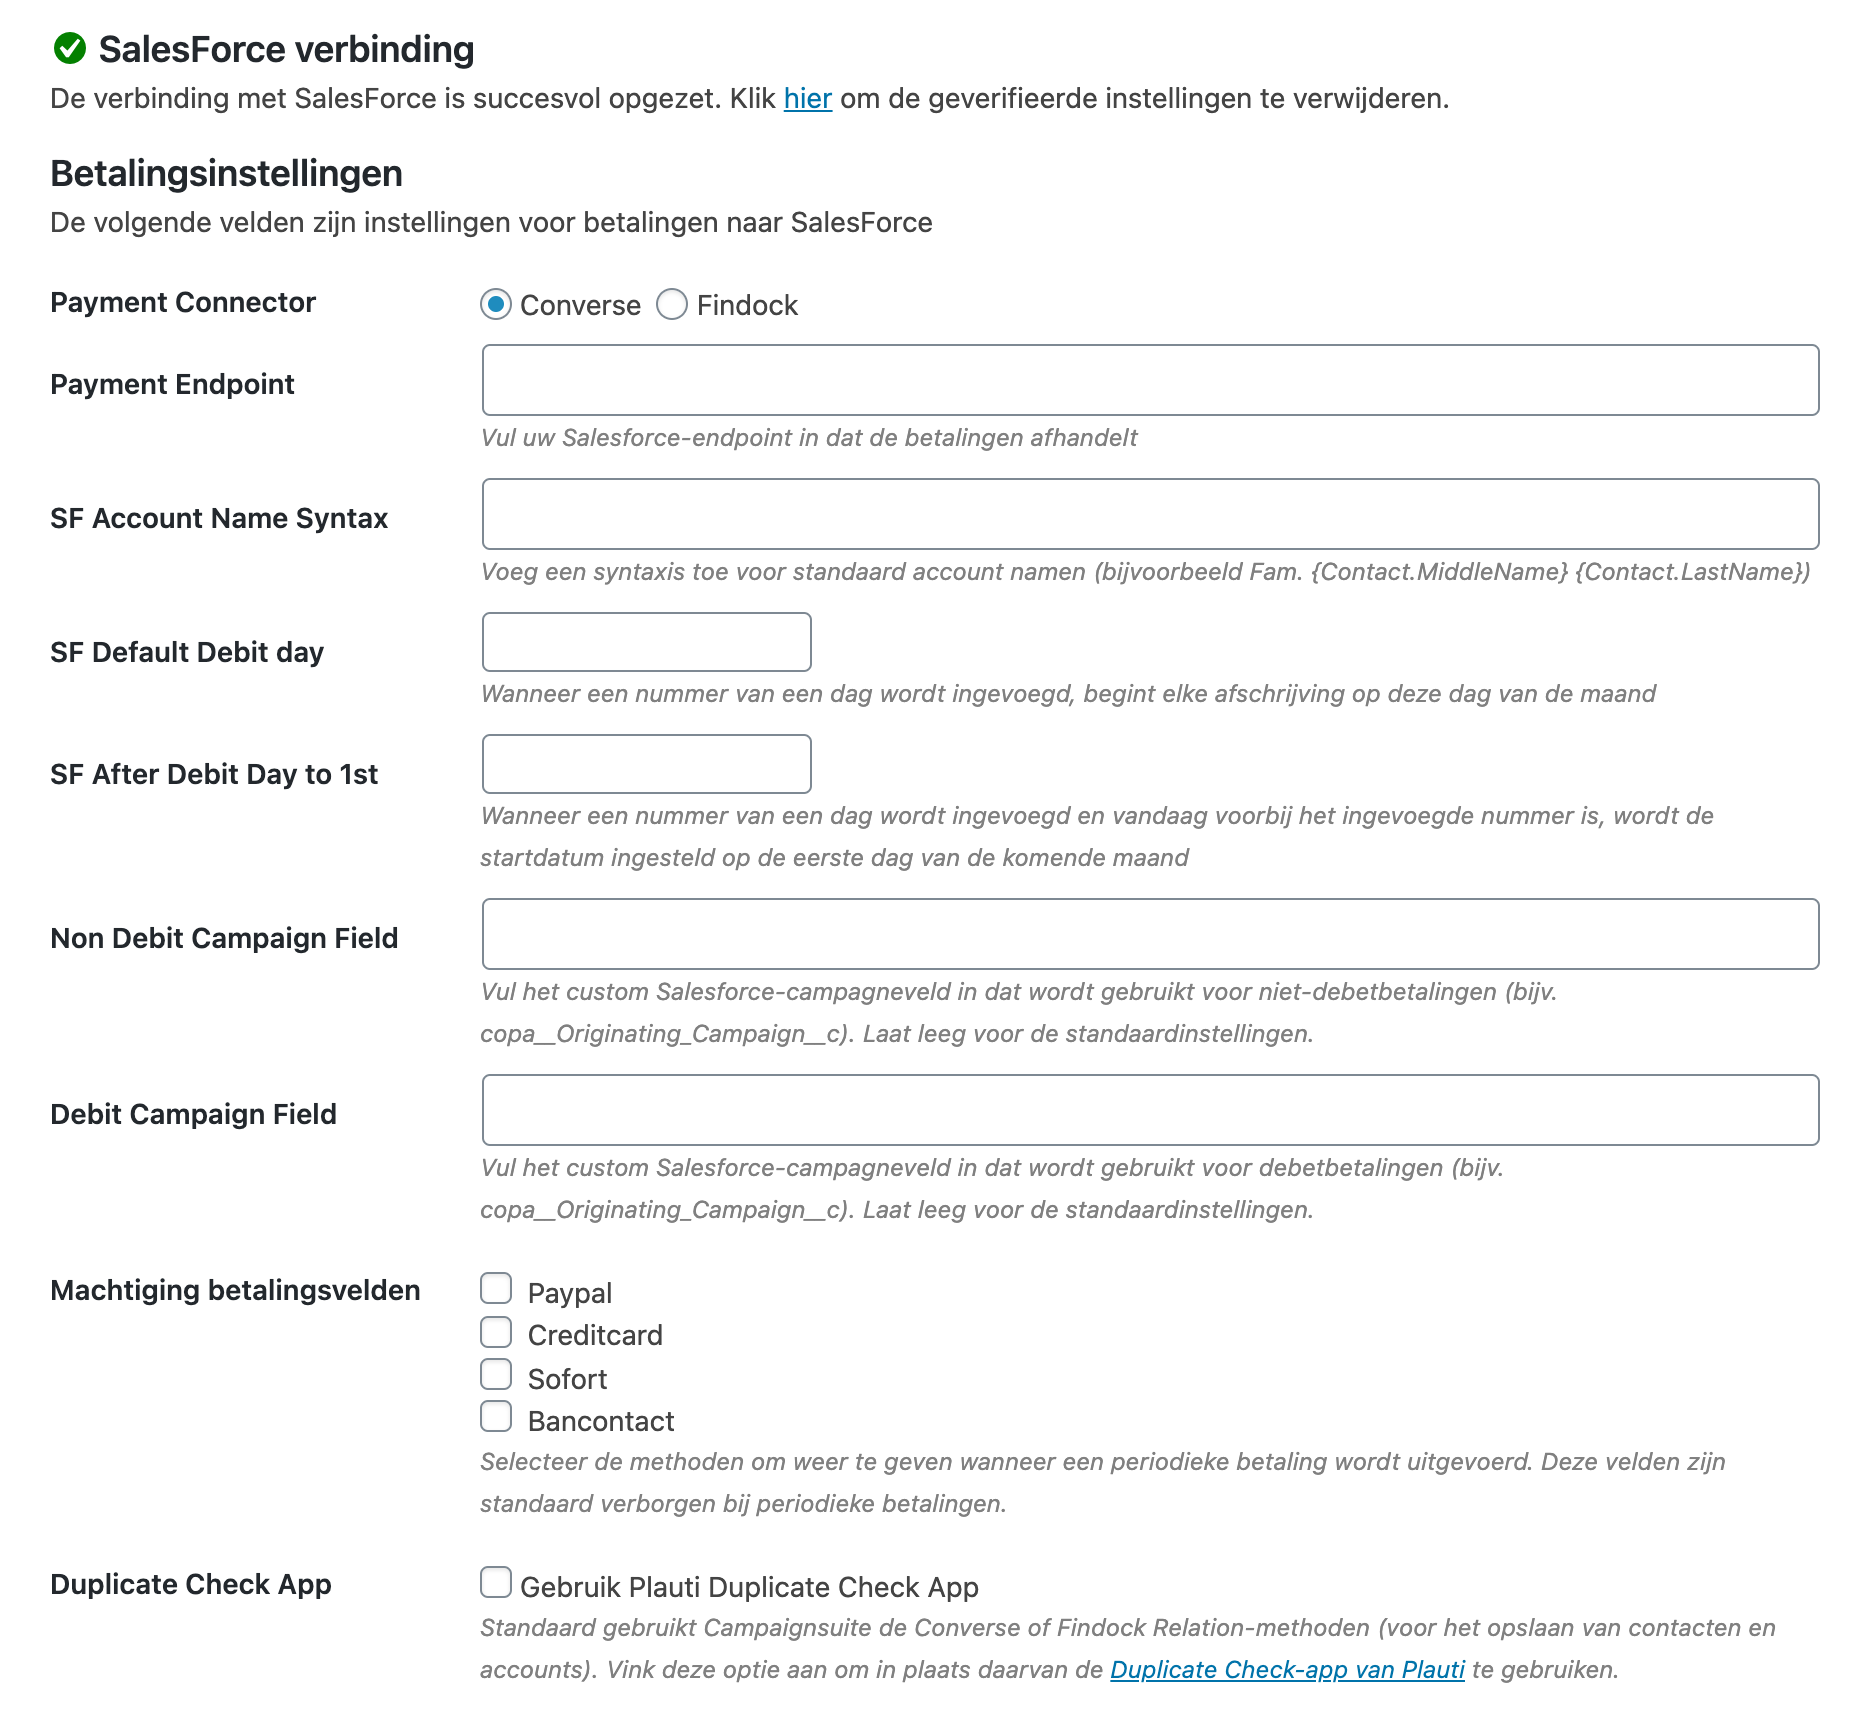
Salesforce
Als u CampaignSuite koppelt aan SalesForce kunnen o.a. de volgende mogelijkheden beschikbaar worden:
Aanmaken van betalingsverzoeken via Converse of Findock
Het aanmaken van custom objecten (zoals Cases)
Het ophalen en bijwerken van Contact en Account gegevens (Preference Center)
Gebruik van ontdubbeling met de Plauti Duplicate Check App
En meer …
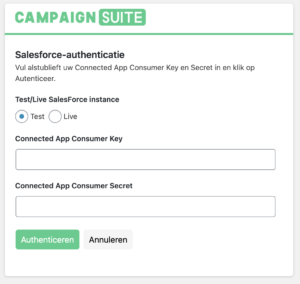
Om een succesvolle verbinding tot stand te brengen met Salesforce moeten er drie stappen uitgevoerd worden:
Het aanmaken van een Connected App
Het toevoegen van Remote Site Setting
Koppel de Connected App aan CampaignSuite
Mautic
CampaignSuite kan gekoppeld worden met het Marketing Automation pakket Mautic. Als de koppeling gelegd is kan u Gravity Forms formulieren koppelen aan Mautic formulieren. De velden in de Mautic formulieren koppelt u dan vervolgens weer aan Mautic Contact velden. Op deze manier kunnen Leads aangemaakt worden via CampaignSuite door Gravity Forms.
Als uw website ook de Mautic pixel inlaadt, zorgt CampaignSuite ervoor dat de inzending gekoppeld zal worden een mogelijk bestaand Mautic contact o.b.v. het Mautic ID (mtcid). Op deze manier kunnen inzendingen automatisch gekoppeld worden aan bestaande of nieuwe Mautic contacten.
Om de Mautic connectie actief te krijgen hoeft u maar één handeling uit te voeren in Mautic:
Nieuwe API Verificatiegegevens aanmaken
Pardot
Het is mogelijk om Pardot aan te sluiten op CampaignSuite. Na deze koppeling op basis van een Connected App in Salesforce heeft u de mogelijkheid om een Gravity Forms inzending naar een Form of Form Handler in Pardot te sturen.
Hierbij heeft u ook de keuze om deze inzending naar Pardot pas uit te voeren als er bijvoorbeeld een betaling succesvol is voltooid naar Salesforce.
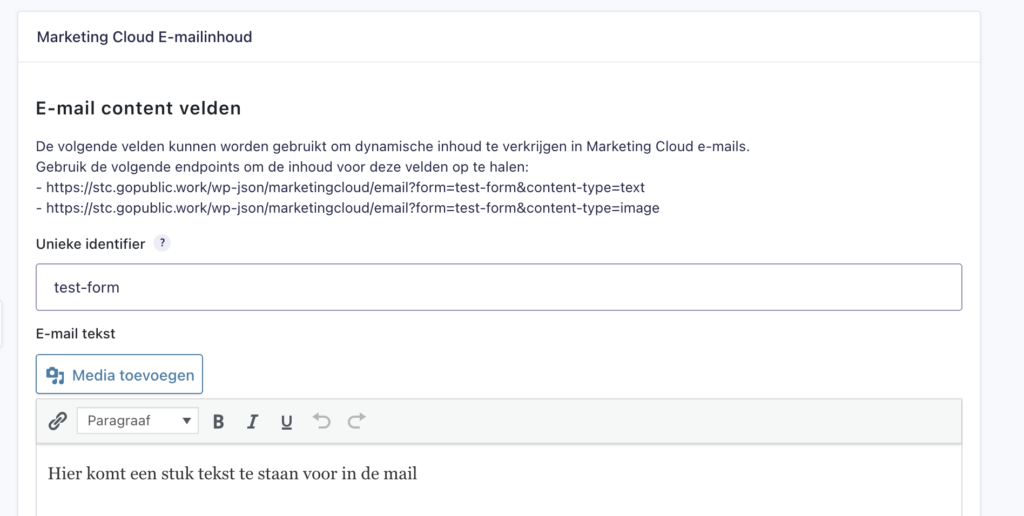
Marketing Cloud
Marketing Cloud is het marketing automation pakket van Salesforce. CampaignSuite biedt een aantal uitbreidingen op Gravity Forms waarmee er verschillende verbindingen gemaakt kunnen worden met Marketing Cloud. Denk hierbij aan:
Het creëeren van een Transactional Email event
Het creëeren van een Journey event
Het prefillen van een formulier op basis van Marketing Cloud Contact data
Dynamische content uit Marketing Cloud gebruiken op pagina’s op basis van unieke parameters
Het prefillen van data en het ophalen van dynamische content uit Marketing Cloud vereisen wel specifieke Cloud Pages. Als u hier gebruik van wilt maken, neem dan contact met ons op.
Gravity Forms
Deze tab toont in één overzicht alle formulieren in Gravity Forms. Per resultaat ziet u welke connecties er ingesteld zijn bij het formulier (zoals Salesforce of Mautic). In de laatste kolom staat een directe link naar de eerst gevonden pagina waarom dit formulier te zien is. Op deze manier kunt u snel naar een bepaalde pagina gaan om het formulier te testen.
Tevens kunt u aangeven of er standaard bij elk formulier een witte overlay getoond moet worden zodra de bezoeker het formulier verzend. Deze overlay zorgt er ook voor dat de bezoeker niet per ongeluk twee keer het formulier verzend.
Introductie
CampaignSuite is meer dan alleen maar een Wordpress plugin. Naast deze toevoeging op uw Wordpress installatie is CampaignSuite eigenlijk een algemene marketing oplossing voor uw organisatie. De plugin is maar een klein deel van het marketinglandschap waar Gopublic u graag mee helpt.
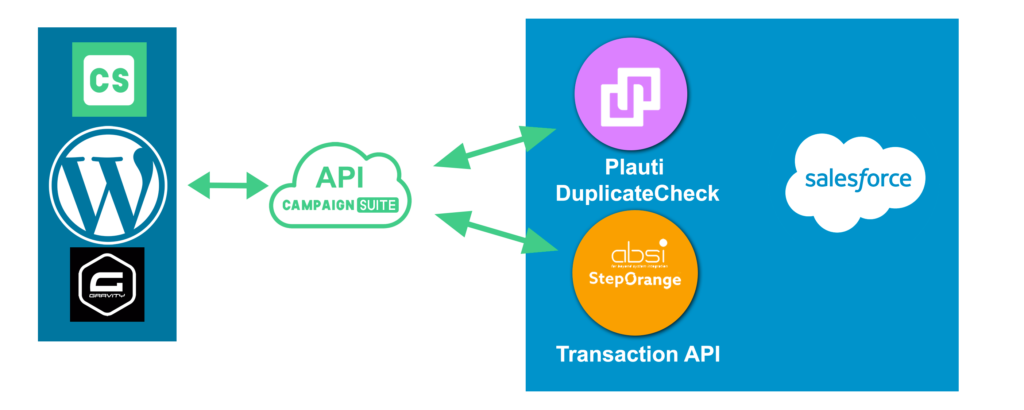
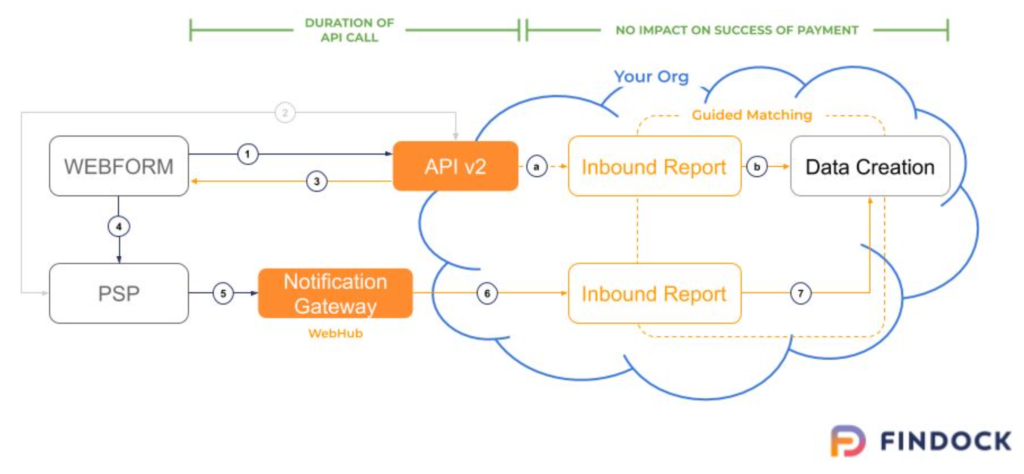
Door de installatie van de CampaignSuite plugin in Wordpress ontstaat er een groot scala aan extra mogelijkheden binnen dit CMS. Met name Gravity Forms krijgt een hoop extra koppelingsmogelijkheden voor externe partijen erbij. Onderstaande afbeelding toont een overzicht van de technische werking van CampaignSuite binnen Wordpress.
Wordpress bevat de plugins Gravity Forms en Campaignsuite
De NodeJS applicatie van Campaignsuite vormt een brug tussen de verschillende platformen.
Salesforce bevat Apps zoals Converse, Findock en Plauti DuplicateCheck. Deze werken naadloos samen met Campaignsuite.
De connectie met Mautic zorgt ervoor dat Gravity Forms inzendingen weggeschreven worden naar Mautic formulieren.
Ook kunnen Gravity Forms inzendingen naar Pardot formulieren gestuurd worden.
Schrijf direct Contacten en/of Accounts weg naar Dynamics of creëer een koppeling met iFunds Engage voor betalingen.
Wordpress moet de plugins Gravity Forms en CampaignSuite bevatten. Deze communiceren met de API van CampaignSuite welke is gemaakt is door Gopublic.
Deze API kan momenteel geautoriseerde verbindingen hebben met:
Salesforce (Converse, Findock en Plauti Duplicate Check)
Mautic
Salesforce Pardot
Dynamics 365
Marketing Cloud
Per verbinding is het mogelijk om de autorisatie in te stellen o.b.v. bijvoorbeeld oAuth2 credentials. In deze documentatie vindt u de verschillende stappen die u moet uitvoeren om een dergelijk verbinding op te zetten.
Connected app
Een Connected App binnen Salesforce zorgt er voor dat je een geautoriseerde verbinding kunt opzetten om op een veilig manier data heen en weer te sturen. Deze verbinding wordt opgezet middels oAuth.
Voer onderstaande stappen uit om de Connected App toe te voegen aan SalesForce.
Ga naar de Setup van Salesforce en zoek naar App.
Klik dan in de zoekresultaten op App manager
Klik rechts bovenin op New Connected App
Vul een Connected App Name in en een contact e-mailadres.
Vink de checkbox Enable OAuth Settings aan onder het kopje API (Enable OAuth Settings)
Vul bij Callback URL de volgende link in: https://api.campaignsuite.nl/v1/token/salesforce/register Deze link is te vinden in de CampaignSuite instellingen onder het tabblad Salesforce:
Voeg bij Selected OAuth Scopes de volgende 2 rechten toe: – Access and manage your data (api) – Perform requests on your behalf at any time (refresh_token, offline_access)
Klik onderaan de pagina op save
Het kan gemiddeld 10 minuten duren voor dat instellingen zijn verwerkt in Salesforce. Kopieer in de tussentijd alvast de Consumer Key en Consumer Secret van de zojuist aangemaakt App. Deze gaan we straks instellen bij CampaignSuite.
API Verificatiegegevens
De verbinding met Mautic wordt opgezet middels een OAuth 2 connectie. Voer onderstaande stappen uit om dit in te stellen:
Log in bij Mautic en klik op het radar-icoon rechts bovenin
Ga vervolgens naar API Verificatiegegevens
Klik op Nieuw in de rechter bovenhoek
Kies bij Autorisatie Protocol voor OAuth 2
Vul een voor u herkenbare naam in voor de connectie
Vul bij het laatste veld de volgende waarde in: https://api.campaignsuite.nl/v1/token/mautic/register Deze URL staat ook bij de instellingen van CampaignSuite.
Klik op Opslaan & sluiten
Kopieer in het daarop volgende scherm de Publieke Sleutel en Geheime Sleutel.
Ga nu naar de tab Mautic in de CampaignSuite instellingen en klik op Authenticeren.
Vul in dit scherm de URL in van uw Mautic instantie en de zojuist gekopieerde Public Key en Secret Key.
Klik al laatste op Authenticeren om bij het inlogscherm van Mautic te komen. Log in met uw inloggegevens om de verbinding te bevestigen.
Er is nu succesvol een connectie gemaakt met uw Mautic instantie.
Introductie
CampaignSuite zorgt voor een aantal veranderingen in zowel de manier waarop een formulier op uw website wordt getoond, als instellingen bij de formulieren in Wordpress.
Formulier op de website
CampaignSuite zorgt ervoor dat er een laad-scherm verschijnt over uw formulieren zodat de bezoeker niet per ongeluk meerdere keren het formulier kan versturen
CampaignSuite geeft de mogelijkheid om een laad-tekst en laad-afbeelding te tonen bij het versturen van een formulier
Adresvelden kunnen een automatische postcode checker bevatten door een simpele instelling bij het veld
En meer..
Bewerken van formulieren
Een keuze uit specifieke CampaignSuite betalingsvelden waarmee u binnen een paar seconden een donatie formulier kunt opmaken.
Er kunnen instellingen bij komen om velden te mappen aan software van derden (zoals Salesforce, Mautic, Pardot en Dynamics)
Er kunnen extra E-commerce instellingen gedaan worden na transacties in formulieren
Er kunnen diverse Feed Actions ingesteld worden (dat zijn acties die uitgevoerd kunnen worden na het versturen van een inzending). Deze kunnen ook custom voor u gemaakt worden door Gopublic.
Er kunnen aparte meldingen (zoals e-mail notificaties) ingesteld worden na succesvolle transacties (Converse en Findock)
En meer…
In het artikel Formulier bewerken gaan we eerst aan de slag met het maken van een eenvoudig donatie formulier. In dit artikel leggen we enkele basis functionaliteiten uit van Gravity Forms om u op weg te helpen bij het maken van een formulier.
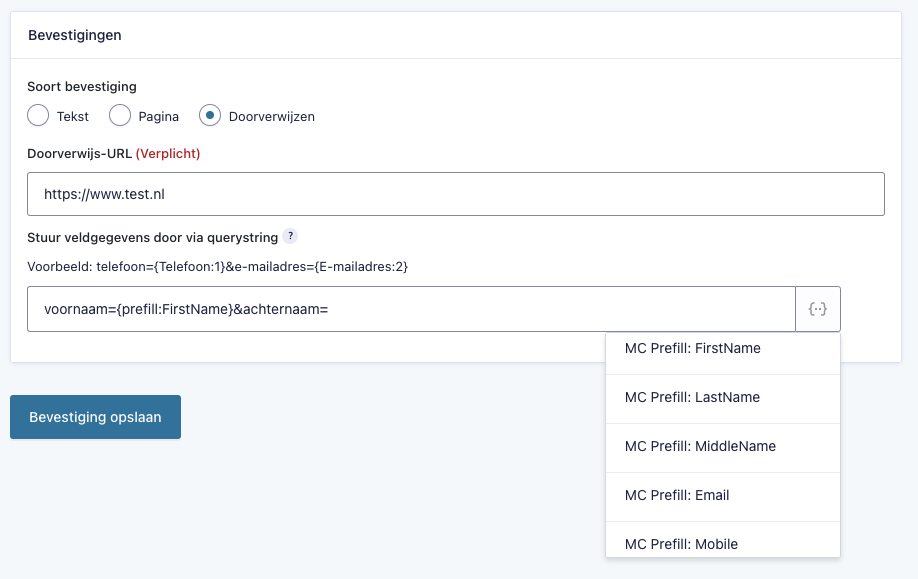
CampaignSuite velden
Wanneer CampaignSuite is geactiveerd verschijnt er een extra blok met velden bij het bewerken van een formulier: CampaignSuite velden. Dit zijn velden die specifiek gemaakt zijn voor formulieren met een betalingsoptie. De velden waaruit gekozen kan worden zijn:
Frequentie Dit veld genereert een radio veld met de verschillende betaalfrequenties. Als u dit veld in uw formulier sleept heeft u vervolgens de mogelijkheid om opties aan of uit te vinken. Op deze manier is het bijvoorbeeld mogelijk om alleen Eenmalig en Maandelijks te tonen. Het is tevens mogelijk om eigen frequenties toe te voegen (mits deze ondersteunt worden door de partij van derden die verantwoordelijk is voor de betalingen).
Bedrag opties Dit is een voorgedefinieerd veld met 3 bedragen waaruit gekozen kan worden. Het is hierbij belangrijk dat de waarde van het veld een getal is (zonder een valuta teken). U bent vrij om deze bedragen te wijzigen of nieuwe bedragen toe te voegen.
Totaal bedrag Bij een financieel formulier is het belangrijk om één veld te hebben waar het definitieve bedrag in komt te staan. Gebruik het Totaal bedrag veld om meerdere Bedrag opties velden met voorwaardelijke logica af te vangen. Dit Totaal bedrag veld is verborgen maar zal altijd gevuld worden met een bedrag wat gekozen wordt of bij een Anders-optie ingevuld wordt.
Betaalmethode Dit veld genereert een radio veld met verschillende betaalmethodes waaruit een donateur kan kiezen. U kunt hier opties aan- of uitvinken om in uw formulier te tonen.
Logica tussen frequentie en betaalmethode
Technisch gezien is niet mogelijk om periodiek met Ideal te betalen. Daarom zorgt CampaignSuite er automatisch voor dat alle niet periodiek ondersteunende betaalmethodes (Ideal, Paypal, Sofort, Creditcard en Bancontact) worden verborgen als men periodiek doneert. Deze instelling kan gewijzigd worden in de CampaignSuite instelling onder het tabblad Salesforce.
Bank keuze Dit veld genereert een dropdown met de beschikbare banken waaruit een donateur kan kiezen. Het is mogelijk om zelf banken toe te voegen mits de value wordt ondersteunt door de payment provider.
Adres (NL) Dit veld genereert een serie van velden die een Nederlands adres vormen. – Postcode – Huisnummer – Toevoeging – Straat – Stad Tevens zit er automatisch een postcode checker op. Zodra er een postcode en huisnummer worden ingevuld, zullen de straat en stad automatisch aangevuld worden.
Globale optin Dit veld toont een checkbox optie voor een optin op bijvoorbeeld een nieuwsbrief. Uiteraard zal dit veld dan nog gemapped moeten worden met een veld in een CRM.
Verbinding maken
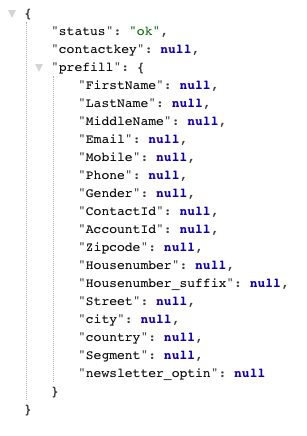
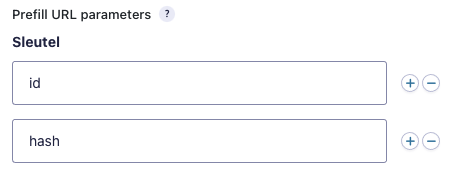
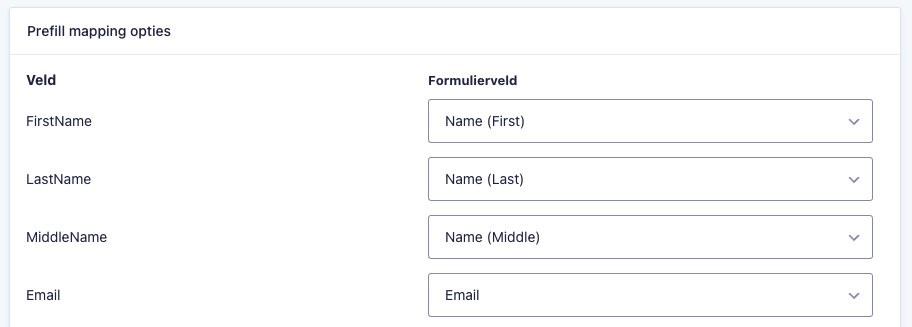
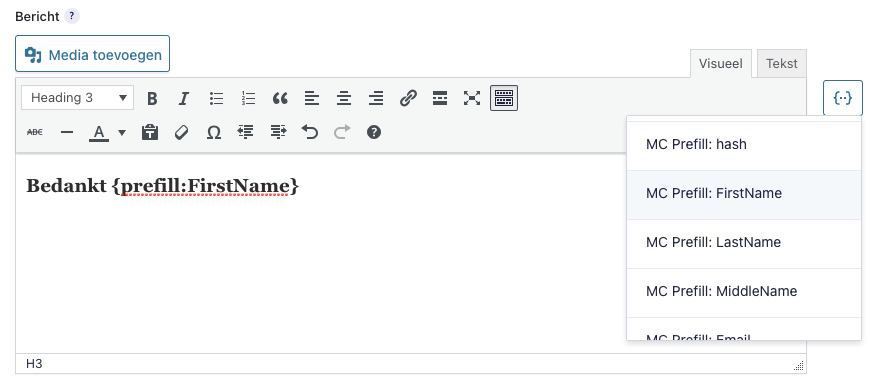
De verbinding met Salesforce wordt altijd gemaakt wanneer de bezoeker het formulier helemaal heeft ingevuld. Behalve wanneer u het formulier vooraf in wilt vullen Contact gegevens (zie het artikel Prefillen o.b.v. ContactIdvoor meer informatie hierover).
Geef bij de Salesforce instellingen van het formulier aan dat er een Salesforce verbinding gemaakt moet worden.
Bestemmings-ID
Kies hier één van de beschikbare bestemmingen uit SalesForce. Een bestemming is een verplicht veld bij een transactie naar Converse.
Campagne-ID
Kies een campagne uit Salesforce om of een transactie aan te koppelen of een Contact (als deze aangemaakt of gevonden wordt). Een campagne is ook verplicht bij een transactie naar Converse.
Creëer Campaign Member
Als u deze optie aanvinkt zal er een CampaignMember object aangemaakt worden nadat de bezoeker het formulier in heeft gevuld. Als het Contact reeds een lid is van de campagne, dan zal er niks gebeuren.
Verwijder inzending direct
Het is mogelijk om bij een formulier in te stellen dat de aangemaakt inzending direct verwijderd moet worden nadat de bezoeker het formulier heeft ingevuld. Dit wordt vaak gebruikt bij Preference centers. Daarmee kan bijvoorbeeld een Contact zijn/haar gegevens updaten (of nieuwsbrief inschrijvingen). Om te voorkomen dat er teveel inzendingen komen, kunnen deze direct verwijderd worden.
LET OP: dit kan niet ongedaan gemaakt worden.
Afhankelijk van uw Customer Payment Management platform (Converse of Findock) verschijnen er nog enkele opties in deze lijst.
Converse
Sta ontdubbeling toe
Standaard staat deze optie op Ja en is gekoppeld aan het Converse API veld AllowDeduplication.
Sta gegevensverrijking toe
Standaard staat deze optie op Ja en is gekoppeld aan het Converse API veld AllowDataEnrichment.
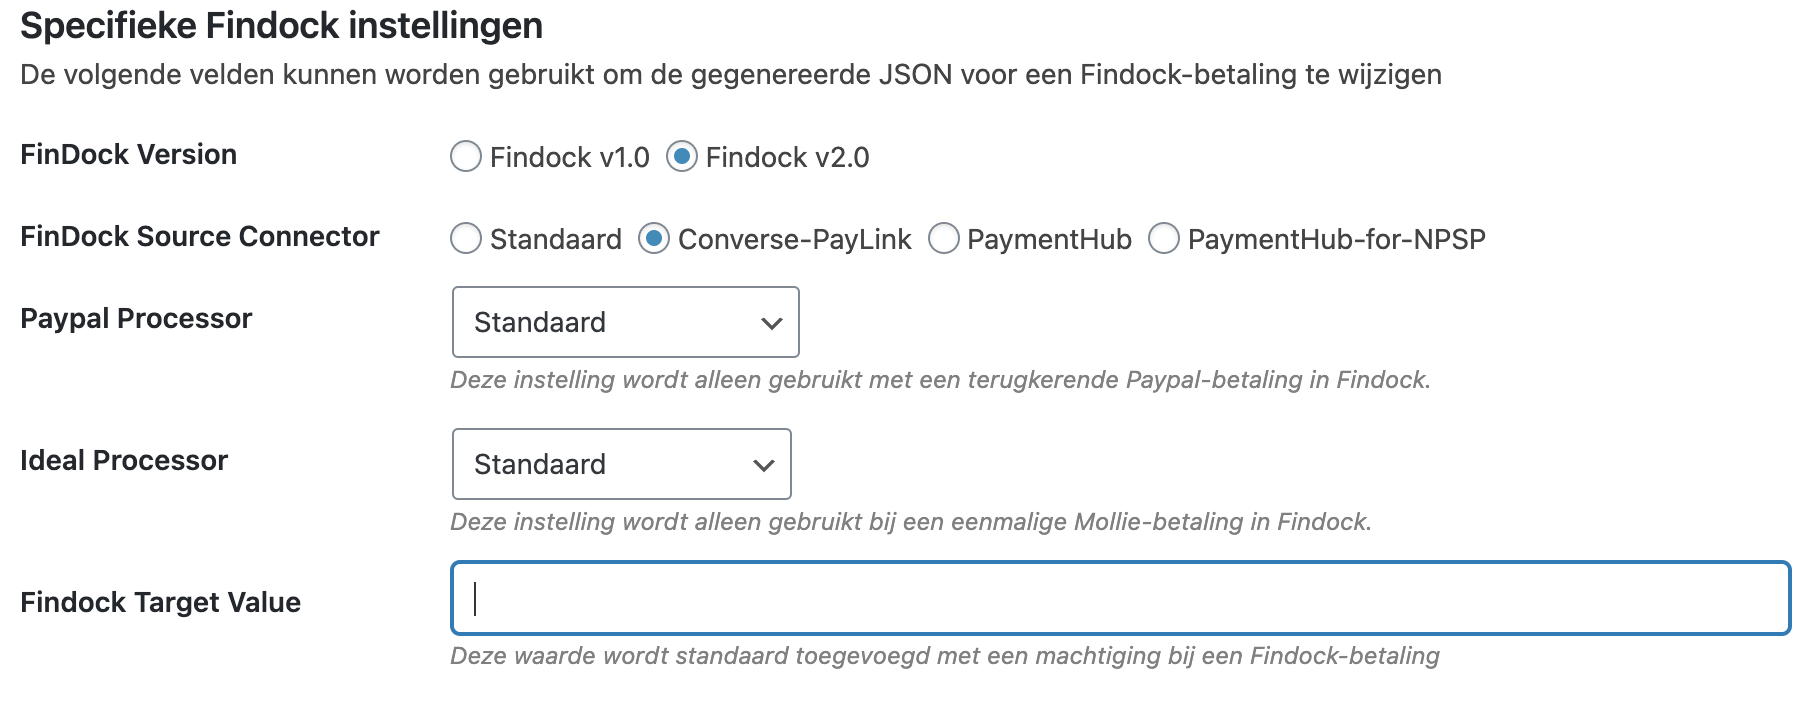
Findock v1
Contact opties
Kies hier wat er moet gebeuren als Findock een bestaand Contact vindt. Overschrijven, vul alleen lege velden of doe niets
Account opties
Kies hier wat er moet gebeuren als Findock een bestaand Account vindt. Overschrijven, vul alleen lege velden of doe niets
Sta ontdubbeling toe
Standaard staat deze optie op Ja en is gekoppeld aan het Findock API veld allowDeduplication.
Let op
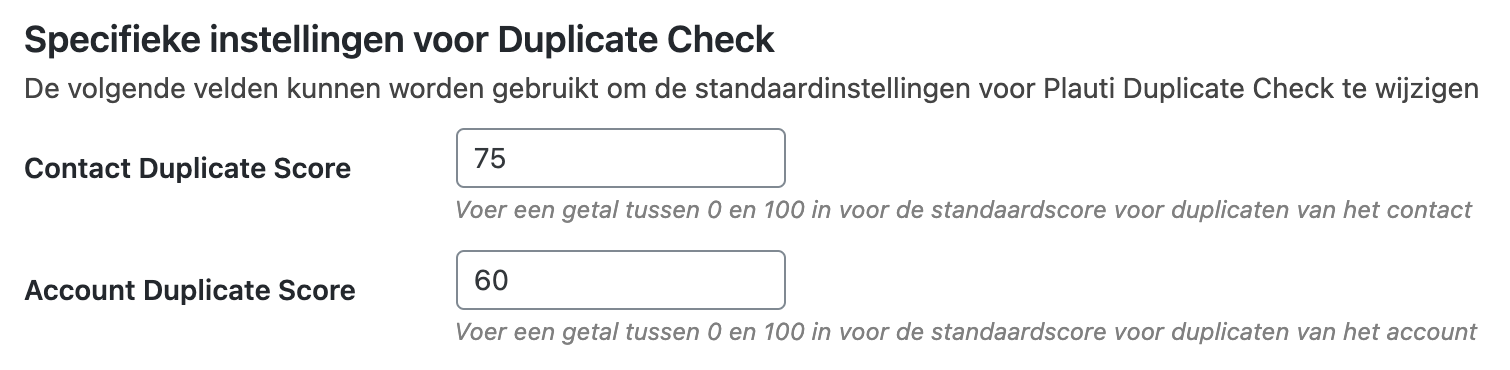
De Converse en Findock optie zoals hierboven vermeld zijn, worden verborgen zodra u in de CampaignSuite instellingen kiest om gebruik te maken van de Plauti Duplicate Check App. Dat komt omdat de App dan alle logica overneemt van het opslaan van het Contact en Account en niet Converse of Findock.
Filters
Op verschillende plekken in de CampaignSuite code zijn Wordpress filters ingebouwd. Deze maken het mogelijk om als developer in het thema invloed uit te oefenen op de data die op dat moment door CampaignSuite wordt gebruikt.
Alle filters kunnen het beste geplaatst worden in de functions.php van uw thema. Klik op onderstaande artikelen om de verschillende filters te bekijken.
Met dit filter kunt u de contact- en account-array manipuleren wanneer deze gegevens worden gemaakt vlak voordat een formulier wordt gevalideerd.
Gebruik
					add_filter( 'cs_validate_contact_account', 'custom_contact_account' );

//You can also use a Gravity Forms form ID to target a specific form
add_filter( 'cs_validate_contact_account_6', 'custom_contact_account' );
Parameters
$contact_account (array) Deze array geeft de weergegeven contact- en account-arrays door. Deze waarde moet worden geretourneerd in de filterfunctie.
$payer (object) Dit is het volledige object van de Payer-klasse van CampaignSuite. Dit object bevat verschillende extra informatie over de betaler.
Dit is het volledige \CampaignSuite\Render_response() klasseobject van CampaignSuite. Dit object bevat informatie over het response dat wordt geretourneerd door de CS Api.
Voorbeeld
Onderstaand voorbeeld schrijft een $_SESSION[‘orig_campaign’] waarde weg op het Salesforce object Contact.
$actions (array) Dit is een array met de beschikbare acties. U kunt meer elementen aan deze array toevoegen voor aangepaste acties.
Voorbeeld
					function get_feed_actions($actions)
{
  $extraActions = [[
    'label' => 'Maak een nieuwe Lead aan',
    'value' => 'custom_lead',
    'object' => 'Lead',
    'objectName' => 'Lead'
  ]];
  return array_merge($actions, $extraActions);
}
cs_get_contact_filter_fields
Beschrijving
Met dit filter kunt u meer Salesforce-contactpersoonvelden toevoegen om te controleren wanneer een contactpersoon-ID wordt doorgegeven in de URL. Standaard wordt een contactpersoon alleen gevonden op basis van een contact-ID. Voor meer veiligheid is het mogelijk om meer velden aan deze controle toe te voegen.
Onderstaand voorbeeld voegt het veld Contact.Email toe als extra check in de URL.
					function cs_get_contact_filter_fields(){
    return ['Email'];
}
cs_add_custom_json
Beschrijving
Met dit filter kunt u eigen custom JSON toevoegen aan de API call richting Findock of Converse. Deze JSON zal toegevoegd worden aan de root van het JSON object.
Onderstaand voorbeeld loopt door Woocommerce items in een winkelwagen en controleert of er Destination ID’s gezet zijn. Als dat het geval is zullen deze worden meegegeven in de JSON call naar de CampaignSuite API.
					function custom_json()
{
    global $woocommerce;
    if ($woocommerce) {
        $items = $woocommerce->cart->get_cart();
        if ($items) {
            $jsonItems = [];
            foreach ($items as $values) {
                $price = get_post_meta($values['product_id'], '_price',true);
                $destination_id = get_post_meta($values['product_id'], '_sf_destination_id', true);
                if ($destination_id) {
                    $jsonItems[] = [
                        'DestinationId' => $destination_id,
                        'Amount' => $price
                    ];
                }
            }
            if ($jsonItems) {
                return [
                    'TransactionInfo' => [
                        'Gifts' => $jsonItems
                    ]
                ];
            }
        }
    }
    return [];
}
Velden koppelen
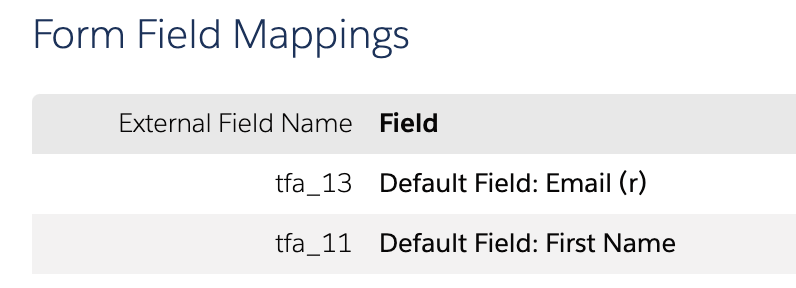
Schakel de verbinding met Mautic om CampaignSuite een inzending aan te laten maken in een Mautic formulier. Kies vervolgens één van de Mautic formulieren. Om de Mautic velden op te halen klikt u op de button Refresh.
In de linker kolom staan alle velden van Gravity Forms en rechts in elke dropdown de velden van het Mautic formulier. Koppel vervolgens alle benodigde velden aan elkaar.
Bij Overige instellingen kunt u het Gravity Forms Entry-ID koppelen en het veld waar een betaalstatus in moet worden opgeslagen. Koppel deze velden als u ervoor wilt zorgen dat de status van een betaling ook naar Mautic gestuurd wordt.
Let op
U moet de velden Gravity Forms Entry-ID en Update betalingsstatus koppelen om ervoor te zorgen dat een verandering van een status goed naar Mautic gestuurd wordt.
cs_validate_contact_account
Beschrijving
Met dit filter kunt u de contact- en account-array manipuleren wanneer deze gegevens worden gemaakt vlak voordat een formulier wordt gevalideerd.
Gebruik
					add_filter( 'cs_validate_contact_account', 'custom_contact_account' );

//You can also use a Gravity Forms form ID to target a specific form
add_filter( 'cs_validate_contact_account_6', 'custom_contact_account' );
Parameters
$contact_account (array) Deze array geeft de weergegeven contact- en account-arrays door. Deze waarde moet worden geretourneerd in de filterfunctie.
$payer (object) Dit is het volledige object van de Payer-klasse van CampaignSuite. Dit object bevat verschillende extra informatie over de betaler.
Deze functie kan worden gebruikt om een lijst met objecten op te halen uit SalesForce of een enkele wanneer een ID wordt doorgegeven.
					/**
    * @param string $objectType Name of the Salesforce object
    * @param string $id Optional Salesforce ID of the object
    * @param array $fields Optional array with fields to return from the object
    * @param array $where Optional array with filters
*/
function getObjects($objectType = '', $id = '', $fields = [], $where = []){}
getObjectStructure
Deze functie kan worden gebruikt om de structuur van een Salesforce-object op te halen.
					/**
   * @param string $objectType The name of the Salesforce object
   * @return object $response The API response
   *
   */
  function getObjectStructure($objectType = ''){}
createCampaignMember
Deze functie doet een Post-verzoek aan de API voor een nieuw CampaignMember-object in Salesforce.
					/**
   * @param string $campaign_id Id of the Campaign
   * @param string $contact_id Id of the Contact
   * @return mixed
   */
  function createCampaignMember($campaign_id, $contact_id){}
create
Functie om een nieuw record van een object in Salesforce te maken.
					/**
 * @param string $object Name of the Salesforce object
 * @param array $data Data to save
 */
function create($object, $data){}
update
Functie om een record van een object in Salesforce bij te werken.
					/**
   * @param string $object Name of the Salesforce object
   * @param string $id Id of the Salesforce object
   * @param array $data Data to save
   */
  function update($object, $id, $data){}
delete
Functie om een record van een object in Salesforce te verwijderen.
					/**
   * @param string $object Name of the Salesforce object
   * @param string $id Id of the object to delete
   */
  function delete($object, $id){}
Connected App Salesforce
Om een verbinding met Pardot te maken moet u een connectie opzetten met een Connected App in Salesforce.
Voer onderstaande stappan uit om de Connected App toe te voegen aan Salesforce.
Ga naar de Setup van Salesforce en zoek naar App.
Klik dan in de zoek resultaten op App manager
Klik rechts bovenin op New Connected App
Vul een Connected App Name in en een contact e-mailadres.
Vink de checkbox Enable OAuth Settings aan onder het kopje API (Enable OAuth Settings)
Vul bij Callback URL de volgende link in: https://api.campaignsuite.nl/v1/token/pardot/register Deze link is te vinden in de CampaignSuite instellingen onder het tabblad Pardot.
Voeg bij Selected OAuth Scopes de volgende 3 rechten toe: – Access and manage your data (api) – Perform requests on your behalf at any time (refresh_token, offline_access) – Pardot-services openen (pardot_api)
Klik onderaan de pagina op save
Het kan gemiddeld 10 minuten duren voor dat instellingen zijn verwerkt in Salesforce. Kopieer in de tussentijd alvast de Consumer Key en Consumer Secret van de zojuist aangemaakt App. Deze gaan we straks instellen bij CampaignSuite.
Pardot formulier
De makkelijkste manier om Gravity Forms formulieren te koppelen aan Pardot is via een bestaand Pardot formulier. Dit kunt u doen bij de formulier instellingen onder het tabblad Pardot.
Pardot connectie
Vink deze checkbox aan om aan te geven dat er een Pardot koppeling gemaakt moet worden.
Submit opties
Wanneer uw formulier eindigt in een betaling (met bijvoorbeeld Converse of Findock) kunt u hier instellen dat er pas een Pardot formulier inzending wordt aangemaakt zodra de betaling ook daadwerkelijk succesvol is. Hiermee kan u succesvolle journeys starten in Pardot voor donateurs.
Form Handler Endpoint
Het is mogelijk om een formulier naar een Form Handler te versturen. Plak hier een Form Handler URL uit Pardot. Deze staan in de kolom URL in het overzicht van Form Handlers in Pardot.
Zodra u een URL heeft ingevuld, klikt up op Refresh zodat u de velden kunt mappen.
Zodra u een URL heeft ingevoerd, en op Refresh heeft geklikt kunt u alle velden handmatig mappen met de Pardot formulier velden.
LET OP: het is belangrijk dat u exact dezelfde naam invult van het Pardot formulier veld bij de kolom key.
CampaignSuite is more than just a Wordpress plugin. In addition to this addon to your Wordpress installation, CampaignSuite is actually a general marketing solution for your organization. The plugin is only a small part of the marketing landscape that Gopublic is happy to help you with.
The installation of the CampaignSuite plugin in Wordpress creates a wide range of extra options within this CMS. Gravity Forms in particular will receive a lot of extra linking options for external parties. The image below shows an overview of the technical operation of CampaignSuite within Wordpress.
Wordpress must contain the plugins Gravity Forms and CampaignSuite. These communicate with the CampaignSuite API which is made by Gopublic.
This API can currently have authorized connections to:
Salesforce (Converse, Findock and Plauti Duplicate Check)
Mautic
Salesforce Pardot
Dynamics 365
Marketing Cloud
Per connection it is possible to set the authorization based on for example oAuth2 credentials. In this documentation, you will find the different steps to take to set up such a connection.
Installation
After activating the plugin, a menu option will be added in the Wordpress admin under Settings called CampaignSuite. Below are all global settings of the plugin.
Enter your CampaignSuite Key here to activate your license. You will receive this license key from us if you have become a CampaignSuite customer. Without this key it is not possible to use CampaignSuite within your environment. Do you not have a license key or have you lost it? Please contact the Gopublic Sales Department .
After activation, the connection options available to you will appear in the left column (depending on your own preferences).
These could be:
SalesForce
Mautic
Pardot
Dynamics
Gravity Forms
Debug
Creation of database tables
When activating the plugin, 3 additional database tables will be created in the Wordpress database. These tables contain information about campaigns and submissions within CampaignSuite.
When a Gravity Forms form is linked to a Mautic form, a submission will store Mautic information in this table (for example the Mautic Contact ID). The entry will also be sent to Mautic.
Various metadata related to Gravity Forms submissions can be stored in this table (such as a SalesForce Case ID)
Salesforce
If you link CampaignSuite to SalesForce, the following options may become available:
Create payment requests via Converse or Findock
Creating custom objects (such as Cases)
Retrieving and updating Contact and Account information (Preference Center)
Using deduplication with the Plauti Duplicate Check App
And more …
To establish a successful connection with Salesforce, three steps must be completed:
Creating a Connected App
Adding Remote Site Setting
Link the Connected App to CampaignSuite
Mautic
CampaignSuite can be linked with the Marketing Automation package Mautic . When the link has been made, you can link Gravity Forms forms to Mautic forms. You then link the fields in the Mautic forms to Mautic Contact fields. In this way, Leads can be created via CampaignSuite by Gravity Forms.
If your website also loads the Mautic pixel, CampaignSuite will ensure that the submission will be linked to a possible existing Mautic contact based on the Mautic ID (mtcid). In this way, submissions can be automatically linked to existing or new Mautic contacts.
To activate the Mautic connection, you only need to perform one action in Mautic:
Create New API Authentication Credentials
Pardot
It is possible to connect Pardot to CampaignSuite. After this link based on a Connected App in Salesforce, you have the option to send a Gravity Forms submission to a Form or Form Handler in Pardot.
You also have the choice to make this submission to Pardot only if, for example, a payment has been successfully completed to Salesforce.
Marketing Cloud
Marketing Cloud is the marketing automation package from Salesforce. CampaignSuite offers a number of extensions to Gravity Forms that allow various connections to be made with Marketing Cloud. Think about:
Creating a Transactional Email event
Creating a Journey event
Prefilling a form based on Marketing Cloud Contact data
Use dynamic content from Marketing Cloud on pages based on unique parameters
Prefilling data and retrieving dynamic content from Marketing Cloud does require specific Cloud Pages. If you want to make use of this, please contact us.
Gravity Forms
This tab shows all forms in Gravity Forms in one overview. For each result you can see which connections have been set up in the form (such as Salesforce or Mautic). The last column contains a direct link to the first page found on which this form can be viewed. This way you can quickly go to a particular page to test the form.
You can also indicate whether a white overlay should be shown with each form by default as soon as the visitor sends the form. This overlay also ensures that the visitor does not accidentally submit the form twice.
Introduction
CampaignSuite is more than just a Wordpress plugin. In addition to this addon to your Wordpress installation, CampaignSuite is actually a general marketing solution for your organization. The plugin is only a small part of the marketing landscape that Gopublic is happy to help you with.
The installation of the CampaignSuite plugin in Wordpress creates a wide range of extra options within this CMS. Gravity Forms in particular will receive a lot of extra linking options for external parties. The image below shows an overview of the technical operation of CampaignSuite within Wordpress.
Wordpress must contain the plugins Gravity Forms and CampaignSuite. These communicate with the CampaignSuite API which is made by Gopublic.
This API can currently have authorized connections to:
Salesforce (Converse, Findock and Plauti Duplicate Check)
Mautic
Salesforce Pardot
Dynamics 365
Marketing Cloud
Per connection it is possible to set the authorization based on for example oAuth2 credentials. In this documentation, you will find the different steps to take to set up such a connection.
Connected app
A Connected App within Salesforce ensures that you can set up an authorized connection in a secure way to send data back and forth. This connection is established through oAuth .
Follow the steps below to add the Connected App to SalesForce.
Go to Salesforce Setup and search for App .
Then click on App manager in the search results
Click on New Connected App in the top right corner
Enter a Connected App Name and a contact email address.
Check the checkbox Enable OAuth Settings under the heading API (Enable OAuth Settings)
Enter the following link at Callback URL : https://api.campaignsuite.nl/v1/token/salesforce/register This link can be found in the CampaignSuite settings under the Salesforce tab:
Add the following 2 rights to Selected OAuth Scopes : – Access and manage your data (api) – Perform requests on your behalf at any time (refresh_token, offline_access)
Click on save at the bottom of the page
It can take an average of 10 minutes for settings to be processed in Salesforce. In the meantime, copy the Consumer Key and Consumer Secret from the newly created App. We will soon set this up at CampaignSuite.
API Verification data
The connection to Mautic is established through a OAuth 2 connection. Follow the steps below to set this up:
Log in to Mautic and click on the radar icon at the top right
Then go to API Authentication Information
Click on New in the top right corner
Choose at Authorization Protocol for OAuth 2
Enter a name that is recognizable to you for the connection
Enter the following value in the last field: https://api.campaignsuite.nl/v1/token/mautic/register This URL can also be found in the CampaignSuite settings.
Click on Save & close
In the next screen, copy the Public Key and Secret Key.
Now go to the Mautic tab in the CampaignSuite settings and click on Authenticate.
In this screen enter the URL of your Mautic instance and the just copied Public Key and Secret Key .
Finally, click on Authenticate to get to the Mautic login screen. Log in with your credentials to confirm the connection.
A connection has now been successfully established with your Mautic instance.
Connected App Salesforce
To establish a connection with Pardot, you must establish a connection with a Connected App in Salesforce.
Follow the steps below to add the Connected App to Salesforce.
Go to Salesforce Setup and search for App .
Click in the search results on App manager
Click on New Connected App in the top right corner
Enter a Connected App Name and a contact email address.
Check the checkbox Enable OAuth Settings under the heading API (Enable OAuth Settings)
Enter the following link at Callback URL : https://api.campaignsuite.nl/v1/token/pardot/register This link can be found in the CampaignSuite settings under the Pardot tab.
Add the following 3 rights to Selected OAuth Scopes : – Access and manage your data (api) – Perform requests on your behalf at any time (refresh_token, offline_access) – Open Pardot Services (pardot_api)
Click on save at the bottom of the page
It can take an average of 10 minutes for settings to be processed in Salesforce. In the meantime, copy the Consumer Key and Consumer Secret from the newly created App. We will soon set this up at CampaignSuite.
Introduction
CampaignSuite provides a number of changes in both the way a form is displayed on your website and settings for the forms in Wordpress.
Form on the website
CampaignSuite ensures that a loading screen appears over your forms so that the visitor cannot accidentally submit the form multiple times
CampaignSuite offers the possibility to display a loading text and loading image when submitting a form
Address fields can contain an automatic zip code checker by simply setting the
field
And more ..
Editing forms
A choice of specific CampaignSuite payment fields that allow you to create a donation form in seconds.
Settings may be added to map fields to third party software (such as Salesforce, Mautic, Pardot and Dynamics)
Additional E-commerce settings can be made after transactions in forms
Several Feed Actions can be set (ie actions that can be performed after submitting a submission). These can also be custom made for you by Gopublic.
Separate notifications (such as email notifications) can be set after successful transactions (Converse and Findock)
And more …
In the article Edit form we first get started with creating a simple donation form. In this article, we’ll explain some of the basic features of Gravity Forms to get you started in creating a form.
CampaignSuite fields
When CampaignSuite is activated, an extra block of fields will appear when editing a form: CampaignSuite fields . These are fields that are made specifically for forms with a payment option. The fields to choose from are:
Frequency This field generates a radio field with the different pay frequencies. If you drag this field into your form, you then have the option to check or uncheck options. In this way it is possible, for example, to only show One-time and Monthly. It is also possible to add own frequencies (if these are supported by the third party party responsible for the payments).
Amount options This is a predefined field with 3 amounts to choose from. It is important that the value of the field is a number (without a currency sign). You are free to change these amounts or add new amounts.
Total amount With a financial form it is important to have one field where the final amount will be entered. Use the Total amount field to capture multiple Amount options fields with conditional logic. This Total amount field is hidden but will always be filled with an amount that is chosen or filled in with an Other option .
Payment method This field generates a radio field with different payment methods from which a donor can choose. Here you can check or uncheck options to display in your form.
Notice Message! Your message here
It is not technically possible to pay periodically with Ideal. That is why CampaignSuite automatically ensures that all non-periodically supporting payment methods (Ideal, Paypal, Sofort, Creditcard and Bancontact) are hidden if you donate periodically. This setting can be changed in the CampaignSuite setting under the Salesforce tab.
Bank choice This field generates a dropdown with the available banks from which a donor can choose. It is possible to add banks yourself if the value is supported by the payment provider.
Address (NL) This field generates a series of fields that form a Dutch address. – Postal Code – House number – Addition – Street – City There is also an automatic zip code checker. As soon as a postcode and house number are entered, the street and city will be automatically completed.
Global optin This field shows a checkbox option for an optin on, for example, a newsletter. Of course this field will still have to be mapped with a field in a CRM.
Connect to Salesforce
The connection to Salesforce is always established when the visitor has completed the form completely. Unless you want to pre-fill the form Contact details (see the article Prefills based on ContactId for more information about this).
Indicate in the Salesforce settings of the form that a Salesforce connection must be established.
Destination ID Select one of the available destinations from SalesForce here. A destination is a required field for a transaction to Converse.
Campaign ID Choose a campaign from Salesforce to either associate a transaction or a Contact (if one is created or found). A campaign is also required for a transaction to Converse.
Create Campaign Member If you check this option, a CampaignMember object will be created after the visitor has completed the form. If the Contact is already a member of the campaign, nothing will happen.
Delete submission immediately It is possible to set a form that the created submission must be deleted immediately after the visitor has completed the form. This is often used at Preference centers. This allows, for example, a Contact to update his / her data (or newsletter registrations). To prevent too many entries, these can be deleted immediately. PLEASE NOTE : this cannot be undone.
Depending on your Customer Payment Management platform (Converse or Findock), a few more options will appear in this list.
Converse
Allow deduplication By default this option is set to Yes and is linked to the Converse API field AllowDeduplication .
Allow data enrichment By default this option is set to Yes and is linked to the Converse API field AllowDataEnrichment .
Findock v1
Contact options Choose what to do if Findock finds an existing Contact. Overwrite, fill in empty fields only or do nothing
Account options Choose what to do if Findock finds an existing Account. Overwrite, fill in empty fields only or do nothing
Allow deduplication By default this option is set to Yes and is linked to the Findock API field allowDeduplication .
Note
The Converse and Findock options mentioned above will be hidden as soon as you choose in the CampaignSuite settings to use the Plauti Duplicate Check App. That is because the App then takes over all the logic of saving the Contact and Account and not Converse or Findock.
Connect fields
Switch the connection to Mautic to have CampaignSuite create a submission in a Mautic form. Then choose one of the Mautic forms. To retrieve the Mautic fields, click on the Refresh button.
The left column contains all the fields of Gravity Forms and the right side of each dropdown contains the fields of the Mautic form. Then link all necessary fields together.
At Other settings you can link the Gravity Forms Entry ID and the field in which a payment status should be stored. Link these fields if you want to ensure that the status of a payment is also sent to Mautic.
Note
You must map the fields Gravity Forms Entry ID and Update Payment Status to ensure that a status change is properly sent to Mautic.
Pardot form
The easiest way to link Gravity Forms forms to Pardot is through an existing Pardot form. You can do this in the form settings under the tab Pardot .
Pardot connection Select this checkbox to indicate that a Pardot link must be made.
Submit options When your form ends in a payment (with Converse or Findock, for example), you can set here that a Pardot form submission is only created once the payment is actually successful. This allows you to start successful journeys in Pardot for donors.
Form Handler Endpoint It is possible to send a form to a Form Handler. Paste a Form Handler URL from Pardot here. These can be found in the URL column in the overview of Form Handlers in Pardot. Once you have entered a URL, click on Refresh so that you can map the fields.
Once you have entered a URL and clicked Refresh you can manually map all fields with the Pardot form fields.
NOTE: it is important that you enter the exact same name of the Pardot form field in the column key .
Filters
Wordpress filters are built in at various places in the CampaignSuite code. These make it possible as a developer in the theme to influence the data that is currently used by CampaignSuite.
All filters are best placed in the functions.php of your theme. Click on the articles below to view the different filters.
This filter allows you to manipulate the contact and account array when this data is created just before a form is validated.
Use
					add_filter( 'cs_validate_contact_account', 'custom_contact_account' );

//You can also use a Gravity Forms form ID to target a specific form
add_filter( 'cs_validate_contact_account_6', 'custom_contact_account' );
Parameters
$contact_account ( array ) This array passes the displayed contact and account arrays. This value must be returned in the filter function.
$payer ( object ) This is the full object of the CampaignSuite Payer class. This object contains various additional information about the payer.
This is the complete CampaignSuite\CampaignSuite\Render_response() class object. This object contains information about the response returned by the CS API.
Example
The example below writes a $_SESSION[‘orig_campaign’] value to the Salesforce Contact object.
$actions (array) This is an array of the available actions. You can add more elements to this array for custom actions.
Example
					function get_feed_actions($actions)
{
  $extraActions = [[
    'label' => 'Maak een nieuwe Lead aan',
    'value' => 'custom_lead',
    'object' => 'Lead',
    'objectName' => 'Lead'
  ]];
  return array_merge($actions, $extraActions);
}
cs_get_contact_filter_fields
Description
With this filter, you can add more Salesforce contact fields to monitor when a contact ID is passed in the URL. By default, a contact is only found based on a contact ID. For more security it is possible to add more fields to this check.
The example below loops through Woocommerce items in a shopping cart and checks whether Destination IDs have been set. If so, these will be passed in the JSON call to the CampaignSuite API.
function custom_json()
{
global $woocommerce;
if ($woocommerce) {
$items = $woocommerce->cart->get_cart();
if ($items) {
$jsonItems = [];
foreach ($items as $values) {
$price = get_post_meta($values['product_id'], '_price',true);
$destination_id = get_post_meta($values['product_id'], '_sf_destination_id', true);
if ($destination_id) {
$jsonItems[] = [
'DestinationId' => $destination_id,
'Amount' => $price
];
}
}
if ($jsonItems) {
return [
'TransactionInfo' => [
'Gifts' => $jsonItems
]
];
}
}
}
return [];
}
cs_validate_contact_account
Description
This filter allows you to manipulate the contact and account array when this data is created just before a form is validated.
Use
add_filter( 'cs_validate_contact_account', 'custom_contact_account' );
//You can also use a Gravity Forms form ID to target a specific form
add_filter( 'cs_validate_contact_account_6', 'custom_contact_account' );
Parameters
$contact_account ( array ) This array passes the displayed contact and account arrays. This value must be returned in the filter function.
$payer ( object ) This is the full object of the CampaignSuite Payer class. This object contains various additional information about the payer.
This function can be used to get a list of objects from SalesForce or a single one when an ID is passed.
/**
* @param string $objectType Name of the Salesforce object
* @param string $id Optional Salesforce ID of the object
* @param array $fields Optional array with fields to return from the object
* @param array $where Optional array with filters
*/
function getObjects($objectType = '', $id = '', $fields = [], $where = []){}
getObjectStructure
This function can be used to get the structure of a Salesforce object.
/**
* @param string $objectType The name of the Salesforce object
* @return object $response The API response
*
*/
function getObjectStructure($objectType = ''){}
createCampaignMember
This function makes a Post request to the API for a new CampaignMember object in Salesforce.
/**
* @param string $campaign_id Id of the Campaign
* @param string $contact_id Id of the Contact
* @return mixed
*/
function createCampaignMember($campaign_id, $contact_id){}
create
Function to create a new record of an object in Salesforce.
/**
* @param string $object Name of the Salesforce object
* @param array $data Data to save
*/
function create($object, $data){}
update
Function to update a record of an object in Salesforce.
/**
* @param string $object Name of the Salesforce object
* @param string $id Id of the Salesforce object
* @param array $data Data to save
*/
function update($object, $id, $data){}
delete
Function to delete a record from an object in Salesforce.
/**
* @param string $object Name of the Salesforce object
* @param string $id Id of the object to delete
*/
function delete($object, $id){}
cs_post_webhook_action
Beschrijving
Met deze actie kunt u zelf de webhook call opvangen zodat u zelf in een eigen actie kunt bepalen of er nog extra code uitgevoerd moet worden zodra er een webhook call plaatsvindt vanuit Salesforce/Findock
$payment (object) Dit object bevat alle informatie over het aangepaste Payment object uit de database tabel wp_gp_donations.
cs_post_webhook_action
Description
With this action you can catch the webhook call yourself so that you can determine in your own action whether additional code needs to be executed as soon as a webhook call takes place from Salesforce/Findock
$payment (object) This object contains all information about the modified Payment object from the database table wp_gp_donations.
Authorisatie Marketing Cloud
De verbinding met Marketing Cloud wordt opgezet middels een OAuth 2 connectie. Voer onderstaande stappen uit om dit in te stellen:
Ga naar de tab Marketing Cloud in de CampaignSuite instellingen en klik op Authenticeren.
Vul de volgende gegevens in van het formulier: – Subdomein ID Dit is een uniek ID wat te vinden is in de URL van Marketing Cloud. Het is belangrijk dat u hier alleen het ID invult, en niet de rest van de URL. – Account ID Vul hier uw Marketing Cloud Account ID in – Client ID Vul hier uw Marketing Cloud Client ID in – Client Secret Vul hier uw Marketing Cloud Secret in
Klik op Authenticeren.
De verbinding is succesvol tot stand gebracht.
Marketing Cloud Authentication
The connection to Marketing Cloud is established through a OAuth 2 connection. Follow the steps below to set this up:
Go to the tab Marketing Cloud in the CampaignSuite settings and click on Authenticate.
Enter the following information in the form: – Subdomain ID This is a unique ID that can be found in the URL of Marketing Cloud. It is important that you only enter the ID here, and not the rest of the URL. – Account ID Enter your Marketing Cloud Account ID here – Client ID Enter your Marketing Cloud Client ID here – Client Secret Enter your Marketing Cloud Secret here
Click Authenticate.
The connection has been established successfully.
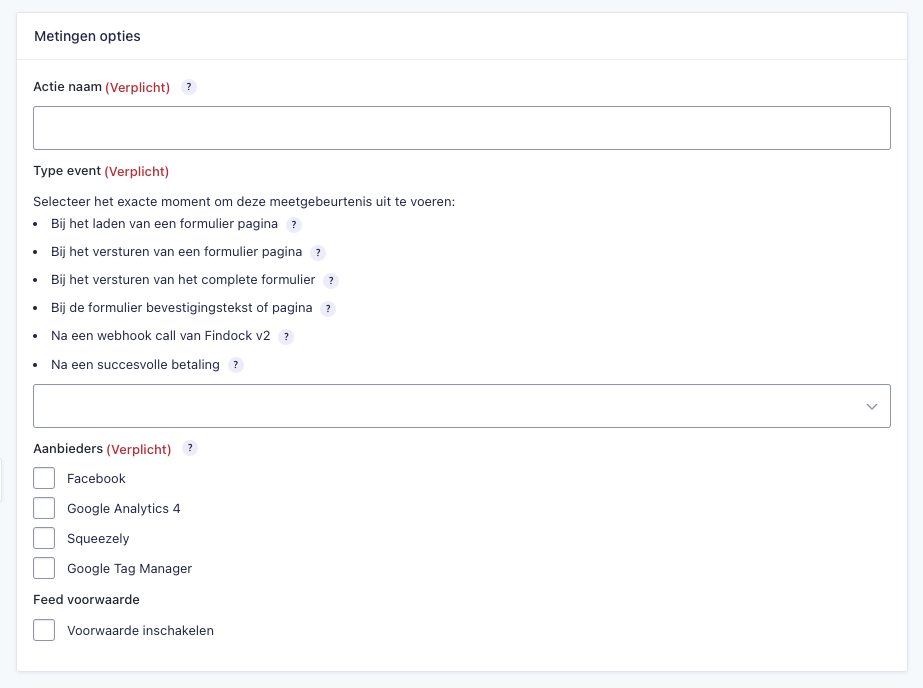
Marketing Cloud feed acties
Om Gravity Forms inzending naar Marketing Cloud te versturen moeten er Feed acties ingesteld worden. Het is eventueel mogelijk om meerdere acties in te stellen op verschillende momenten bij een inzending o.b.v. conditionele logica.
Voer onderstaande stappen uit om een koppeling te maken tussen een formulier en Marketing Cloud:
Ga naar Instellingen van het Gravity Forms formulier en klik op het tabblad Marketing Cloud.
Klik op de button Nieuwe toevoegen om een nieuwe actie toe te voegen.
Onderstaande scherm komt dan in beeld:
Vul een voor u herkenbare naam in voor deze Feed actie bij het veld Actie naam.
Kies een moment van uitvoering voor de actie.Een Marketing Cloud Feed actie kan op 3 verschillende momenten uitgevoerd worden:
Onmiddellijk na het invullen van het formulier Dit is het moment vlak nadat er een nieuwe Gravity Forms inzending is aangemaakt. Deze actie vindt plaats in de browser van de bezoeker.
Na een matched Findock v2 Webhook-call (bijv. Contact/Account gevonden) Findock v2 geeft onder water een seintje aan de website middels een Webhook wanneer het een Contact en Account heeft aangemaakt of gevonden. Als u voor dit moment kiest zal er op dat moment een call naar Marketing Cloud worden verstuurd. Dit gebeurt asynchroon met de Gravity Forms inzending.
Na een succesvolle betaling Findock v2 geeft onder water een seintje aan de website middels een Webhook wanneer eer transactie succesvol is afgerond in Salesforce. Kies dit moment als u alleen wilt dat er een call naar Marketing Cloud gaat als de betaling succesvol is.
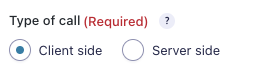
Kies het type Marketing Cloud call
Zodra u een type call heeft geselecteerd verschijnt er een dropdown met een keuzelijst van alle events die momenteel beschikbaar zijn in Marketing Cloud. Selecteer een event om verder te gaan.
Bij Feed voorwaarde heeft u de mogelijkheid om condities in te stellen voor de actie. U kunt bijvoorbeeld de actie pas uit laten voeren als een bepaald veld is ingevuld in het formulier.
Klik op Instellingen opslaan om alles op te slaan.
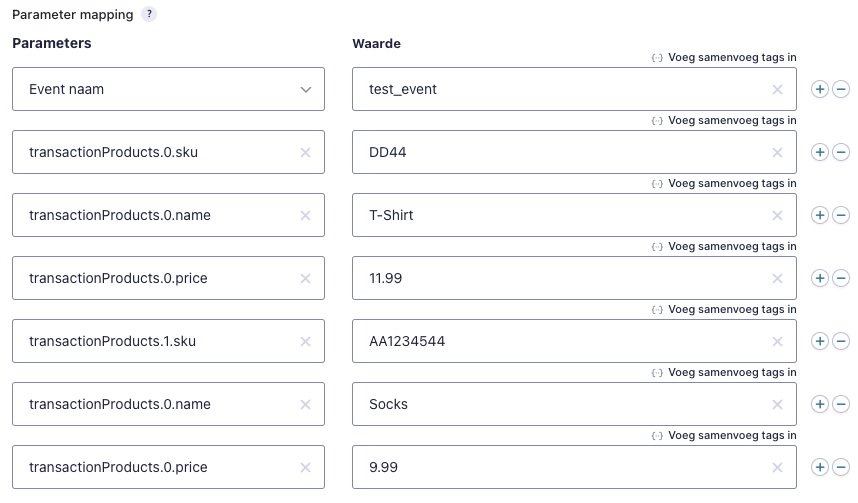
Als er een Data Extensions gevonden is bij het gekozen event zal er na het opslaan een lijst verschijnen van alle beschikbare Data Extensie velden:
Koppel als laatste de juiste Data Extensie velden aan de Gravity Forms velden. Velden met een rode asterisk (*) moeten gemapped worden anders zal er een foutmelding plaatsvinden bij de API call.
Inzendingen
Bij inzendingen worden notities opgeslagen wanneer er Marketing Cloud API calls uitgevoerd worden. Op deze manier kan u altijd zien welke acties er hebben plaatsgevonden bij bepaalde inzendingen:
Marketing Cloud feed actions
To send Gravity Forms submission to Marketing Cloud, Feed actions must be set up. It is possible to set multiple actions at different times during a submission based on the conditional logic.
Follow the steps below to create a link between a form and Marketing Cloud:
Go to Settings of the Gravity Forms form and click on the tab Marketing Cloud.
Click on the button Add new to add a new action.
The screen below will then appear:
Enter a recognizable name for this Feed action in the Action name field.
Choose a moment of execution for the action. A Marketing Cloud Feed action can be executed at 3 different moments:
Immediately after filling out the form This is the moment right after a new Gravity Forms submission is created. This action takes place in the visitor’s browser.
After a matched Findock v2 Webhook call (e.g. Contact/Account found) Findock v2 notifies the website underwater through a Webhook when it has created or found a Contact and Account. If you choose this moment, a call will be sent to Marketing Cloud at that moment. This happens asynchronously with the Gravity Forms submission.
After a successful payment Findock v2 notifies the website underwater through a Webhook when a transaction has been successfully completed in Salesforce. Choose this moment if you only want a call to go to Marketing Cloud if the payment is successful.
Choose the type of Marketing Cloud call
Once you have selected a call type, a dropdown will appear with a list of all events currently available in Marketing Cloud. Please select an event to continue.
At Feed condition you have the option to set conditions for the action. For example, you will not execute an action until a certain field is filled out in the form.
Click on Save Settings to save everything.
If a Data Extensions is found for the selected event, a list of all available Data Extension fields will appear after saving:
Finally, link the correct Data Extension fields to the Gravity Forms fields. Fields with a red asterisk (*) must be mapped otherwise an error will occur at the API call.
Submissions
Notes are saved on submissions when Marketing Cloud API calls are made. This way you can always see which actions have taken place with certain submissions:
Gravity Forms
Gravity Forms is een zeer uitgebreide plugin voor Wordpress om formulieren mee te maken. Het is daarom dat wij gekozen hebben om deze plugin te gebruiken voor CampaignSuite. Gravity Forms heeft ook zeer veel mogelijkheden om uit te breiden. Met name de Actions en Filters zorgen ervoor dat je als developer op veel manieren de werking van de plugin kunt beïnvloeden.
Deze documentatie bevat vooral uitleg over de toevoegen/aanpassingen die CampaignSuite in de plugin doet. Het zal niet in detail ingaan op de basis werking van Gravity Forms.
CampaignSuite zorgt voor een aantal veranderingen in zowel de manier waarop een formulier op uw website wordt getoond, als instellingen bij de formulieren in Wordpress.
Formulier op de website
CampaignSuite zorgt ervoor dat er een laad-scherm verschijnt over uw formulieren zodat de bezoeker niet per ongeluk meerdere keren het formulier kan versturen
CampaignSuite geeft de mogelijkheid om een laad-tekst en laad-afbeelding te tonen bij het versturen van een formulier
Adresvelden kunnen een automatische postcode checker bevatten door een simpele instelling bij het veld
En meer..
Bewerken van formulieren
Een keuze uit specifieke CampaignSuite betalingsvelden waarmee u binnen een paar seconden een donatie formulier kunt opmaken.
Er kunnen instellingen bij komen om velden te mappen aan software van derden (zoals Salesforce, Mautic, Pardot en Dynamics)
Er kunnen extra E-commerce instellingen gedaan worden na transacties in formulieren
Er kunnen diverse Feed Actions ingesteld worden (dat zijn acties die uitgevoerd kunnen worden na het versturen van een inzending). Deze kunnen ook custom voor u gemaakt worden door Gopublic.
Er kunnen aparte meldingen (zoals e-mail notificaties) ingesteld worden na succesvolle transacties (Converse en Findock)
En meer…
In het artikel Formulier bewerken gaan we eerst aan de slag met het maken van een eenvoudig donatie formulier. In dit artikel leggen we enkele basis functionaliteiten uit van Gravity Forms om u op weg te helpen bij het maken van een formulier.
Formulier bewerken
Dit artikel maakt gebruik van een simpel test formulier. Om dit formulier te gebruiken kan je onderstaand bestand downloaden en importeren in Gravity Forms:
Pak dit bestand uit en importeer het in Gravity Forms. Er zal een nieuw formulier gemaakt worden met de naam Simpele donatie.
Dit formulier is opgebouwd uit 3 pagina’s:
Kies een frequentie en bedrag
Vul NAW gegevens in
Kies een betaalmethode
De volgende artikelen zullen enkele functies behandelen van Gravity Forms die gebruikt kunnen worden bij dit soort formulieren.
Formulier instellingen
CampaignSuite voegt een drietal extra opties toe aan de instellingen van een formulier. Deze zijn allemaal te vinden onder Instellingen -> Formulierinstellingen -> Formulieropties
Formulier loading-overlay Wanneer u in CampaignSuite heeft ingesteld dat er een witte loading-overlay getoond moet worden voor alle formulieren, dan kunt u hier specifiek bij dit formulier aangeven om dat niet te doen.
Formulier laden tekst Vul hier een tekst in om te tonen wanneer het Gravity Forms formulier aan het laden is.
Formulier laden tekst kleur Kies hier een kleur voor de tekst die wordt getoond aan de hand van een kleurenkiezer.
Formulier laden afbeelding Voer hier optioneel een link in naar een online .gif afbeeldingen om onder de laadtekst te tonen.
Let op
De “laden tekst”, “laden tekst kleur” en “laden afbeelding” werken alleen als u bij de CampaignSuite instellingen onder het tabblad Gravity Forms heeft aangegeven dat er een witte overlay geladen moet worden. Anders zullen de laadtekst en de afbeelding niet getoond worden.
Meldingen
Wanneer een bezoeker een formulier heeft voltooid kan er een melding verstuurd worden via de mail. Bij het aanmaken van een nieuw formulier wordt er standaard een melding aangemaakt voor de Wordpress admin (Beheerdersmelding). Deze melding stuurt een e-mail naar het admin-adres van Wordpress met als onderwerp Nieuwe inzending van {form_title}. Deze melding wordt direct verstuurd als de inzending wordt opgeslagen.
Zodra CampaignSuite is geactiveerd komen er vier extra ‘momenten’ bij waaruit je kunt kiezen om een melding te laten versturen:
CampaignSuite betaling is voltooid Wanneer de status van een betaling op voltooid wordt gezet (Collected) zal deze melding verstuurd worden.
CampaignSuite betaling is mislukt Wanneer de status van een betaling op mislukt wordt gezet (Failed) zal deze melding verstuurd worden.
CampaignSuite betaling is in behandeling Wanneer de status van een betaling in behandeling is (Pending) zal deze melding verstuurd worden.
CampaignSuite betaling is geannuleerd Wanneer de status van een betaling op geannuleerd wordt gezet (Cancelled) zal deze melding verstuurd worden.
Op deze manier is het dus mogelijk om pas een e-mail te versturen naar een donateur op het moment dat de betaling ook daadwerkelijk succesvol was.
Salesforce
Zodra CampaignSuite een verbinding heeft opgezet met Salesforce verschijnt er bij elk formulier onder Instellingen een tab genaamd Salesforce. Hier kunnen alle instellingen gedaan worden voor de verbinding naar Salesforce. Denk hierbij aan:
Het aanmaken van een CampaignMember object
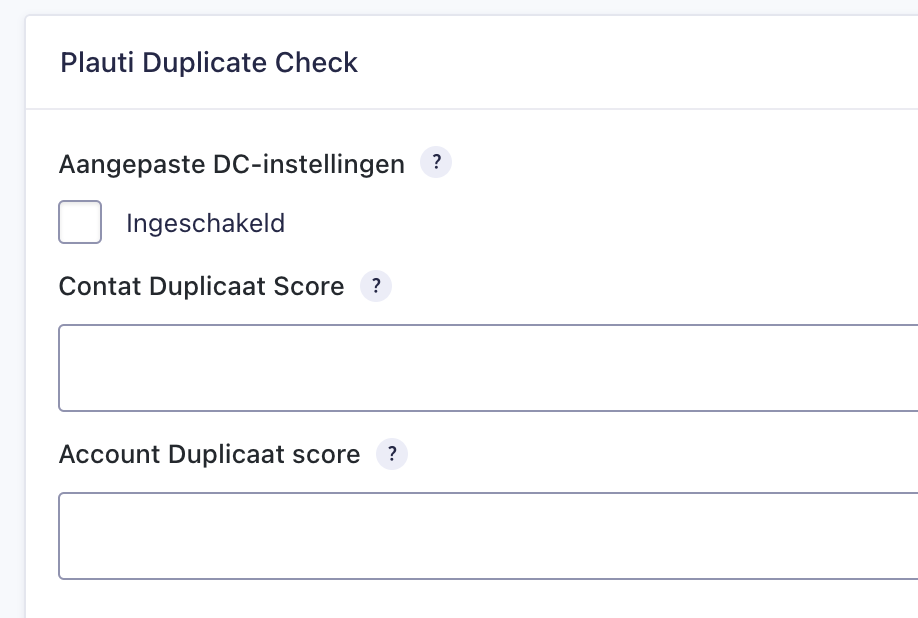
Plauti Duplicate Check opties instellen
Betalingsvelden koppelen voor een transactie naar Converse of Findock
Synchronisatie van CampaignMember objecten of Memberships
Mappen van Contact en Account velden
In deze documentatie zullen we langs alle opties gaan en uitleggen wat u ermee kunt doen.
Mautic
Mautic is een volwaardig marketing automation systeem wat is in te zetten in B2B en B2C. Oneindig veel verschillende marketing taken kunnen met Mautic worden geautomatiseerd. Van het simpel door sturen van een formulier tot complexe leadnurturing of remarketing / upsell campagnes.
CampaignSuite biedt de mogelijkheid om een Gravity Forms inzending naar een Mautic formulier te versturen. Op deze manier is het mogelijk bezoeker een start te laten maken met bijvoorbeeld een journey in Mautic.
Als u in Mautic contactvelden koppelt aan de formuliervelden, worden automatisch inzending gekoppeld aan nieuwe of bestaande contacten (leads) in Mautic.
Pardot
Pardot is een Salesforce applicatie die specifiek is ontworpen voor B2B marketing automation. Met Pardot krijgen marketing- en salesafdelingen de beschikking over een reeks krachtige tools om data te gebruiken voor automatische marketing, om meer en betere leads te genereren en om de ROI van hun campagnes te berekenen.
Wanneer CampaignSuite gekoppeld is aan Pardot heeft u de mogelijkheid om Gravity Forms inzendingen direct te versturen naar Pardot formulieren of Pardot Form Handlers.
Marketing Cloud
Zodra er een verbinding is opgezet met Marketing Cloud zullen er verschillende functies getoond worden in Gravity Forms. Enkele voorbeelden van deze functies zijn:
Het aanmaken van Marketing Cloud feed acties voor Transactionele e-mails en journeys.
Gebruik maken van prefill mogelijkheden op velden.
Dynamische content instellen voor Marketing Cloud e-mails.
Het kunnen instellen van Prefill variabelen bij Gravity Forms bevestigingen.
Alle onderdelen zullen worden behandeld in onderstaande artikelen.
Feed acties
Het is mogelijk (mits u de permissie op CampaignSuite heeft) om Feed acties in te stellen. Een feed actie is een actie welke uitgevoerd kan worden door CampaignSuite vlak nadat er een nieuwe inzending is gemaakt in Gravity Forms. Acties kunnen in twee verschillende categorieën worden ingedeeld:
1. Creëer een Salesforce object
Met CampaignSuite is het mogelijk om een nieuw record in Salesforce aan te maken voor elk Object wat beschikbaar is. Denk bijvoorbeeld aan een Case, Campagne of Bestemming. Het is zelfs mogelijk om meerdere Feed acties na elkaar uit te laten voeren en de gegenereerde ID’s die er per Feed gemaakt worden te gebruiken in de mapping van de velden.
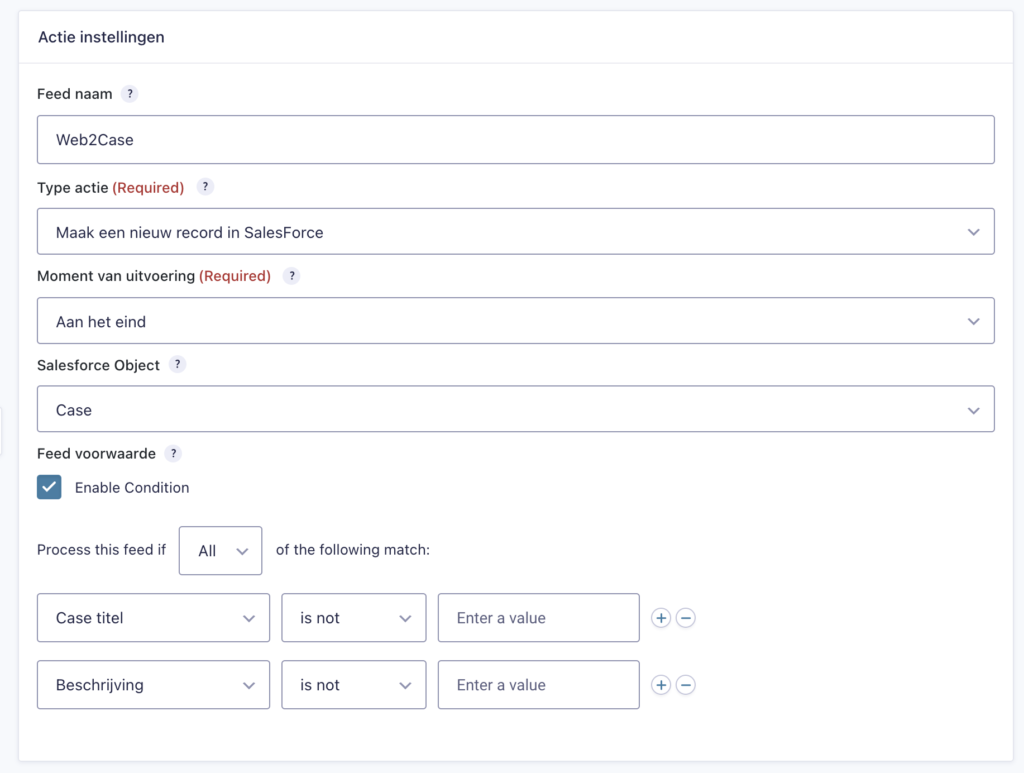
Onderstaande screenshot toont een voorbeeld van een Feed actie waar een Case wordt aangemaakt. Hierbij is ook een Feed voorwaarde ingesteld. Dat houdt in dat deze feed alleen wordt uitgevoerd als aan alle condities wordt voldaan.
Feed naam
Vul hier een herkenbare naam in voor de feed
Type actie
Selecteer hier de actie die u wilt laten uitvoeren
Moment vanuitvoering
Bij sommige acties kan het zijn dat er een Contact ID nodig is. Kies in dat geval voor de optie Aan het eind zodat er op het moment van uitvoeren een Contact ID bestaat.
Salesforce Object
Dit ziet u alleen wanneer u kiest voor de type actie “Maak een nieuw record in Salesforce”. Kies hier een object uit uw Salesforce instantie.
Feed voorwaarde
Deze voorwaarden werken exact hetzelfde als de voorwaarden die in te stellen zijn bij formulier velden.
Als u een actie kiest wat gekoppeld is aan een Salesforce object verschijnen er bij Instellingen alle velden van dit object. Koppel deze aan de juiste Gravity Forms velden om de waarden op de juiste manier in Salesforce te krijgen.
2. Een custom actie gemaakt door Gopublic
Het is ook mogelijk dat Gopublic in overleg met u custom acties maakt. Denk bijvoorbeeld aan het aanmaken van Webshop orders of het wegschrijven van Cadeaus naar Salesforce. Neem gerust contact met ons op als u hiervan gebruikt wilt maken.
CS E-commerce
Als CampaignSuite is geactiveerd én het formulier maakt een transactie zal er bij het bedankt-bericht van het Gravity Forms formulier standaard een Google E-commerce script worden toegevoegd.
Wanneer u als formulier bevestiging niet Tekst heeft maar Pagina, dan is het ook mogelijk om op de pagina waar de donateur op terecht komt na een succesvolle betaling een shortcode te gebruiken om zo toch het Google E-commerce script uit te laten voeren. Voeg op deze pagina dan het volgende toe:
[ecommerce]
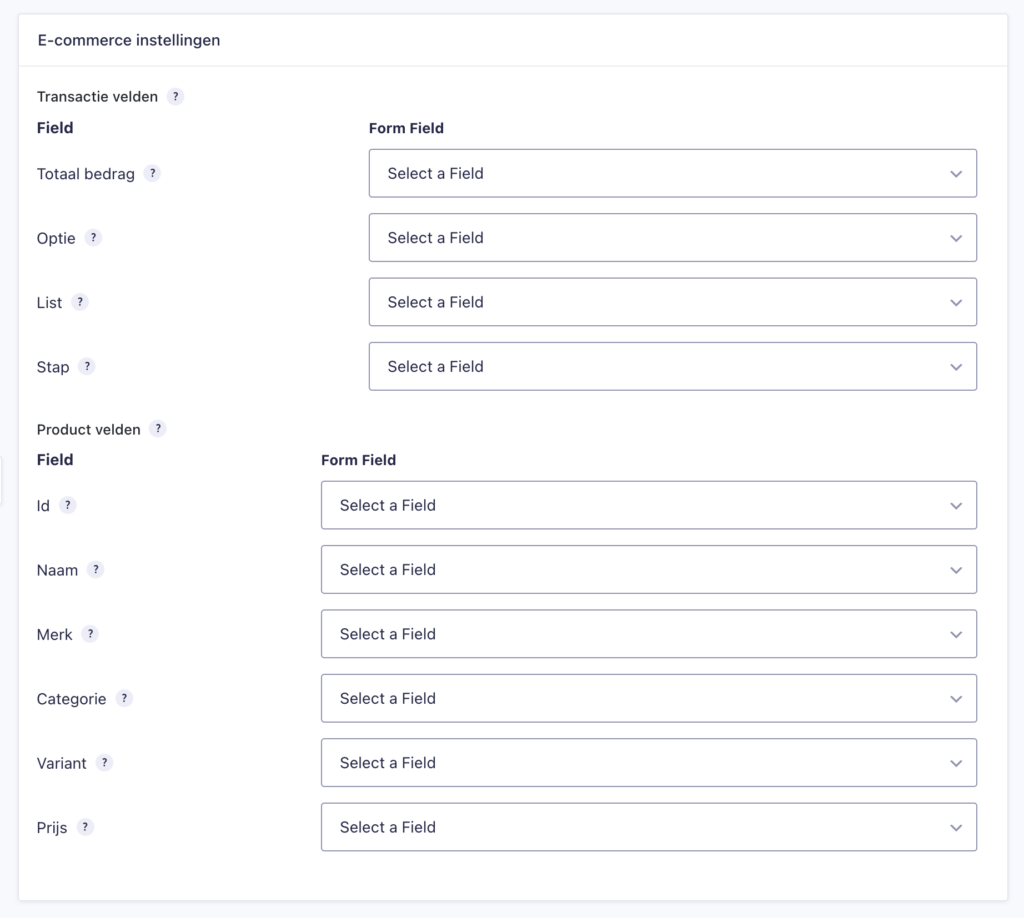
Geavanceerde E-commerce instellingen
Een uitgebreide feature van CampaignSuite is om meer instellingen te kunnen doen aan de E-commerce code. Deze feature zit niet in het basis pakket. Neem contact met ons op als u geïnteresseerd bent naar deze uitbreiding.
Bij E-commerce instellingen kan u alle velden van het E-commerce script instellen. Deze optie wordt vaak gebruikt met verborgen velden in het formulier. Deze velden ziet de bezoeker niet, maar u kunt deze wel vooraf laten invullen met waarden. Deze koppelt u vervolgens bij de instellingen aan het E-commerce veld.
Inzendingen
Bij inzendingen ziet u een lijst weergave van alle inzendingen van het formulier. U kunt de kolommen die getoond worden instellen met het radar-icoon rechts bovenin de lijst.
U kunt teven de inzendingen filteren op de velden die in het formulier staan. CampaignSuite biedt ook de mogelijkheid om te filteren op betalingsstatus. Op deze manier kunt u dus een lijst krijgen met alle succesvolle betalingen. De eerste kolom is altijd klikbaar om naar de gedetailleerde weergave te gaan van de inzending.
Opmerkingen
Wanneer u in de detailweergave bent van een inzending vindt u in de linker kolom onder de velden een blok met Opmerkingen. Op verschillende momenten bij het aanmaken van de inzending (het versturen van een formulier) kan CampaignSuite eem opmerking bij de inzending zetten. Enkele voorbeelden hiervan zijn:
Salesforce-call geïnitieerd
Salesforce-betaling succesvol afgerond
Status Mautic formulier inzending veranderd naar: ‘Collected’
Ook wanner er een onverwachte fout optreedt, zal dat hier bij de opmerkingen te vinden zijn.
Details betaling
Wanneer er een transactie heeft plaatsgevonden, vindt u de status hiervan terug in de rechterkolom onder het kopje Details betaling.
Salesforce en Mautic
Ook alle informatie met betrekking tot Salesforce of Mautic worden in deze kolom getoond.
Squeezely
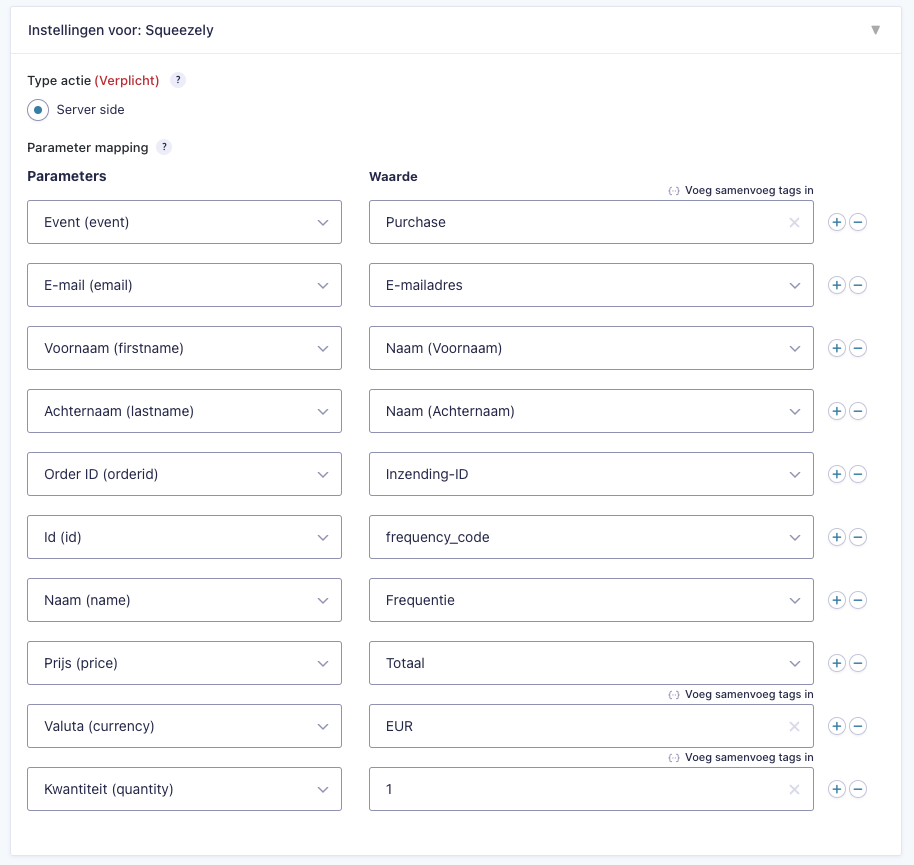
Squeezely Customer Data Platform helpt marketeers efficiënt klantgegevens te verzamelen, campagnes via meerdere kanalen op te zetten en resultaten op één plek te analyseren. CampaignSuite biedt een mogelijkheid om parameters te genereren die ingezet kunnen worden voor Squeezely.
Ga naar de Instellingen van een formulier en klik op het tabblad Squeezely.
Schakel de Squeezely functionaliteit in om gebruik te maken van de functie.
Selecteer een veld uit het formulier om de hash mee te berekenen die gebruikt wordt in Squeezely (vaak is dat bijvoorbeeld een e-mail veld)
Vul een parameter naam in welke gebruikt kan worden door CampaignSuite om automatisch aan URL toe te voegen. Denk hierbij bijvoorbeeld aan een Succes URL voor een iDeal betaling via Findock.
Geef eventueel aan of alle redirect URL’s in dit formulier automatisch aangevuld moeten worden door de naam van de parameter en de waarde van het hash veld.
Handmatig toevoegen van parameter
Het is mogelijk om bij formulier bevestigingen handmatig de Squeezely parameter toe te voegen als u de functionaliteit hebt geactiveerd en ingesteld. Dat kan er als volgt uit zien:
Metingen
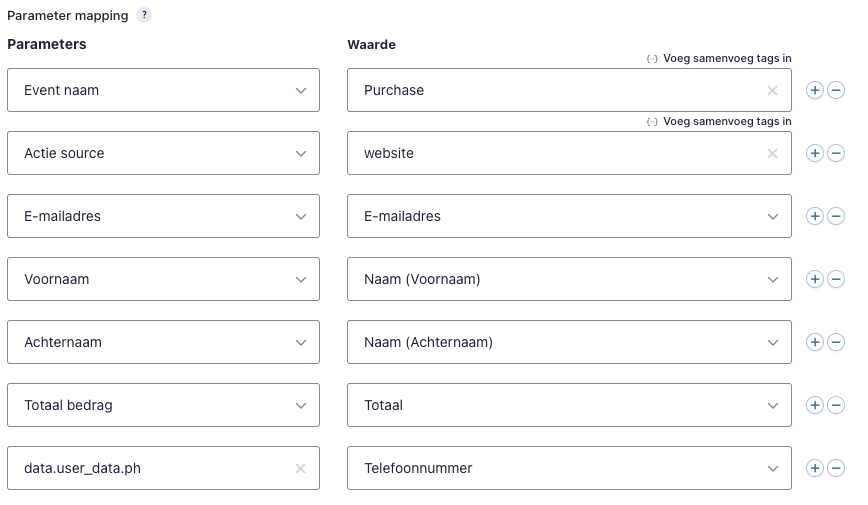
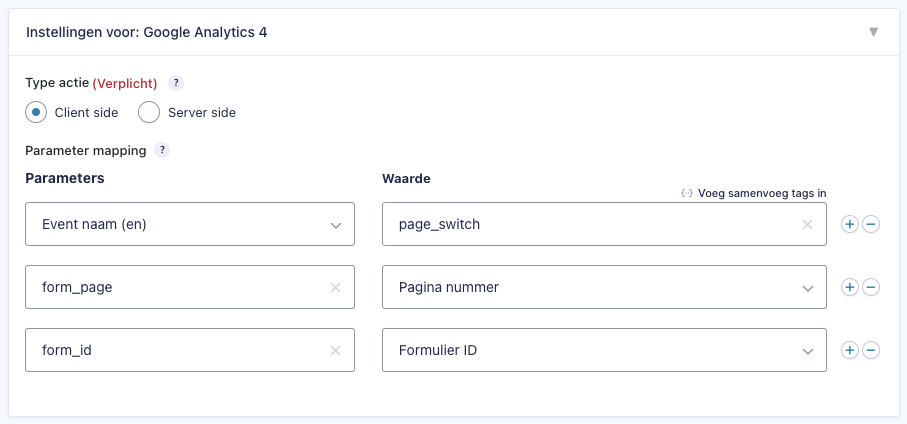
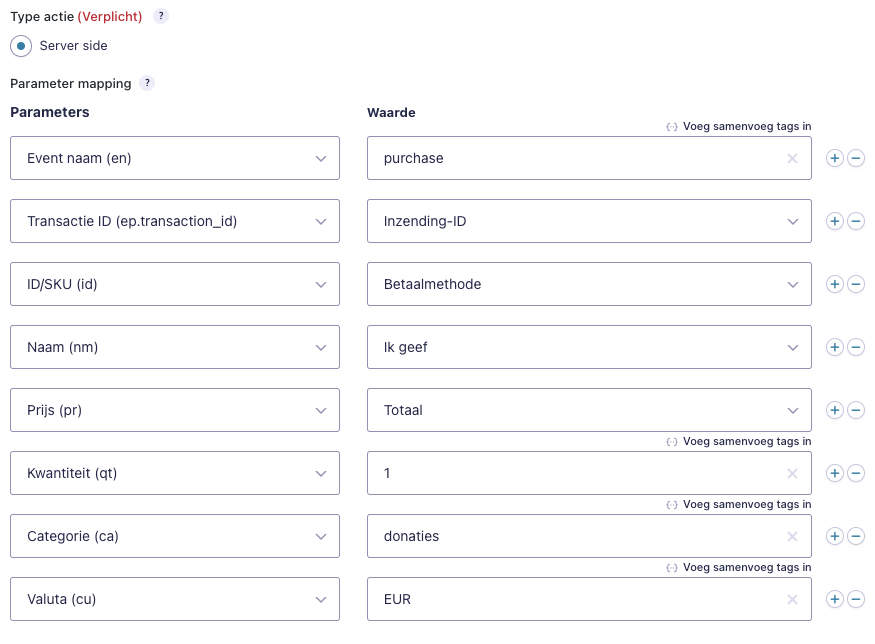
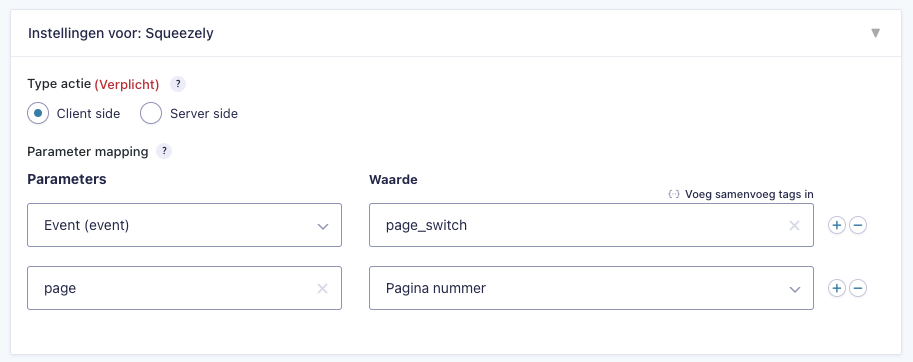
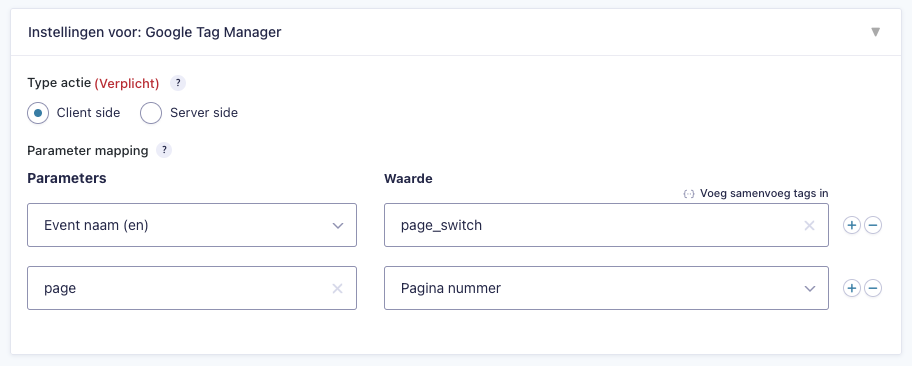
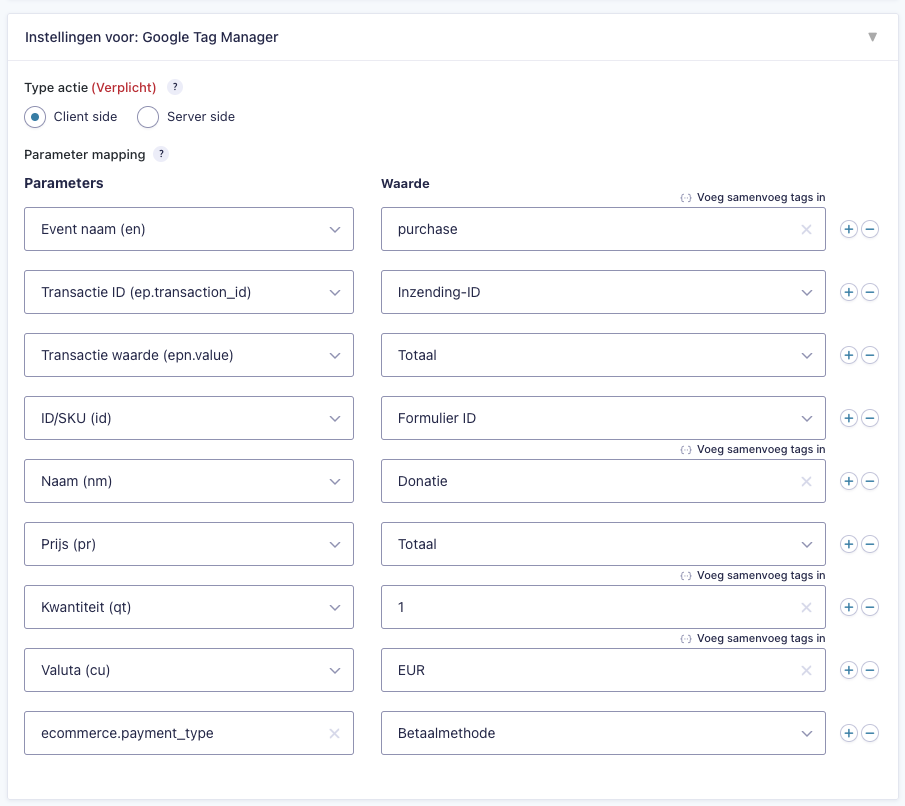
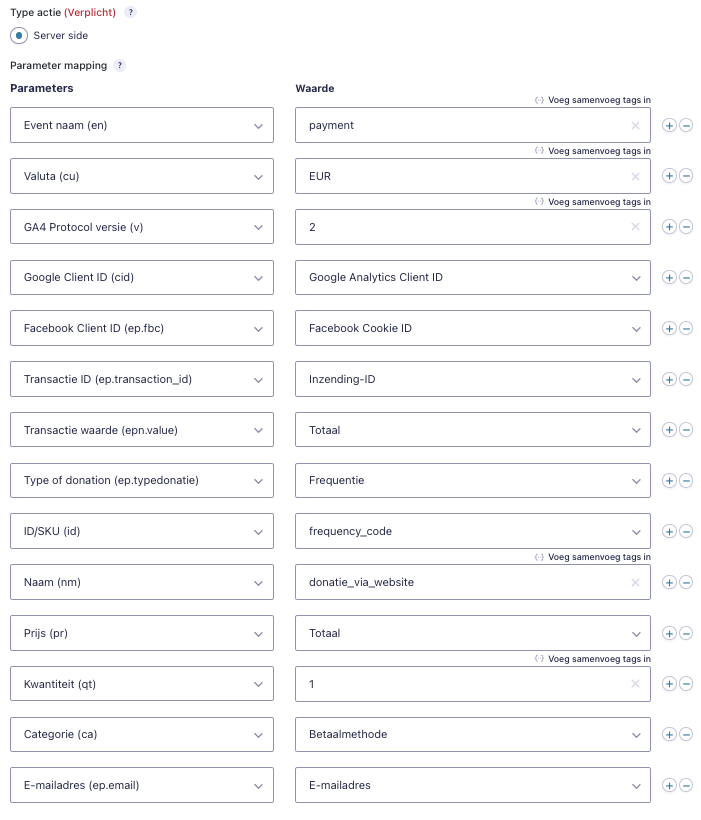
CampaignSuite bevat een zeer uitgebreid systeem om metingen bij formulieren in te stellen. Denk hierbij aan bijvoorbeeld Client Side en Server Side events op bepaalde momenten in een formulier. Deze momenten kunnen bijvoorbeeld zijn wanneer je van pagina wisselt in een formulier of als er een succesvolle betaling heeft plaatsgevonden.
Er zijn in totaal 6 momenten waarop je kunt bepalen dat er iets gemeten moet worden door één van de vier aanbieders (Facebook, Google Analytics 4, Squeezely of Google Tag Manager). Het is mogelijk om meerdere acties aan te maken per formulier.
Bekijk onderstaande artikelen om meer informatie te verkrijgen over de opties van metingen.
Installatie
Na activatie van de plugin zal er in de Wordpress admin een menuoptie bij komen onder Instellingen genaamd CampaignSuite. Hieronder staan alle globale instellingen van de plugin.
Vul hier uw CampaignSuite Key om uw licentie te activeren. Deze licentiekey krijgt u van ons als u CampaignSuite klant geworden bent. Zonder deze sleutel is het niet mogelijk om CampaignSuite te gebruiken binnen uw omgeving. Heeft u geen licentie key of bent u deze kwijtgeraakt? Neem dan contact op met de Gopublic Sales afdeling.
Na de activatie verschijnen er (afhankelijk van uw eigen voorkeuren) in de linkerkolom de voor u beschikbare connectie mogelijkheden. Dit kunnen zijn:
SalesForce
Mautic
Pardot
Dynamics
Gravity Forms
Debug
Creatie van database tabellen
Bij de activatie van de plugin zullen er 3 extra database tabellen worden aangemaakt in de database van Wordpress. Deze tabellen bevatten informatie van acties en inzendingen binnen CampaignSuite.
Wanneer een Gravity Forms formulier is gekoppeld aan een Mautic formulier zal bij een inzending in deze tabel Mautic informatie worden opgeslagen (bijvoorbeeld het Mautic Contact ID). Tevens zal de inzending naar Mautic verstuurd worden.
Diverse meta data m.b.t. Gravity Forms inzendingen kunnen in deze tabel worden opgeslagen (zoals een SalesForce Case ID)
Remote Site
Findock maakt gebruik van Webhooks. Om uw website toegankelijk te maken binnen Salesforce moet de URL van us website toegevoegd worden bij de Remote Site Settings. Voer daarvoor de onderstaande stappen uit:
Ga naar de Setup van Salesforce en zoek naar Remote.
Klik daarna in de zoekresultaten op Remote Site Settings.
Klik op New Remote Site
Voer een naam en de URL van uw website waar CampaignSuite op draait in.
Klik op Save
Uw website is nu toegevoegd als veilige website om benaderd te worden door bijvoorbeeld Findock.
Mautic instellingen
Het is aan te raden om dezelfde velden in het Gravity Forms formulier te hebben als het Mautic formulier. Maar u hoeft niet twee keer een formulier aan te maken. CampaignSuite heeft als optie om een Gravity Forms formulier in één keer te kopiëren naar een Mautic formulier.
Selecteer een formulier uit Gravity Forms en kies of het een Standalone of Campagne formulier moet worden in Mautic. Klik daarna op Maak een formulier.
Nu is er in Mautic een nieuw formulier aangemaakt met exact dezelfde velden als het Gravity Forms formulier.
Formulier bewerken
Dit artikel maakt gebruik van een simpel test formulier. Om dit formulier te gebruiken kan je onderstaand bestand downloaden en importeren in Gravity Forms:
Wanneer CampaignSuite is geactiveerd verschijnt er een extra blok met velden bij het bewerken van een formulier: CampaignSuite velden. Dit zijn velden die specifiek gemaakt zijn voor formulieren met een betalingsoptie. De velden waaruit gekozen kan worden zijn:
Frequentie Dit veld genereert een radio veld met de verschillende betaalfrequenties. Als u dit veld in uw formulier sleept heeft u vervolgens de mogelijkheid om opties aan of uit te vinken. Op deze manier is het bijvoorbeeld mogelijk om alleen Eenmalig en Maandelijks te tonen. Het is tevens mogelijk om eigen frequenties toe te voegen (mits deze ondersteunt worden door de partij van derden die verantwoordelijk is voor de betalingen).
Bedrag opties Dit is een voorgedefinieerd veld met 3 bedragen waaruit gekozen kan worden. Het is hierbij belangrijk dat de waarde van het veld een getal is (zonder een valuta teken). U bent vrij om deze bedragen te wijzigen of nieuwe bedragen toe te voegen.
Totaal bedrag Bij een financieel formulier is het belangrijk om één veld te hebben waar het definitieve bedrag in komt te staan. Gebruik het Totaal bedrag veld om meerdere Bedrag opties velden met voorwaardelijke logica af te vangen. Dit Totaal bedrag veld is verborgen maar zal altijd gevuld worden met een bedrag wat gekozen wordt of bij een Anders-optie ingevuld wordt.
Betaalmethode Dit veld genereert een radio veld met verschillende betaalmethodes waaruit een donateur kan kiezen. U kunt hier opties aan- of uitvinken om in uw formulier te tonen.
Logica tussen frequentie en betaalmethode
Technisch gezien is niet mogelijk om periodiek met Ideal te betalen. Daarom zorgt CampaignSuite er automatisch voor dat alle niet periodiek ondersteunende betaalmethodes (Ideal, Paypal, Sofort, Creditcard en Bancontact) worden verborgen als men periodiek doneert. Deze instelling kan gewijzigd worden in de CampaignSuite instelling onder het tabblad Salesforce.
Bank keuze Dit veld genereert een dropdown met de beschikbare banken waaruit een donateur kan kiezen. Het is mogelijk om zelf banken toe te voegen mits de value wordt ondersteunt door de payment provider.
Adres (NL) Dit veld genereert een serie van velden die een Nederlands adres vormen. – Postcode – Huisnummer – Toevoeging – Straat – Stad Tevens zit er automatisch een postcode checker op. Zodra er een postcode en huisnummer worden ingevuld, zullen de straat en stad automatisch aangevuld worden.
Globale optin Dit veld toont een checkbox optie voor een optin op bijvoorbeeld een nieuwsbrief. Uiteraard zal dit veld dan nog gemapped moeten worden met een veld in een CRM.
Voorwaardelijke logica
Voorwaardelijke logica kan gebruikt worden op veld-niveau. Dat houdt in dat je velden kunt verbergen of tonen op basis van keuzes/waardes van andere velden. Deze instelling is te vinden onder het tabje Geavanceerd van een veld.
Bovenstaand voorbeeld zegt: Toon dit veld als er aan alle voorwaarde wordt voldaan: – Als het veld Frequentie gelijk is aan Eenmalig
Je kunt er ook voor kiezen om meerdere voorwaarden toe te voegen. In het voorbeeld formulier is op verschillende plekken gebruik gemaakt van deze handigheid. Onder andere bij het IBAN veld. Deze mag alleen worden getoond als er gekozen is voor de betaalmethode Debitbetaling.
Ook op de eerste pagina van ons voorbeeld formulier wordt voorwaardelijke logica toegepast op de bedragen. De donateur ziet andere bedragen voor een eenmalige frequentie dan bijvoorbeeld een maandelijkse.
Postcode checker
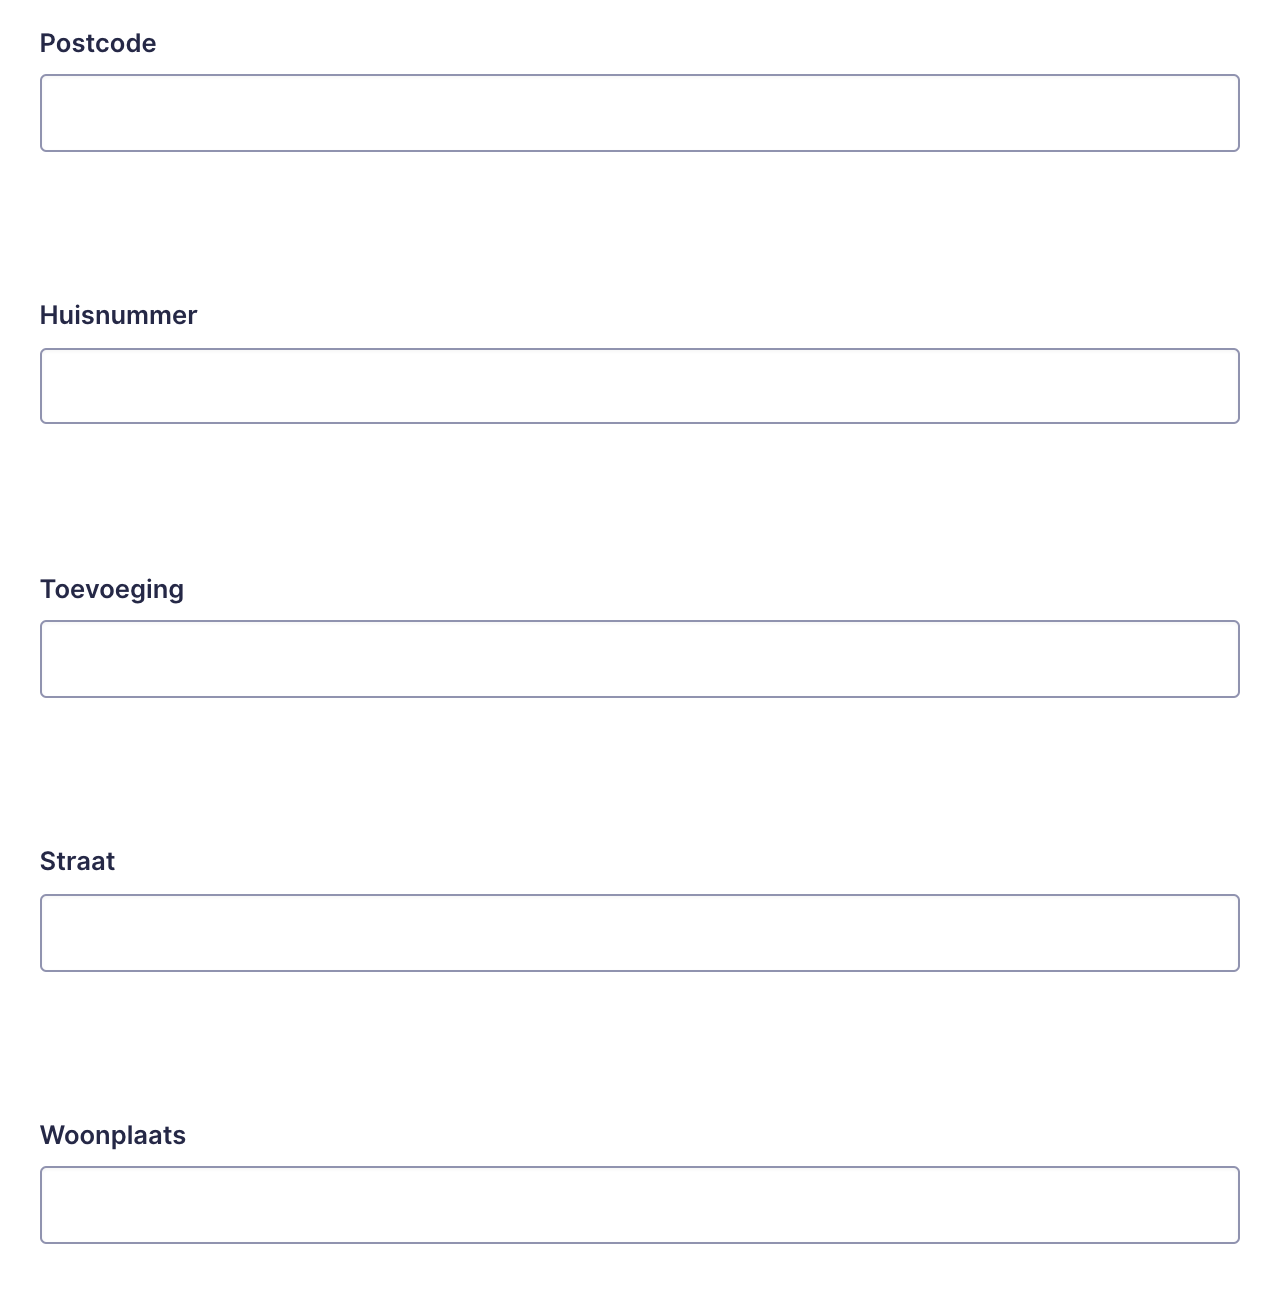
CampaignSuite heeft een ingebouwde Postcode checker welke gebruikt kan worden in elk Gravity Forms formulier. Standaard staat de Postcode checker al geactiveerd op het CampaignSuite veld Adres (NL). Maar het is ook mogelijk om dit toe te passen op eigen adres velden door middel van Aangepaste CSS-klasse op velden.
Stel uw formulier bevat de velden zoals in de afbeelding hiernaast.
Om de Postcode checker hier op in te stellen moet u voorgedefinieerde CSS-klasseinstellen op elk veld: – zipcode – housenumber – addon – street – city
Stel dat in bij het veld Custom CSS Class:
Als alle vijf de velden goed ingesteld zijn zal de Postcode checker automatisch geactiveerd worden waneer er ten minste een postcode en huisnummer worden ingevuld.
Let op
De Postcode checker wordt niet geactiveerd in de Voorbeeld modus van het formulier in de Wordpress admin.
Velden naast elkaar zetten
Wist u dat je met CSS-klasse nog meer kunt doen? Het is ook mogelijk om losse adresvelden netjes naast elkaar te zetten met de volgende CSS-klasse: – gf_left_third – gf_middle_third – gf_right_third Of als je twee velden naast elkaar wilt zetten: – gf_left_half – gf_right_half Het formulier ziet dan als volgt uit:
Masker invoer
Invoermaskers bieden een visuele gids waarmee gebruikers gemakkelijker gegevens in een specifieke indeling kunnen invoeren, zoals datums en telefoonnummers. Maskers kunnen ingevuld worden op Tekstregels.
Eigenlijk forceer je de bezoeker een formulier veld op een bepaalde manier in te voeren. Denk hierbij aan een postcode (eerst vier nummers en dan twee letters) of een Nederlands telefoonnummer (tien cijfers). CampaignSuite voegt standaard het masker IBAN toe waar u uit kunt kiezen.
Dit is in te stellen in het tabblad Uiterlijk van een veld:
Mogelijke maskers kunnen zijn:
Beschrijving
Masker
Postcode
9999 aa
Datum
99-99-9999
Telefoonnummer
9999999999
Prefill HTML en textarea
CampaignSuite maakt het mogelijk om een tekstvak of HTML veld in uw formulier automatisch te laten vullen met waarden uit andere velden in het formulier. Dit kan vooral handig zijn om op uw laatste pagina van het formulier een uitgebreide samenvatting te tonen van de ingevulde informatie van het formulier.
Let op
Deze functionaliteit werkt alleen als uw formulier uit meer dan 1 pagina bestaat. De velden worden namelijk gevuld wanneer de bezoeker van pagina wisselt in het formulier.
Onderstaande afbeeldingen tonen twee voorbeelden van de manier waarop je een tekstvak en HTML veld kunt vullen.
De waarden van de velden kunnen worden ingevoerd door de syntax:
{input_field_id}
Waarbij field_id het ID is van het veld in uw formulier.
Wist u dat?
Als u de parameter ?cs_post=true toevoegt aan de URL van de pagina waar uw formulier op staat, ziet u (wanneer u op de knop onderaan het formulier klikt) precies welke veld ID’s en waarden u kunt gebruiken bij het prefillen van tekstvakken en HTML velden.
Timber plugin
Het is ook mogelijk om bepaalde logica toe te passen op de code in de velden. Als u de plugin Timber heeft geïnstalleerd is het ook mogelijk om de gebruik te maken van .twig logica. Kijk op deze website voor een uitleg van de mogelijkheden.
Enkele voorbeelden van .twig logica zijn:
{% if "{input_1}" == "Ideal" %}
Dit is een Ideal betaling
{% else %}
Dit is geen Ideal betaling
{% endif %}
{% switch "{input_3}" %}
{% case 'Ideal' %}
<p>Ideal betaling</p>
{% case 'Direct debit' %}
<p>Machtiging</p>
{% case 'Creditcard' %}
{% case 'Sofort' %}
<p>Andere betaalmethode</p>
{% default %}
<p>Geen betaalmethode bekend</p>
{% endswitch %}
Verberg vooraf ingevulde velden
Bij elk Gravity Forms veld kan u er voor kiezen om deze te verbergen als de waarde ervan vooraf ingevuld is. Doorloop onderstaande stappen om dit in te stellen bij een veld:
Bewerk een formulier
Klik op een veld
Klik in de rechterkolom op het tabblad Geavanceerd
Klik op de optie Verberg indien vooraf ingevuld
Hiermee is nu aangegeven dat het veld wordt verborgen als de waarde vooraf is ingevuld. Dat geldt ook voor de Gravity Forms optie Toestaan dat veld dynamisch wordt gevuld.
Wanneer u dit instelt zal het veld ook worden verborgen als daarvan de waarde in de URL is meegegeven.
Marketing Cloud en Salesforce
Deze functie werkt ook als de waarde van de velden door data worden ingevuld vanuit Marketing Cloud of Salesforce
Voorwaardelijke logica
Voorwaardelijke logica kan gebruikt worden op veld-niveau. Dat houdt in dat je velden kunt verbergen of tonen op basis van keuzes/waardes van andere velden. Deze instelling is te vinden onder het tabje Geavanceerd van een veld.
Bovenstaand voorbeeld zegt: Toon dit veld als er aan alle voorwaarde wordt voldaan: – Als het veld Frequentie gelijk is aan Eenmalig
Je kunt er ook voor kiezen om meerdere voorwaarden toe te voegen. In het voorbeeld formulier is op verschillende plekken gebruik gemaakt van deze handigheid. Onder andere bij het IBAN veld. Deze mag alleen worden getoond als er gekozen is voor de betaalmethode Debitbetaling.
Ook op de eerste pagina van ons voorbeeld formulier wordt voorwaardelijke logica toegepast op de bedragen. De donateur ziet andere bedragen voor een eenmalige frequentie dan bijvoorbeeld een maandelijkse.
Betalingsvelden
Wanneer er een betaling gedaan moet worden in het formulier geeft u dat aan bij het blok Betalingsvelden. Het is de bedoeling dat u de juiste Gravity Forms velden gaat koppelen aan de instellingen velden. Bij betalingsvelden zijn dat:
Bedrag Koppel hier een veld wat als waarde altijd een getal heeft. Dit kan een tekstveld zijn waar je alleen een nummer in kunt vullen of een radio veld met bedrag keuzes. Als er meerdere radio velden zijn met bedragen (zoals eenmalig of maandelijks) koppel dan altijd het Totaal bedrag veld hier.
Financieel of niet-financieel
Een formulier controleert op basis van dit Bedrag veld of een het een transactie moet maken of niet. Dat kan zijn wanneer dit veld niet is gekoppeld of wanneer de waarde van het gekoppelde veld 0 is. Dan gaat de inzending automatisch verder als niet-financiële inzending.
Betaalmethode Koppel hier een veld waar men een betaalmethode kan kiezen. De waardes van dit veld moeten altijd één van de volgende waardes zijn: Ideal, Direct debit, Creditcard, Sofort, Bancontact of Paypal. Het maakt niet uit wat de labels zijn, als de waardes maar gelijk zijn aan één van de bovengenoemde opties.
Frequentie Koppel hier een veld waar men kan kiezen uit een betaal frequentie. De waardes van dit veld moeten altijd één van de volgende waardes zijn: One-time, Monthly, Quarterly of Yearly. Het maakt niet uit wat de labels zijn, als de waardes maar gelijk zijn aan één van de bovengenoemde opties.
Bank selectie Koppel hier een veld waar men kan kiezen uit een bank. De opties die ondersteunt worden zijn: – ABN Amro (ABNANL2A) – ASN Bank (ASNBNL21) – ING (INGBNL2A) – KNAB bank (KNABNL2H) – Rabobank (RABONL2U) – Regiobank (RBRBNL21) – SNS Bank (SNSBNL2A) – Triodos bank (TRIONL2U) – Van Lanschot (FVLBNL22)
IBAN Koppel hier een veld waar men het IBAN nummer kan invoeren van zijn/haar bank.
Naam rekeninghouder Dit veld is niet verplicht om te koppelen maar kan optioneel gekoppeld worden aan een tekstveld waar de bezoeker een naam in kan vullen van de rekeninghouder. Als die veld niet gekoppeld wordt of leeg blijft zal CampaignSuite automatisch de voornaam en achternaam invullen van de inzender.
Dynamische bestemming Het is (naast een vaste bestemming) ook mogelijk om een veld te koppelen waar de donateur kan kiezen voor een bestemming. Maar hier een dropdown veld van met bij de opties als Label een naam van de bestemming en als waarde (value) het bestemmings-ID uit Salesforce. Op deze manier kunnen dynamisch donaties gekoppeld worden aan bestemmingen.
Dynamische campagne Dit veld werkt hetzelfde als het veld Dynamische bestemming. Koppel hier een dropdown waar de donateur kan kiezen uit verschillende campagnes.
Account Record Type Het is mogelijk om in uw formulier te vragen of de donateur een particulieren donatie doet of namens een organisatie. Koppel hier een veld waar de bezoeker een keuze heeft uit Particulier of Organisatie. Zorg er voor dat de waarden van de keuzes altijd is Household of Organisation.
Let op
De waardes van het Account Record Type kunnen per Salesforce instantie afwijken. Neem voor de zekerheid contact op met uw implementatie partij om na te gaan wat de exacte naamgevingen zijn van het Account Record Type.
cs_post_submit
Beschrijving
Met dit filter kunt u acties uitvoeren na een succesvolle inzending bij de Campaign Suite API.
Dit is het volledige \CampaignSuite\Render_response() klasseobject van CampaignSuite. Dit object bevat informatie over het response dat wordt geretourneerd door de CS Api.
Voorbeeld
Onderstaand voorbeeld schrijft een $_SESSION[‘orig_campaign’] waarde weg op het Salesforce object Contact.
Functie om alle Mautic formulieren op te halen. Wanneer $id is doorgegeven, wordt slechts één formulier geretourneerd.
/**
* Function to retrieve all Mautic forms. When $id is passed, only one form is returned
*
* @param $id int Id of a Mautic form
* @return array $forms Returns an array of Mautic forms
*/
public function getForms($id = ''){}
createForm
Deze functie zal een nieuw Mautic-formulier creëren op basis van een Gravity Forms-formulier en zijn velden.
/**
* @param $type string Type can be Campaign or Standalone
* @param $form array The gravity Forms form as an array
*/
public function createForm($type, $form){}
postFormEntry
Deze functie stuurt rechtstreeks een wp_remote_post() verzoek naar Mautic. Dit is nodig omdat Mautic het IP-adres van de bezoeker nodig heeft om het contact te identificeren.
/**
* @param $form_id int Id of the Mautic form
* @param $data array Array of the data to post to the form
*/
public function postFormEntry($form_id, $data){}
updateEntry
Met deze functie wordt een Mautic-formulier inzending bijgewerkt op basis van bepaalde voorwaarden.
/**
* @param int $mautic_form_id The Mautic form ID
* @param array $where Array of conditions
* @param array $updates Array of fields to update
*/
function updateEntry($mautic_form_id, $where, $updates){}
Koppeling CampaignSuite
Als de Connected App is aangemaakt kan u deze koppelen aan CampaignSuite. Doorloop de volgende stappen om dit te doen:
Ga in Wordpress naar Instellingen > CampaignSuite > Pardot
Klik op Authenticeren
Selecter in de popup of u wilt verbinden met een Test, Dev of Live omgeving.
Vul de Connected App Consumer Key,Connected App Consumer Secret en Business Unit ID in klik op Authenticeren. (Klik hier om te lezen waar u het Business Unit ID kunt vinden).
Vul in het daarop volgende scherm de login gegevens in van een Salesforce user en log in op Salesforce
Wanneer u vervolgens terugkeert is de verbinding tot stand gebracht en kan u klikken op Sluit venster. De pagina zal dan automatisch vernieuwd worden en zullen de Pardot instellingen worden getoond.
Momenteel zijn er geen extra instellingen beschikbaar voor de Pardot connectie.
Pardot Form Handler
Form Handlers in Pardot zijn een alternatief voor Pardot-formulieren. U kunt een Form Handler gebruiken om uw formulieren van derden of aangepaste formulieren met Pardot te integreren om inzendingsgegevens bij te houden.
Bij het gebruiken van Form Handlers is het niet mogelijk om eenvoudig Gravity Forms velden te mappen met Form Handler velden. Deze moet u stuk voor stuk handmatig invoeren in de Pardot instellingen van het Gravity Forms formulier.
Kopieer en plak het Endpoint URL van de Form Handler in het veld Form Handler Endpoint van de Gravity Forms Pardot instellingen.
Klik op Instellingen bijwerken
Onderaan verschijnt er nu een mogelijkheid om zelf velden te mappen. In de linkerkolom vult u het External Field Name in van Pardot en in de rechterkolom selecteert u een veld uit het Gravty Forms formulier. De Pardot veld aliassen kunt u vinden onder het kopje Form Field Mappings als u de Form Handler opent in Pardot:
Klik op het plusje rechts van de velden om meerdere velden handmatig te mappen. Zodra alle velden gekoppeld zijn klikt u Instellingen bijwerken om het op te slaan.
Installation
After activating the plugin, a menu option will be added in the Wordpress admin under Settings called CampaignSuite. Below are all global settings of the plugin.
Enter your CampaignSuite Key here to activate your license. You will receive this license key from us if you have become a CampaignSuite customer. Without this key it is not possible to use CampaignSuite within your environment. Do you not have a license key or have you lost it? Please contact the Gopublic Sales Department .
After activation, the connection options available to you will appear in the left column (depending on your own preferences).
These could be:
SalesForce
Mautic
Pardot
Dynamics
Gravity Forms
Debug
Creation of database tables
When activating the plugin, 3 additional database tables will be created in the Wordpress database. These tables contain information about campaigns and submissions within CampaignSuite.
When a Gravity Forms form is linked to a Mautic form, a submission will store Mautic information in this table (for example the Mautic Contact ID). The entry will also be sent to Mautic.
Various metadata related to Gravity Forms submissions can be stored in this table (such as a SalesForce Case ID)
Remote Site
Findock uses Webhooks. To make your website accessible within Salesforce, the URL of your website must be added to the Remote Site Settings . To do this, follow the steps below:
Go to Salesforce Setup and search for R emote .
Then click Remote Site Settings in the search results.
Click on New Remote Site
Enter a name and the URL of your website running CampaignSuite.
Click on Save
Your website has now been added as a secure website to be accessed by, for example, Findock.
Mautic settings
It is recommended to have the same fields in the Gravity Forms form as the Mautic form. But you don’t have to create a form twice. CampaignSuite has the option to copy a Gravity Forms form to a Mautic form in one go.
Select a form from Gravity Forms and choose whether it should be a Standalone or Campaign form in Mautic. Then click on Create a form .
Now a new form has been created in Mautic with exactly the same fields as the Gravity Forms form.
Connection CampaignSuite
Once the Connected App has been created, you can link it to CampaignSuite. Go through the following steps to do this:
In Wordpress go to Settings > CampaignSuite > Pardot
Click on Authenticate
Select in the popup whether you want to connect to a Test, Dev or Live environment.
Enter the Connected App Consumer Key, Connected App Consumer Secret and Business Unit ID click Authenticate. (Click here to find out where to find the Business Unit ID).
In the next screen enter the login details of a Salesforce user and log in to Salesforce
When you return the connection is established and you can click on Close window. The page will then be refreshed automatically and the Pardot settings will be displayed.
Currently there are no additional settings available for the Pardot connection.
CampaignSuite provides a number of changes in both the way a form is displayed on your website and settings for the forms in Wordpress.
Form on the website
CampaignSuite ensures that a loading screen appears over your forms so that the visitor cannot accidentally submit the form multiple times
CampaignSuite offers the possibility to display a loading text and loading image when submitting a form
Address fields can contain an automatic zip code checker by simply setting the
field
And more ..
Editing forms
A choice of specific CampaignSuite payment fields that allow you to create a donation form in seconds.
Settings may be added to map fields to third party software (such as Salesforce, Mautic, Pardot and Dynamics)
Additional E-commerce settings can be made after transactions in forms
Several Feed Actions can be set (ie actions that can be performed after submitting a submission). These can also be custom made for you by Gopublic.
Separate notifications (such as email notifications) can be set after successful transactions (Converse and Findock)
And more …
In the article Edit form we first get started with creating a simple donation form. In this article, we’ll explain some of the basic features of Gravity Forms to get you started in creating a form.
Edit a form
This article uses a simple test form. To use this form you can download the file below and import it into Gravity Forms:
Extract this file and import it into Gravity Forms. A new form will be created called Simple Donation.
This form consists of 3 pages:
Choose a frequency and amount
Enter name and address
Choose a payment method
The following articles will cover some of the features of Gravity Forms that can be used with these types of forms.
Form settings
CampaignSuite adds three extra options to the settings of a form. These can all be found under Settings -> Form settings -> Form options
Form loading overlay If you have set in CampaignSuite to show a white loading overlay for all forms, you can specify here specifically with this form not to do so.
Load form text Enter a text here to show when the Gravity Forms form is loading.
Load form text color Choose a color here for the text that will be displayed using a color picker.
Load form image Optionally enter a link here to an online .gif image to display below the loading text.
Notice
The “load text”, “load text color” and “load image” only work if you have indicated in the CampaignSuite settings under the tab Gravity Forms that a white overlay must be loaded. Otherwise the loading text and image will not be displayed.
Notifications
When a visitor has completed a form, a notification can be sent by email. When creating a new form, a notification is created by default for the Wordpress admin (Administrator notification). This notification will send an email to the Wordpress admin address with the subject New submission from {form_title} . This notification is sent immediately when the submission is saved.
Once CampaignSuite has been activated, four extra ‘moments’ will be added from which you can choose to have a notification sent:
CampaignSuite payment has been completed When the status of a payment is set to completed (Collected), this notification will be sent.
CampaignSuite payment failed When the status of a payment is set to Failed, this message will be sent.
CampaignSuite payment is pending When the status of a payment is pending (Pending), this notification will be sent.
CampaignSuite payment has been canceled When the status of a payment is canceled (Canceled), this notification will be sent.
In this way it is therefore possible to only send an e-mail to a donor when the payment was actually successful.
Salesforce
Once CampaignSuite has set up a connection with Salesforce, a tab named Salesforce will appear with each form under Settings . Here all settings can be made for the connection to Salesforce. Think about:
Creating a CampaignMember object
Set Plauti Duplicate Check options
Link payment fields for a transaction to Converse or Findock
Synchronization of CampaignMember objects or Memberships
Folders of Contact and Account fields
In this documentation we will go through all the options and explain what you can do with them.
Mautic
Mautic is a full-fledged marketing automation system that can be used in B2B and B2C. An infinite number of different marketing tasks can be automated with Mautic. From simple forwarding of a form to complex lead nurturing or remarketing / upsell campaigns.
CampaignSuite offers the possibility to send a Gravity Forms submission to a Mautic form. In this way it is possible to allow the visitor to start a journey in Mautic, for example.
If you link contact fields to the form fields in Mautic, submissions are automatically linked to new or existing contacts (leads) in Mautic.
Pardot
Pardot is a Salesforce application specifically designed for B2B marketing automation. With Pardot, marketing and sales departments have access to a range of powerful tools to use data for automatic marketing, generate more and better leads and calculate the ROI of their campaigns.
When CampaignSuite is linked to Pardot you have the option to send Gravity Forms submissions directly to Pardot forms or Pardot Form Handlers.
Marketing Cloud
Once a connection has been established with Marketing Cloud, various functions will be displayed in Gravity Forms. Some examples of these features are:
Creating Marketing Cloud feed actions for Transactional emails and journeys.
Use prefill options on fields.
Set up dynamic content for Marketing Cloud emails.
Being able to set Prefill variables with Gravity Forms confirmations.
All parts will be covered in the articles below.
Feed actions
It is possible (if you have the permission on CampaignSuite) to set up Feed actions. A feed action is an action that can be performed by CampaignSuite shortly after a new submission has been made in Gravity Forms. Actions can be divided into two different categories:
1. Create a Salesforce object
With CampaignSuite it is possible to create a new record in Salesforce for every Object that is available. Consider, for example, a Case, Campaign or Destination. It is even possible to have multiple Feed actions executed one after the other and to use the generated IDs that are created per Feed in the mapping of the fields.
The screenshot below shows an example of a Feed action where a Case is created. A Feed condition has also been set. This means that this feed will only run if all conditions are met.
Feed name Enter a recognizable name for the feed here
Type of action Select the action you want to have performed here
Moment of execution Some actons may require a Contact ID. In that case, choose the option At the end so that a Contact ID exists at the time of execution.
Salesforce Object You will only see this when you choose the action type “Create a new record in Salesforce”. Choose an object from your Salesforce instance here.
Feed condition These conditions work exactly the same as the conditions that can be set with form fields.
If you choose an action that is linked to a Salesforce object, all fields of this object will appear at Settings . Link these to the correct Gravity Forms fields to get the values correctly in Salesforce.
2. A custom action made by Gopublic
It is also possible that Gopublic makes custom actions in consultation with you. Consider, for example, creating Webshop orders or writing Gifts to Salesforce. Feel free to contact us if you would like to make use of this.
CS E-commerce
If CampaignSuite is activated and the form makes a transaction, a Google E-commerce script will be added by default to the thank you message of the Gravity Forms form.
If your form confirmation does not have Text but Page , then it is also possible to use a shortcode on the page where the donor ends up after a successful payment in order to still have the Google E-commerce script executed. Then add the following to this page:
[ecommerce]
Advanced E-commerce Settings
An extensive feature of CampaignSuite is to be able to make more settings for the E-commerce code. This feature is not included in the basic package. Please contact us if you are interested in this extension.
In E-commerce settings you can set all fields of the E-commerce script. This option is often used with hidden fields in the form. The visitor does not see these fields, but you can have them pre-filled with values. You then link this to the E-commerce field in the settings.
Entries
With entries you will see a list of all entires of the form. You can set the columns that are shown with the radar icon at the top right of the list.
You can also filter the entries on the fields in the form. CampaignSuite also offers the option to filter by payment status. So this way you can get a list of all successful payments. The first column is always clickable to go to the detailed view of the entry.
Comments
When you are in the detailed view of an entry, you will find a block with Comments in the left column below the fields. At various times during the creation of the entry (sending a form), CampaignSuite may add a comment to the entry. Some examples of this are:
Salesforce call initiated
Salesforce payment completed successfully
Status Mautic form entry changed to: ‘Collected’
Even if an unexpected error occurs, it will be found here in the comments.
Payment details
When a transaction has taken place, you will find its status in the right column under the heading Payment details.
Salesforce and Mautic
All information related to Salesforce or Mautic is also shown in this column.
Squeezely
Squeezely Customer Data Platform helps marketers efficiently collect customer data, build multi-channel campaigns, and analyze results in one place. CampaignSuite offers a possibility to generate parameters that can be used for Squeezely.
Go to the Settings of a form and click on the tab Squeezely.
Enable the Squeezely functionality to use the feature.
Select a field from the form to calculate the hash used in Squeezely (often this is an email field, for example)
Enter a parameter name which can be used by CampaignSuite to automatically append to URL. Think, for example, of a Success URL for an iDeal payment via Findock.
Optionally indicate whether all redirect URLs in this form should be auto-completed with the name of the parameter and the value of the hash field.
Manually adding parameter
It is possible to manually add the Squeezely parameter to form confirmations if you have enabled and set up the functionality. That might look like this:
Measurement
CampaignSuite contains a very extensive system for setting measurements on forms. Think for example of Client Side and Server Side events at certain moments in a form. These moments can be, for example, when you switch pages in a form or when a successful payment has taken place.
There are a total of 6 moments when you can determine that something needs to be measured by one of the four providers (Facebook, Google Analytics 4, Squeezely or Google Tag Manager). It is possible to create multiple actions per form.
Check out the articles below to learn more about measurement options.
Edit a form
This article uses a simple test form. To use this form you can download the file below and import it into Gravity Forms:
When CampaignSuite is activated, an extra block of fields will appear when editing a form: CampaignSuite fields . These are fields that are made specifically for forms with a payment option. The fields to choose from are:
Frequency This field generates a radio field with the different pay frequencies. If you drag this field into your form, you then have the option to check or uncheck options. In this way it is possible, for example, to only show One-time and Monthly. It is also possible to add own frequencies (if these are supported by the third party party responsible for the payments).
Amount options This is a predefined field with 3 amounts to choose from. It is important that the value of the field is a number (without a currency sign). You are free to change these amounts or add new amounts.
Total amount With a financial form it is important to have one field where the final amount will be entered. Use the Total amount field to capture multiple Amount options fields with conditional logic. This Total amount field is hidden but will always be filled with an amount that is chosen or filled in with an Other option .
Payment method This field generates a radio field with different payment methods from which a donor can choose. Here you can check or uncheck options to display in your form.
Notice Message! Your message here
It is not technically possible to pay periodically with Ideal. That is why CampaignSuite automatically ensures that all non-periodically supporting payment methods (Ideal, Paypal, Sofort, Creditcard and Bancontact) are hidden if you donate periodically. This setting can be changed in the CampaignSuite setting under the Salesforce tab.
Bank choice This field generates a dropdown with the available banks from which a donor can choose. It is possible to add banks yourself if the value is supported by the payment provider.
Address (NL) This field generates a series of fields that form a Dutch address. – Postal Code – House number – Addition – Street – City There is also an automatic zip code checker. As soon as a postcode and house number are entered, the street and city will be automatically completed.
Global optin This field shows a checkbox option for an optin on, for example, a newsletter. Of course this field will still have to be mapped with a field in a CRM.
Conditional logic
Conditional logic can be used at the field level. This means that you can hide or show fields based on choices / values of other fields. This setting can be found under the Advanced tab of a field.
The example above says: Show this field if all conditions are met: – When the Frequency field equals Once
You can also choose to add multiple conditions. This skill has been used in various places in the example form. Among other things at the IBAN field. This may only be shown if the payment method Debit payment has been selected.
Conditional logic is also applied to the amounts on the first page of our sample form. The donor sees different amounts for a one-off frequency than, for example, a monthly one.
Zipcode checker
CampaignSuite has a built-in Zipcode checker which can be used in any Gravity Forms form. By default, the Zipcode checker is already activated in the CampaignSuite field Address (NL) . But it is also possible to apply this to custom address fields using Custom CSS class on fields.
Suppose your form contains the fields as in the image on the right.
To set the Zipcode checker to this, you must set predefined CSS-class on each field: – zipcode – housenumber – addon – street – city
Set this in the field in the Appearance tab:
If all five fields are set correctly, the Zipcode checker will be automatically activated when at least one postcode and house number are entered.
Note
The Zipcode checker is not activated in the Preview mode of the form in the Wordpress admin.
Align field next to each other
Did you know that you can do even more with CSS class ? It is also possible to neatly put separate address fields next to each other with the following CSS class: – gf_left_third – gf_middle_third – gf_right_third Or if you want to put two fields next to each other: – gf_left_half – gf_right_half The form will then look like this:
Mask input
Input masks provide a visual guide that makes it easier for users to enter information in a specific format, such as dates and phone numbers. Masks can be filled in on Text lines .
You are actually forcing the visitor to enter a form field in a certain way. Think of a postcode (first four numbers and then two letters) or a Dutch telephone number (ten digits). CampaignSuite adds the IBAN mask that you can choose from by default.
This can be set in the Appearance tab of a field:
Possible masks can be:
Description
Mask
Zipcode
9999 aa
Date
99-99-9999
Phone number
9999999999
Prefill HTML and textarea
CampaignSuite makes it possible to have a text box or HTML field in your form automatically filled with values from other fields in the form. This can be especially useful for showing a detailed summary of the information entered on the form on your last page of the form.
Note
This functionality only works if your form consists of more than 1 page. The fields are filled when the visitor switches pages in the form.
The images below show two examples of how you can fill a text box and HTML field.
The values of the fields can be entered by the syntax:
{input_field_id}
Where field_id is the ID of the field in your form.
Did you know
If you add the parameter ?cs_post=true to the URL of the page where your form is located, you will see (when you click the button at the bottom of the form) exactly which field IDs and values you can use when prefilling text boxes and HTML fields.
Timber plugin
It is also possible to apply some logic to the code in the fields. If you have installed the plugin Timber it is also possible to use .twig logic. See this website for an explanation of the possibilities.
Some examples of .twig logic are:
{% if "{input_1}" == "Ideal" %}
This is an Ideal payment
{% else %}
This is not an Ideal payment
{% endif %}
{% switch "{input_3}" %}
{% case 'Ideal' %}
<p>Ideal payment</p>
{% case 'Direct debit' %}
<p>Debit</p>
{% case 'Creditcard' %}
{% case 'Sofort' %}
<p>Other payment method</p>
{% default %}
<p>Unknown payment method</p>
{% endswitch %}
Hide prefilled fields
With each Gravity Forms field you can choose to hide it if its value is pre-filled. Follow the steps below to set this up for a field:
Edit a form
Click on a field
Click in the right column on the tab Advanced
Click the option Hide if pre-filled
This now indicates that the field will be hidden if the value is pre-filled. This also applies to the Gravity Forms option Allow field to be filled dynamically.
When you set this, the field will also be hidden if its value is given in the URL.
Marketing Cloud and Salesforce
This function also works if the value of the fields is filled in by data from Marketing Cloud or Salesforce
Conditional logic
Conditional logic can be used at the field level. This means that you can hide or show fields based on choices / values of other fields. This setting can be found under the Advanced tab of a field.
The example above says: Show this field if all conditions are met: – When the Frequency field equals Once
You can also choose to add multiple conditions. This skill has been used in various places in the example form. Among other things at the IBAN field. This may only be shown if the payment method Debit payment has been selected.
Conditional logic is also applied to the amounts on the first page of our sample form. The donor sees different amounts for a one-off frequency than, for example, a monthly one.
Payment fields
When a payment has to be made in the form, indicate this in the block Payment fields . The intention is that you will link the correct Gravity Forms fields to the settings fields. For payment fields these are:
Amount Link here a field that has the value always a number. This can be a text field where you can only enter a number or a radio field with amount options. If there are multiple radio fields with amounts (such as one-off or monthly) always link the Total amount field here.
Notice Message! Your message here
A form checks on the basis of this Amount field whether it should make a transaction or not. This can be when this field is not linked or when the value of the linked field is 0. Then the submission will automatically continue as a non-financial submission.
Payment method Link a field here where you can choose a payment method. The values of this field must always be one of the following values: Ideal, Direct debit, Creditcard, Sofort, Bancontact or Paypal. It doesn’t matter what the labels are, as long as the values are equal to one of the above options.
Frequency Link a field here where you can choose a payment frequency. The values of this field must always be one of the following values: One-time, Monthly, Quarterly or Yearly. It doesn’t matter what the labels are, as long as the values are equal to one of the above options.
Bank selection Link a field here where you can choose from a bank. The options that are supported are: – ABN Amro (ABNANL2A) – ASN Bank (ASNBNL21) – ING (INGBNL2A) – KNAB bank (KNABNL2H) – Rabobank (RABONL2U) – Regional bank (RBRBNL21) – SNS Bank (SNSBNL2A) – Triodos bank (TRIONL2U) – Van Lanschot (FVLBNL22)
IBAN Link a field here where one can enter the IBAN number of his / her bank.
Account holder name This field is not mandatory to link but can optionally be linked to a text field where the visitor can enter the name of the account holder. If that field is not linked or is left empty, CampaignSuite will automatically fill in the first and last name of the submitter.
Dynamic destination In addition to a fixed destination, it is also possible to link a field where the donor can choose a destination. But here is a dropdown field with the options as Label a name of the destination and as value (value) the destination ID from Salesforce. In this way, donations can be dynamically linked to destinations.
Dynamic campaign This field works the same as the Dynamic destination field. Link a dropdown here where the donor can choose from different campaigns.
Account Record Type It is possible to ask in your form whether the donor is making a private donation or on behalf of an organization. Link a field here where the visitor can choose from Private or Organization. Make sure the values of the choices are always Household or Organization .
Note
The values of the Account Record Type can differ per Salesforce instance. To be sure, contact your implementation party to find out the exact names of the Account Record Type.
Pardot Form Handler
Form Handlers in Pardot are an alternative to Pardot forms. You can use a Form Handler to integrate your third-party or custom forms with Pardot to track submission data.
When using Form Handlers it is not possible to easily map Gravity Forms fields with Form Handler fields. You have to enter these manually one by one in the Pardot settings of the Gravity Forms form.
Copy and paste the Endpoint URL of the Form Handler into the Form Handler Endpoint field of the Gravity Forms Pardot settings.
Click on Update settings
At the bottom you will now see a possibility to map fields yourself. In the left column enter the External Field Name of Pardot and in the right column select a field from the Gravty Forms form. The Pardot field aliases can be found under the heading Form Field Mappings when you open the Form Handler in Pardot:
Click the plus sign to the right of the fields to manually map multiple fields. Once all fields are linked, click Update Settings to save it.
cs_post_submit
Description
This filter allows you to take actions after a successful submission to the Campaign Suite API.
This is the complete CampaignSuite\CampaignSuite\Render_response() class object. This object contains information about the response returned by the CS API.
Example
The example below writes a $_SESSION[‘orig_campaign’] value to the Salesforce Contact object.
Function to retrieve all Mautic forms. When $id is passed, only one form is returned.
/**
* Function to retrieve all Mautic forms. When $id is passed, only one form is returned
*
* @param $id int Id of a Mautic form
* @return array $forms Returns an array of Mautic forms
*/
public function getForms($id = ''){}
createForm
This function will create a new Mautic form from a Gravity Forms form and its fields.
/**
* @param $type string Type can be Campaign or Standalone
* @param $form array The gravity Forms form as an array
*/
public function createForm($type, $form){}
postFormEntry
This function sends a wp_remote_post () request directly to Mautic. This is necessary because Mautic needs the visitor’s IP address to identify the contact.
/**
* @param $form_id int Id of the Mautic form
* @param $data array Array of the data to post to the form
*/
public function postFormEntry($form_id, $data){}
updateEntry
This feature updates a Mautic form submission based on certain conditions.
/**
* @param int $mautic_form_id The Mautic form ID
* @param array $where Array of conditions
* @param array $updates Array of fields to update
*/
function updateEntry($mautic_form_id, $where, $updates){}
Met deze actie kunt u zelf de webhook call opvangen zodat u zelf in een eigen actie kunt bepalen of er nog extra code uitgevoerd moet worden zodra er een webhook call plaatsvindt vanuit Salesforce/Findock
With this action you can catch the webhook call yourself so that you can determine in your own action whether additional code needs to be executed as soon as a webhook call takes place from Salesforce/Findock
$payment (object) This object contains all information about the modified Payment object from the database table wp_gp_donations.
Marketing Cloud options
Once you have established the secure connection to Marketing Cloud, several options will appear in the Marketing Cloud tab.
Prefill Endpoint page
Here you can enter a URL of a public Marketing Cloud Page. This page contains logic that can retrieve Contact data from Marketing Cloud’s database based on parameters in the URL (for example, id and hash). This data must be displayed as JSON data.
If you would like to use this functionality, please contact us.
Marketing Cloud opties
Als u de beveiligde verbinding met Marketing Cloud tot stand hebt gebracht verschijnen er diverse opties in het tabblad Marketing Cloud.
Prefill-pagina Endpoint
Hier kunt u een URL invullen van een openbare Marketing Cloud Page. Deze pagina bevat logica die op basis van parameters in de URL (bijvoorbeeld id en hash) Contact data kan ophalen uit de database van Marketing Cloud. Deze data moet worden getoond als JSON data.
Als u gebruik wilt maken van deze functionaliteit, neem dan contact met ons op.
Prefillen van velden
CampaignSuite biedt de mogelijkheid om Gravity Forms velden vooraf te laten vullen met Contact data uit Marketing Cloud. Om gebruik te maken van deze functionaliteit is het noodzakelijk dat er een specifieke Cloud Page bestaat in Marketing Cloud. Deze pagina genereert een JSON met daarin de beschikbare velden om op te halen.
Een voorbeeld van een dergelijke JSON is:
In de algemene CampaignSuite instellingen kan het Endpoint ingesteld worden voor deze Cloud Page (Prefill-pagina Endpoint). Daarnaast is het ook mogelijk om per formulier deze URL te overschrijven.
Doorloop de volgende stappen om velden te laten prefillen met Marketing Cloud data:
Ga naar de Instellingen van een formulier en klik op het tabblad MC Prefill.
Klik op de eerste checkbox om prefillen in te schakelen voor dit formulier
Stel vervolgens alle parameters in die nodig zijn in de URL van de pagina om een record op te halen in Marketing Cloud. In deze afbeelding staat er bijvoorbeeld 2 parameters ingesteld. De URL van de pagina waar het formulier op komt te staan moet er dan bijvoorbeeld als volgt uit zien: https://www.test.nl/formulier-pagina?id=5847&hash=fjd837hjd93
Geef aan of het formulier verborgen moet worden als er op basis van de opgegeven parameters en hun waarde geen record gevonden kan worden in Marketing Cloud. U kunt ook een bericht typen wat getoond moet worden in plaats van het formulier als deze verborgen wordt.
Het is eventueel mogelijk om het standaard Prefill Endpoint te overschrijven met een andere. Doet die bij het veld Custom prefill URL.
Velden mappen
Als laatste stap is het noodzakelijk om velden uit Marketing Cloud te koppelen aan uw Gravity Forms velden. Op deze manier bepaalt u welke data in welk veld gezet moet worden.
Bevestigingen personaliseren
Wanneer u gebruik maakt van de prefill mogelijkheid zullen deze velden ook te gebruiken zijn bij formulier bevestigingen (zoals een bevestiging tekst of redirect URL).
Bevestiging tekst
Alle Marketing Cloud Prefill velden kunnen gebruikt worden in het bericht van een bevestiging. Klik hiervoor op de accolades rechts van de editor en kies daar één van de prefill velden.
Redirect pagina of URL
Het is ook mogelijk om de prefill velden te gebruiken in een querystring:
Prefilling fields
CampaignSuite offers the possibility to prefill Gravity Forms fields with Contact data from Marketing Cloud. To use this functionality it is necessary that a specific Cloud Page exists in Marketing Cloud. This page generates a JSON containing the available fields to retrieve.
An example of such a JSON is:
In the general CampaignSuite settings, the Endpoint can be set for this Cloud Page (Prefill page Endpoint). In addition, it is also possible to overwrite this URL per form.
Follow these steps to prefill fields with Marketing Cloud data:
Go to the Settings of a form and click on the tab MC Prefill.
Click on the first checkbox to enable prefilling for this form.
Then set all parameters needed in the URL of the page to retrieve a record in Marketing Cloud. For example, in this image there are 2 parameters set. The URL of the page where the form will be placed on could look like this: https://www.test.nl/formulier-pagina?id=5847&hash=fjd837hjd93
Specify whether to hide the form if no record can be found in Marketing Cloud based on the specified parameters and their value. You can also type a message to be shown instead of the form if it is hidden.
It is possible to overwrite the default Prefill Endpoint with another one. Add it to the field Custom prefill URL.
Map fields
As a final step, it is necessary to link fields from Marketing Cloud to your Gravity Forms fields. In this way you determine which data should be placed in which field.
Personalize confirmations
When you use the prefill option, these fields can also be used for form confirmations (such as confirmation text or redirect URL).
Confirmation text
All Marketing Cloud Prefill fields can be used in the confirmation message. To do this, click on the curly brackets to the right of the editor and select one of the prefill fields.
Redirect page or URL
It is also possible to use the prefill fields in a querystring:
Developers
Dit gedeelte van de documentatie bevat technische toelichting voor developers. Niet alleen kunnen de geautoriseerde connecties in uw thema gebruikt worden, ook kunt u gebruik maken van verschillende Filters van CampaignSuite. Op deze manier is het mogelijk om data te beïnvloeden tijdens bepaalde flows binnen CampaignSuite.
Tevens is er een artikel die de verschillende endpoints doorneemt die CampaignSuite toevoegt aan Wordpress.
Op verschillende plekken in de CampaignSuite code zijn Wordpress filters ingebouwd. Deze maken het mogelijk om als developer in het thema invloed uit te oefenen op de data die op dat moment door CampaignSuite wordt gebruikt.
Alle filters kunnen het beste geplaatst worden in de functions.php van uw thema. Klik op onderstaande artikelen om de verschillende filters te bekijken.
Actions
URL parameters
U kunt in de URL van uw website diverse parameters toevoegen om debug opties te activeren van CampaignSuite. Hiermee is het bijvoorbeeld mogelijk om de call richting de CampaignSuite API of Converse en Findock te debuggen.
Mogelijke parameters zijn:
?cs_debug
https://www.website.nl/formulier?cs_debug=true
Wanneer deze parameter wordt toegevoegd, wordt automatisch een formulier geladen zonder ajax. Wanneer het formulier is ingevuld, ziet u de JSON die naar de CampaignSuite API wordt verzonden. Het toont u ook de JSON die vanuit de API naar Salesforce wordt verzonden. Dit alles voordat Gravity Forms de invoer daadwerkelijk maakt.
?cs_post=true
https://www.website.nl/formulier?cs_post=true
Wanneer deze parameter wordt toegevoegd, toont elke pagina u de geposte waarden. Dit kan handig zijn als u de exacte geposte veldnamen wilt weten. Deze namen kunnen worden gebruikt in tekstgebied- en HTML-velden om vooraf te vullen met die veldwaarden.
?cs_ajax
https://www.website.nl/formulier?cs_ajax=false
Gebruik deze parameter om een Gravity Forms Ajax-instelling te overrulen met true of false.
Het ID wat in deze parameter wordt doorgegeven, moet een Salesforce-contactpersoon-ID zijn. Als de contactpersoon wordt gevonden in Salesforce, worden alle toegewezen contactpersoon- en accountvelden vooraf ingevuld met de waarden van Salesforce.
Client connecties
Als developer heb je de beschikking om de geautoriseerde verbindingen ook in je eigen thema te gebruiken. Er zijn een aantal voorgedefinieerde functies die je per connectie kunt gebruiken. Start elke connectie altijd eerst op de onderstaande manier:
Bekijk onderstaande artikelen om de beschikbare functie per connectie in te zien.
Endpoints
Wanneer CampaignSuite geactiveerd is komen er een aantal nieuwe endpoints bij binnen Wordpress. Deze endpoints kunnen aangeroepen worden door software van derden. Hieronder staan deze endpoints uitgelegd met de daarbij behorende parameters.
gp_webhook_path
Dit endpoint kan benaderd worden door Findock en handelt alle webhook aanroepen af met betrekking tot wijzigingen van een betaling (of in het geval van Findock 2 mutaties in het PaymentIntent). CampaignSuite bepaalt zelf automatisch op basis van de inhoud van de call of het voor Findock v1 of v2 is. Bij elke API call richting Findock voegt CampaignSuite automatisch deze URL toe als WebhookURL.
Dit endpoint kan worden gebruikt om een Mautic Lead Integration te verwijderen. Dit endpoint is alleen toegankelijk met een POST-aanvraag met de volgende parameters:
Parameter
Beschrijving
email
Het e-mailadres van een Mautic lead
entityId
Het Mautic entiteit om te verwijderen
entityId
De ID van de Salesforce-entiteit (bijv. Campaign ID)
Dit endpoint kan worden gebruikt om een Mautic Lead Integration te verwijderen. Dit endpoint is alleen toegankelijk met een POST-aanvraag met de volgende parameters:
One-click-payment is een manier om via een URL direct een donatie te maken waarbij de bezoeker in één keer doorgestuurd wordt naar zijn/haar bank-pagina. Het voordeel hiervan is is dat de complete flow identiek is aan het invullen van een donatie formulier, echter zonder tussenkomst van de pagina waar het formulier op staat.
Om One-Click-Payment te laten werken moet u minstens voldoen aan de volgende punten:
Er moet een formulier aangemaakt zijn welke volledig gekoppeld is aan een Salesforce betaling
Het formulier moet wel op een pagina (desnoods verborgen) staan voor het geval de donateur zijn/haar donatie beëindigd.
Er moet een bedank bericht of bedank pagina ingesteld staan voor het succesvol afvangen van de donateur.
De velden van het formulier die u wilt vullen moeten ingesteld zijn om dynamisch gevuld te mogen worden. Lees meer informatie hierover op deze website.
Als bovenstaande punten ingesteld zijn kan de URL voor een One-Click-Payment er als volgt uit zien:
Er zijn een aantal verplichte parameters in de URL:
amount Vul hier het bedrag in voor de donatie
form_id Vul hier het ID in van het Gravity Forms formulier waar de betaling afgehandeld moet worden
contact (optioneel) Vul hier een ID in van een Salesforce Contact
Als u geen Salesforce Contact ID mee stuurt in de URL zijn een voornaam, achternaam en e-mailadres ook verplicht om mee te sturen in de URL.
Zodra men op de link klikt zal het formulier vooraf ingevuld worden met de benodigde waarden en verstuurd worden via de API. Als er velden missen of fouten plaatsvinden dan worden die direct in beeld getoond.
Salesforce
Als u CampaignSuite koppelt aan SalesForce kunnen o.a. de volgende mogelijkheden beschikbaar worden:
Aanmaken van betalingsverzoeken via Converse of Findock
Het aanmaken van custom objecten (zoals Cases)
Het ophalen en bijwerken van Contact en Account gegevens (Preference Center)
Gebruik van ontdubbeling met de Plauti Duplicate Check App
En meer …
Om een succesvolle verbinding tot stand te brengen met Salesforce moeten er drie stappen uitgevoerd worden:
Een Connected App binnen Salesforce zorgt er voor dat je een geautoriseerde verbinding kunt opzetten om op een veilig manier data heen en weer te sturen. Deze verbinding wordt opgezet middels oAuth.
Voer onderstaande stappen uit om de Connected App toe te voegen aan SalesForce.
Ga naar de Setup van Salesforce en zoek naar App.
Klik dan in de zoekresultaten op App manager
Klik rechts bovenin op New Connected App
Vul een Connected App Name in en een contact e-mailadres.
Vink de checkbox Enable OAuth Settings aan onder het kopje API (Enable OAuth Settings)
Vul bij Callback URL de volgende link in: https://api.campaignsuite.nl/v1/token/salesforce/register Deze link is te vinden in de CampaignSuite instellingen onder het tabblad Salesforce:
Voeg bij Selected OAuth Scopes de volgende 2 rechten toe: – Access and manage your data (api) – Perform requests on your behalf at any time (refresh_token, offline_access)
Klik onderaan de pagina op save
Het kan gemiddeld 10 minuten duren voor dat instellingen zijn verwerkt in Salesforce. Kopieer in de tussentijd alvast de Consumer Key en Consumer Secret van de zojuist aangemaakt App. Deze gaan we straks instellen bij CampaignSuite.
Remote Site
Findock maakt gebruik van Webhooks. Om uw website toegankelijk te maken binnen Salesforce moet de URL van us website toegevoegd worden bij de Remote Site Settings. Voer daarvoor de onderstaande stappen uit:
Ga naar de Setup van Salesforce en zoek naar Remote.
Klik daarna in de zoekresultaten op Remote Site Settings.
Klik op New Remote Site
Voer een naam en de URL van uw website waar CampaignSuite op draait in.
Klik op Save
Uw website is nu toegevoegd als veilige website om benaderd te worden door bijvoorbeeld Findock.
Koppelen aan CampaignSuite
Als de Connected App is aangemaakt kan u deze koppelen aan CampaignSuite. Doorloop de volgende stappen om dit te doen:
Ga in Wordpress naar Instellingen > CampaignSuite > Salesforce
Klik op Authenticeren
Selecter in de popup of u wilt verbinden met een Sandbox (Test) of met een productie omgeving (Live)
Vul de Connected App Consumer Key en Connected App Consumer Secret in klik op Authenticeren.
Vul in het daarop volgende scherm de login gegevens in van een Salesforce user en log in op Salesforce
Wanneer u vervolgens terugkeert is de verbinding tot stand gebracht en kan u klikken op Sluit venster. De pagina zal dan automatisch vernieuwd worden en zullen de Salesforce instellingen worden getoond.
Instellingen
Wanneer er een verbinding tot stand is gebracht met Salesforce kunnen de volgende instellingen gewijzigd worden binnen CampaignSuite die invloed hebben op de manier waarop CampaignSuite communiceert met het CRM.
Betalingsinstellingen
Payment Connector Selecteer hier uw huidige Payment Connector binnen de Salesforce instantie. Momenteel ondersteunen wij Converse en Findock (v1 en v2).
Payment Endpoint Vul hier het correcte endpoint in wat gebruikt kan worden voor de communicatie met bijvoorbeeld Converse of Findock. Deze instellingen zijn vaak te vinden bij de Site instellingen van uw Salesforce instantie.
SF Account Name Syntax Standaard wordt de Naam van een Account samengesteld door {Contact.FirstName} {Contact.LastName}. Stel in dit veld een andere syntax in als de naam moet afwijken. Bijvoorbeeld Fam. {Contact.MiddleName} {Contact.LastName}.
SF Default Debit Day Wanneer een donateur een machtiging afgeeft is de start datum altijd de dag waarom de donatie wordt gedaan. Als dit een vaste dag van de maand moet zijn, vul dat dan in bij dit veld.
SF After Debit Day to 1st Wanneer hier een nummer van een dag wordt ingevoerd en een donateur geeft een machtiging af op een dag van de maand welke later is dan het opgegeven getal, zal de startdatum van een machtiging ingesteld worden op de 1e van de volgende maand.
Non Debit Campaign Field CampaignSuite bepaalt op basis van de Payment Connector en de Source Connector welke custom velden op er gebruikt moeten worden voor een niet-debetbetaling naar SalesForce. Als dit veld moet afwijken, vul dat dan hier in (bijv. copa__Originating_Campaign__c).
Debit Campaign Field CampaignSuite bepaalt op basis van de Payment Connector en de Source Connector welke custom velden op er gebruikt moeten worden voor een debetbetaling naar SalesForce. Als dit veld moet afwijken, vul dat dan hier in (bijv. copa__Originating_Campaign__c).
Machtiging betalingsvelden Wanneer er een periodieke betaling wordt gedaan, verbergt CampaignSuite automatisch de betaalmethodes Ideal, Paypal, Creditcard, Sofort en Bancontact. Vink hier de methodes aan die niet verborgen moeten worden.
Duplicate Check App Bij financiële en niet-financiële formulieren zal CampaignSuite standaard gebruik maken van de Relation API opties van Converse of Findock. Deze API houdt rekening met de Duplicate Rules van Salesforce. Mits uw instantie beschikt over de Plauti Duplicate Check App, vink dat dan hier aan. Elke verbinding m.b.t. een Contact en/of Account zal eerst via de App lopen. Daarna eventueel via de betalings-API.
Specifieke instellingen voor Duplicate Check
Wanneer CampaignSuite gebruik maakt van de Duplicate Check zal altijd eerst de API aangeroepen worden als er een Contact/Account combinatie moet worden opgeslagen. Het voordeel hiervan is, is dat uw zelf in de instellingen van de Duplicate Check App kunt bepalen wanneer er een duplicaat gevonden wordt of niet. Dit gaat op basis van scores. In deze CampaignSuite instellingen kunt u deze scores bepalen voor een Account en een Contact. Kijk op deze pagina voor meer informatie over het gebruik van scores.
Specifieke Findock instellingen
Als u als Payment Connector Findock heeft, kunt u kiezen uit v1 en v2. Naast deze instelling zijn er ook nog de volgende aanpassingen mogelijk:
Findock Version Geef hier aan of u gebruik wilt maken van v1 of v2 van Findock.
Findock Source Connector Kies hier de door u gebruikte Source Connector in de Findock configuratie.
Paypal Processor Als uw Paypal Processor afwijkt van de standaard, kan u dat hier aangeven. Deze instelling wordt alleen gebruikt met een terugkerende Paypal-betaling in Findock.
Ideal Processor Als uw Ideal Processor afwijkt van de standaard, kan u dat hier aangeven. Deze instelling wordt alleen gebruikt bij een eenmalige Mollie-betaling in Findock.
Findock Target Value Het Target veld is beschikbaar in de API call van Findock. Deze waarde wordt standaard toegevoegd met een machtiging bij een Findock-betaling.
Koppelen aan CampaignSuite
Als de Connected App is aangemaakt kan u deze koppelen aan CampaignSuite. Doorloop de volgende stappen om dit te doen:
Ga in Wordpress naar Instellingen > CampaignSuite > Salesforce
Klik op Authenticeren
Selecter in de popup of u wilt verbinden met een Sandbox (Test) of met een productie omgeving (Live)
Vul de Connected App Consumer Key en Connected App Consumer Secret in klik op Authenticeren.
Vul in het daarop volgende scherm de login gegevens in van een Salesforce user en log in op Salesforce
Wanneer u vervolgens terugkeert is de verbinding tot stand gebracht en kan u klikken op Sluit venster. De pagina zal dan automatisch vernieuwd worden en zullen de Salesforce instellingen worden getoond.
Formulier instellingen
CampaignSuite voegt een drietal extra opties toe aan de instellingen van een formulier. Deze zijn allemaal te vinden onder Instellingen -> Formulierinstellingen -> Formulieropties
Formulier loading-overlay Wanneer u in CampaignSuite heeft ingesteld dat er een witte loading-overlay getoond moet worden voor alle formulieren, dan kunt u hier specifiek bij dit formulier aangeven om dat niet te doen.
Formulier laden tekst Vul hier een tekst in om te tonen wanneer het Gravity Forms formulier aan het laden is.
Formulier laden tekst kleur Kies hier een kleur voor de tekst die wordt getoond aan de hand van een kleurenkiezer.
Formulier laden afbeelding Voer hier optioneel een link in naar een online .gif afbeeldingen om onder de laadtekst te tonen.
Let op
De “laden tekst”, “laden tekst kleur” en “laden afbeelding” werken alleen als u bij de CampaignSuite instellingen onder het tabblad Gravity Forms heeft aangegeven dat er een witte overlay geladen moet worden. Anders zullen de laadtekst en de afbeelding niet getoond worden.
Postcode checker
CampaignSuite heeft een ingebouwde Postcode checker welke gebruikt kan worden in elk Gravity Forms formulier. Standaard staat de Postcode checker al geactiveerd op het CampaignSuite veld Adres (NL). Maar het is ook mogelijk om dit toe te passen op eigen adres velden door middel van Aangepaste CSS-klasse op velden.
Stel uw formulier bevat de velden zoals in de afbeelding hiernaast.
Om de Postcode checker hier op in te stellen moet u voorgedefinieerde CSS-klasseinstellen op elk veld: – zipcode – housenumber – addon – street – city
Stel dat in bij het veld Custom CSS Class:
Als alle vijf de velden goed ingesteld zijn zal de Postcode checker automatisch geactiveerd worden waneer er ten minste een postcode en huisnummer worden ingevuld.
Let op
De Postcode checker wordt niet geactiveerd in de Voorbeeld modus van het formulier in de Wordpress admin.
Velden naast elkaar zetten
Wist u dat je met CSS-klasse nog meer kunt doen? Het is ook mogelijk om losse adresvelden netjes naast elkaar te zetten met de volgende CSS-klasse: – gf_left_third – gf_middle_third – gf_right_third Of als je twee velden naast elkaar wilt zetten: – gf_left_half – gf_right_half Het formulier ziet dan als volgt uit:
Converse
Converse is de voorloper van Findock en maakt het mogelijk om via hun API endpoints Relaties en Transacties naar Salesforce te sturen. Deze dienst maakt het voor CampaignSuite mogelijk om formulier inzendingen als transactie of relatie naar SalesForce te versturen. Het verloop van een dergelijk verzoek kan verschillen als je gebruik maakt van Plauti Duplicate Check of niet. Wanneer u Plauti niet gebruikt ziet de flow van Converse er zo uit:
Gravity Forms stuurt een inzending naar de API van CampaignSuite. Deze bepaalt o.b.v. de velden en waarden die hij binnen krijgt of het een transactie is of niet. Converse heeft aparte endpoints die aangeroepen moeten worden voor een transactie of relatie. In dit scenario zal altijd gekozen worden voor òf de Relation API òf de Transaction API.
Relation API
In dit geval worden er alleen een Account en Contact aangemaakt of aangepast. CampaignSuite krijgt altijd als reactie van de Relation API een Contact ID en een Account ID terug. Deze waarden zijn ook terug te vinden bij de inzending binnen Gravity Forms in de rechter kolom.
Transaction API
Bij een transactie worden ook Contact en Account gegevens naar Converse gestuurd maar ook transactie waarden zoals bedrag, frequentie en betaalmethode. Converse gaat op zijn beurt allerlei acties uitvoeren om het Contact en Account netjes weg te schrijven om vervolgens een betalingsverzoek aan te maken bij de gekoppelde Payment Provider (bijvoorbeeld Mollie of Buckaroo). CampaignSuite krijgt naast een Contact ID en een Account ID ook een Installment ID (bij eenmalige transacties) of Recurring ID (bij periodieke transacties). Deze informatie is altijd terug te vinden bij de inzendingen van Gravity Forms:
Duplicate Rules Salesforce
Bij het gebruik van de Converse Relation API zal Converse gebruik maken van de Salesforce Duplicate Rules die u heeft ingesteld binnen het CRM.
Wanneer u Plauti Duplicate Check gebruikt zal het schema er als volgt uitzien:
Niet financieel
Bij een niet financiële inzending zal CampaignSuite alleen contact maken met de Plauti Duplicate Check App. CampaignSuite ontvangt dan een Contact ID en Account ID en stopt daarna de flow.
Financieel
Eerst zal CampaignSuite via de Plauti Duplicate Check App het Contact en Account afhandelen. Daarna zal CampaignSuite de Transaction API aanroepen met alleen het Contact en Account ID en uiteraard de transactie velden en waarden.
In alle gevallen zullen alle ID’s die CampaignSuite terug krijgt van Converse of de Plauti Duplicate Check App opslaan bij de inzending.
Webhook betalingsstatus
In tegenstelling tot Findock heeft Converse geen automatische Webhook die ervoor zorgt dat CampaignSuite een seintje krijgt van Salesforce als er een wijziging plaatsvindt in de status van een Installment. Daarom zal CampaignSuite een uur lang elke vijf minuten de status ophalen van het aangemaakt Installment. Zodra dit Collected is zal CampaignSuite stoppen met controleren. Op deze manier zorgt CampaignSuite er voor dat de status van de betalingen in Gravity Forms gelijk zijn aan de betalingen in Salesforce.
URL parameters
U kunt in de URL van uw website diverse parameters toevoegen om debug opties te activeren van CampaignSuite. Hiermee is het bijvoorbeeld mogelijk om de call richting de CampaignSuite API of Converse en Findock te debuggen.
Mogelijke parameters zijn:
?cs_debug
https://www.website.nl/formulier?cs_debug=true
Wanneer deze parameter wordt toegevoegd, wordt automatisch een formulier geladen zonder ajax. Wanneer het formulier is ingevuld, ziet u de JSON die naar de CampaignSuite API wordt verzonden. Het toont u ook de JSON die vanuit de API naar Salesforce wordt verzonden. Dit alles voordat Gravity Forms de invoer daadwerkelijk maakt.
?cs_post=true
https://www.website.nl/formulier?cs_post=true
Wanneer deze parameter wordt toegevoegd, toont elke pagina u de geposte waarden. Dit kan handig zijn als u de exacte geposte veldnamen wilt weten. Deze namen kunnen worden gebruikt in tekstgebied- en HTML-velden om vooraf te vullen met die veldwaarden.
?cs_ajax
https://www.website.nl/formulier?cs_ajax=false
Gebruik deze parameter om een Gravity Forms Ajax-instelling te overrulen met true of false.
Het ID wat in deze parameter wordt doorgegeven, moet een Salesforce-contactpersoon-ID zijn. Als de contactpersoon wordt gevonden in Salesforce, worden alle toegewezen contactpersoon- en accountvelden vooraf ingevuld met de waarden van Salesforce.
cs_get_feed_actions
Beschrijving
Met dit filter kunt u aangepaste feedacties toevoegen aan Gravity Forms.
A Connected App within Salesforce ensures that you can set up an authorized connection in a secure way to send data back and forth. This connection is established through oAuth .
Follow the steps below to add the Connected App to SalesForce.
Go to Salesforce Setup and search for App .
Then click on App manager in the search results
Click on New Connected App in the top right corner
Enter a Connected App Name and a contact email address.
Check the checkbox Enable OAuth Settings under the heading API (Enable OAuth Settings)
Enter the following link at Callback URL : https://api.campaignsuite.nl/v1/token/salesforce/register This link can be found in the CampaignSuite settings under the Salesforce tab:
Add the following 2 rights to Selected OAuth Scopes : – Access and manage your data (api) – Perform requests on your behalf at any time (refresh_token, offline_access)
Click on save at the bottom of the page
It can take an average of 10 minutes for settings to be processed in Salesforce. In the meantime, copy the Consumer Key and Consumer Secret from the newly created App. We will soon set this up at CampaignSuite.
Remote Site
Findock uses Webhooks. To make your website accessible within Salesforce, the URL of your website must be added to the Remote Site Settings . To do this, follow the steps below:
Go to Salesforce Setup and search for R emote .
Then click Remote Site Settings in the search results.
Click on New Remote Site
Enter a name and the URL of your website running CampaignSuite.
Click on Save
Your website has now been added as a secure website to be accessed by, for example, Findock.
Connect to CampaignSuite
Once the Connected App has been created, you can link it to CampaignSuite. Go through the following steps to do this:
In Wordpress go to Settings > CampaignSuite > Salesforce
Click on Authenticate
Select in the popup whether you want to connect to a Sandbox (Test) or to a production environment (Live)
Enter the Connected App Consumer Key and Connected App Consumer Secret and click Authenticate.
In the next screen enter the login details of a Salesforce user and log in to Salesforce
When you return the connection is established and you can click on Close window. The page will then be refreshed automatically and the Salesforce settings will be shown.
Settings
When a connection is established with Salesforce, the following settings can be changed within CampaignSuite that affect the way CampaignSuite communicates with the CRM.
Payment settings
Payment Connector Select your current Payment Connector within the Salesforce instance here. We currently support Converse and Findock (v1 and v2).
Payment Endpoint Enter the correct endpoint here which can be used for communication with, for example, Converse or Findock. These settings can often be found at the Site settings of your Salesforce instance.
SF Account Name Syntax By default, the Name of an Account is composed by {Contact.FirstName} {Contact.LastName} . Set a different syntax in this field if the name must be different. For example Fam. {Contact.MiddleName} {Contact.LastName}.
SF Default Debit Day When a donor issues an authorization, the start date is always the day the donation is made. If this should be a fixed day of the month, enter it in this field.
SF After Debit Day to 1st When a number of a day is entered here and a donor issues an authorization on a day of the month that is later than the specified number, the start date of an authorization will be set to the 1st of the following month.
Non Debit Campaign Field CampaignSuite determines on the basis of the Payment Connector and the Source Connector which custom fields should be used for a non-debit payment to SalesForce. If this field needs to be different, enter it here (e.g. copa__Originating_Campaign__c) .
Debit Campaign Field CampaignSuite determines based on the Payment Connector and the Source Connector which custom fields should be used for a debit payment to SalesForce. If this field needs to be different, enter it here (e.g. copa__Originating_Campaign__c) .
Payment field authorization When a recurring payment is made, CampaignSuite automatically hides the payment methods Ideal, Paypal, Creditcard, Sofort and Bancontact. Check here the methods that should not be hidden.
Duplicate Check App For financial and non-financial forms, CampaignSuite will by default use the Relation API options from Converse or Findock. This API takes into account the Salesforce Duplicate Rules. Provided your organization has the Plauti Duplicate Check App, tick it here. Every connection with regard to a Contact and / or Account will first go through the App. Then possibly via the payment API.
Specific settings for Duplicate Check
When CampaignSuite uses the Duplicate Check, the API will always be called first if a Contact / Account combination has to be stored. The advantage of this is that you can determine in the settings of the Duplicate Check App when a duplicate is found or not. This is based on scores. In these CampaignSuite settings you can determine these scores for an Account and a Contact. See this page for more information on using scores.
Specific Findock settings
If your Payment Connector has Findock, you can choose from v1 and v2 . In addition to this setting, the following adjustments are also possible:
Findock Version Indicate here whether you want to use Findock v1 or v2.
Findock Source Connector Select the Source Connector you are using in the Findock configuration.
Paypal Processor If your Paypal Processor deviates from the standard, you can indicate this here. This setting is only used with a recurring Paypal payment in Findock.
Ideal Processor If your Ideal Processor deviates from the standard, you can indicate this here. This setting is only used with a one-time Mollie payment in Findock.
Findock Target Value The Target field is available in Findock’s API call. This value is added by default with a Findock payment authorization.
Connect to CampaignSuite
Once the Connected App has been created, you can link it to CampaignSuite. Go through the following steps to do this:
In Wordpress go to Settings > CampaignSuite > Salesforce
Click on Authenticate
Select in the popup whether you want to connect to a Sandbox (Test) or to a production environment (Live)
Enter the Connected App Consumer Key and Connected App Consumer Secret and click Authenticate.
In the next screen enter the login details of a Salesforce user and log in to Salesforce
When you return the connection is established and you can click on Close window. The page will then be refreshed automatically and the Salesforce settings will be shown.
Form settings
CampaignSuite adds three extra options to the settings of a form. These can all be found under Settings -> Form settings -> Form options
Form loading overlay If you have set in CampaignSuite to show a white loading overlay for all forms, you can specify here specifically with this form not to do so.
Load form text Enter a text here to show when the Gravity Forms form is loading.
Load form text color Choose a color here for the text that will be displayed using a color picker.
Load form image Optionally enter a link here to an online .gif image to display below the loading text.
Notice
The “load text”, “load text color” and “load image” only work if you have indicated in the CampaignSuite settings under the tab Gravity Forms that a white overlay must be loaded. Otherwise the loading text and image will not be displayed.
Zipcode checker
CampaignSuite has a built-in Zipcode checker which can be used in any Gravity Forms form. By default, the Zipcode checker is already activated in the CampaignSuite field Address (NL) . But it is also possible to apply this to custom address fields using Custom CSS class on fields.
Suppose your form contains the fields as in the image on the right.
To set the Zipcode checker to this, you must set predefined CSS-class on each field: – zipcode – housenumber – addon – street – city
Set this in the field in the Appearance tab:
If all five fields are set correctly, the Zipcode checker will be automatically activated when at least one postcode and house number are entered.
Note
The Zipcode checker is not activated in the Preview mode of the form in the Wordpress admin.
Align field next to each other
Did you know that you can do even more with CSS class ? It is also possible to neatly put separate address fields next to each other with the following CSS class: – gf_left_third – gf_middle_third – gf_right_third Or if you want to put two fields next to each other: – gf_left_half – gf_right_half The form will then look like this:
Converse
Converse is the predecessor of Findock and makes it possible to send Relations and Transactions to Salesforce endpoints via their API. This service makes it possible for CampaignSuite to send form submissions as a transaction or relation to SalesForce. The course of such a request may differ if you use Plauti Duplicate Check or not. When you are not using Plauti, the flow of Converse looks like this:
Gravity Forms sends a submission to the CampaignSuite API. This determines on the basis of the fields and values it receives whether it is a transaction or not. Converse has separate endpoints that must be called for a transaction or relationship. In this scenario, either the Relation API or the Transaction API will always be chosen.
Relation API
In this case, only an Account and Contact will be created or modified. CampaignSuite always receives a Contact ID and an Account ID in response from the Relation API. These values can also be found in the submission within Gravity Forms in the right column.
Duplicate Rules Salesforce
When using the Converse Relation API, Converse will use the Salesforce Duplicate Rules that you have set within the CRM.
When using Plauti Duplicate Check the scheme will look like this:
Not financial
For a non-financial submission, CampaignSuite will only contact the Plauti Duplicate Check App. CampaignSuite will then receive a Contact ID and Account ID and then the flow will stop.
Financial
First, CampaignSuite will handle the Contact and Account via the Plauti Duplicate Check App. After that CampaignSuite will call the Transaction API with only the Contact and Account ID and of course the transaction fields and values.
In all cases, all IDs that CampaignSuite gets back from Converse or the Plauti Duplicate Check App will save with the submission.
Webhook Payment Status
Unlike Findock, Converse does not have an automatic Webhook that causes CampaignSuite to notify from Salesforce when there is a change in the status of an Installment. Therefore, CampaignSuite will fetch the status of the created Installment every five minutes for an hour. Once this is Collected CampaignSuite will stop checking. In this way, CampaignSuite ensures that the status of the payments in Gravity Forms are the same as the payments in Salesforce.
Wordpress filters are built in at various places in the CampaignSuite code. These make it possible as a developer in the theme to influence the data that is currently used by CampaignSuite.
All filters are best placed in the functions.php of your theme. Click on the articles below to view the different filters.
Actions
URL parameters
You can add various parameters in the URL of your website to activate debugging options of CampaignSuite. This makes it possible, for example, to debug the call to the CampaignSuite API or Converse and Findock.
Possible parameters are:
?cs_debug
https://www.website.nl/formulier?cs_debug=true
When this parameter is added, a form is automatically loaded without ajax. When the form is completed, you will see the JSON sent to the CampaignSuite API. It also shows you the JSON sent from the API to Salesforce. All this before Gravity Forms actually makes the input.
?cs_post=true
https://www.website.nl/formulier?cs_post=true
When this parameter is added, each page will show you the posted values. This can be useful if you want to know the exact field names posted. These names can be used in text area and HTML fields to prefill with those field values.
?cs_ajax
https://www.website.nl/formulier?cs_ajax=false
Use this parameter to overrule a Gravity Forms Ajax setting with true or false.
The ID passed in this parameter must be a Salesforce contact ID. If the contact is found in Salesforce, all assigned contact and account fields are pre-populated with the Salesforce values.
Client connections
As a developer you have the disposal to use the authorized connections in your own theme. There are a number of predefined functions that you can use per connection. Always start each connection in the following way first:
View the articles below to see the available function per connection.
Endpoints
When CampaignSuite is activated, a number of new endpoints will be added within Wordpress. These endpoints can be accessed by third party software. These endpoints are explained below with the associated parameters.
gp_webhook_path
This endpoint can be accessed by Findock and handles all webhook calls related to changes to a payment (or in the case of Findock 2 changes in the PaymentIntent). CampaignSuite automatically determines whether it is for Findock v1 or v2 based on the content of the call. With every API call to Findock, CampaignSuite automatically adds this URL as WebhookURL.
Example
One-click payment is a way to make a direct donation via a URL where the visitor is redirected to his / her bank page in one go. The advantage of this is that the complete flow is identical to filling in a donation form, but without going through the page containing the form.
In order for One-Click-Payment to work, you must at least meet the following points:
A form must be created which is fully linked to a Salesforce payment
The form must be on a page (hidden if necessary) in case the donor terminates his / her donation.
A thank you message or thank you page must be set up for successful donor capture.
The fields of the form you want to fill must be set to be filled dynamically. Read more information about this at this website .
If the above points are set, the URL for a One-Click-Payment can look like this:
There are a number of mandatory parameters in the URL:
amount
Enter the amount for the donation here
form_id
Enter the ID of the Gravity Forms form where the payment should be handled here
contact (optional)
Enter an ID of a Salesforce Contact
here
If you do not include a Salesforce Contact ID in the URL, a first name, last name, and email address are also required to include in the URL.
As soon as you click on the link, the form will be pre-filled with the required values and sent via the API. If fields are missing or errors occur, they will be displayed immediately.
URL parameters
You can add various parameters in the URL of your website to activate debugging options of CampaignSuite. This makes it possible, for example, to debug the call to the CampaignSuite API or Converse and Findock.
Possible parameters are:
?cs_debug
https://www.website.nl/formulier?cs_debug=true
When this parameter is added, a form is automatically loaded without ajax. When the form is completed, you will see the JSON sent to the CampaignSuite API. It also shows you the JSON sent from the API to Salesforce. All this before Gravity Forms actually makes the input.
?cs_post=true
https://www.website.nl/formulier?cs_post=true
When this parameter is added, each page will show you the posted values. This can be useful if you want to know the exact field names posted. These names can be used in text area and HTML fields to prefill with those field values.
?cs_ajax
https://www.website.nl/formulier?cs_ajax=false
Use this parameter to overrule a Gravity Forms Ajax setting with true or false.
The ID passed in this parameter must be a Salesforce contact ID. If the contact is found in Salesforce, all assigned contact and account fields are pre-populated with the Salesforce values.
cs_get_feed_actions
Description
This filter allows you to add custom feed actions to Gravity Forms.
$actions (array) This is an array of the available actions. You can add more elements to this array for custom actions.
Example
function get_feed_actions($actions)
{
$extraActions = [[
'label' => 'Maak een nieuwe Lead aan',
'value' => 'custom_lead',
'object' => 'Lead',
'objectName' => 'Lead'
]];
return array_merge($actions, $extraActions);
}
Dynamische content in e-mails
Marketing Cloud kan e-mails versturen in een Transactioneel E-mail event. In deze mails is het technisch mogelijk om dynamisch content te zetten wat ingesteld kan worden bij het formulier. Het is hierbij wel noodzakelijk dat u deze technische oplossing in Marketing Cloud hebt ingesteld. Mocht u interesse hebben in deze feature, neem dan contact met ons op.
Voer onderstaande stappen uit om dynamische content in te stellen voor Marketing Cloud E-mails:
Ga naar de Instellingen van het formulier en klik op het tabblad MC Email Content.
Vul een unieke identifier in voor de connectie tussen Marketing Cloud en CampaignSuite. Deze waarde mag geen spaties bevatten maar alleen kleine letters. Later is het ook mogelijk om deze identifier te mappen aan een Marketing Cloud veld bij een Feed actie.
Vul de tekst in die op de plek in de e-mail moet worden gezet.
Kies eventueel ook een afbeelding die gebruikt kan worden in de e-mail.
Klik op Instellingen opslaan om alles op te slaan
Technisch is het nu mogelijk om via de Endpoints die getoond worden in dit tabblad deze dynamische content te gebruiken in e-mails van Marketing Cloud.
Mappen van unieke identifier
Wanneer u een unieke identifier heeft ingevuld kan u dit veld mappen aan een Data Extensie veld bij de Marketing Cloud Feed acties:
Deze functie biedt dus de manier om heel dynamisch de content van een e-mail uit Marketing Cloud dynamisch te vullen met informatie uit het formulier.
Dynamic content in emails
Marketing Cloud can send emails in a Transactional Email event. In these emails it is technically possible to use dynamic content that can be set in the form. However, it is necessary that you have set up this technical solution in Marketing Cloud. If you are interested in this feature, please contact us.
Follow the steps below to set up dynamic content for Marketing Cloud Emails:
Go to the Settings of the form and click on the MC Email Content tab.
Enter a unique identifier for the connection between Marketing Cloud and CampaignSuite. This value cannot contain spaces, only lowercase letters. Later it is also possible to map this identifier to a Marketing Cloud field with a Feed action.
Enter the text to be placed in the email.
You can also choose an image that can be used in the email.
Click on Save Settings to save everything
Technically it is now possible to use this dynamic content in emails from Marketing Cloud via the Endpoints shown in this tab.
Mapping of unique identifier
When you have entered a unique identifier you can map this field to a Data Extension field in the Marketing Cloud Feed actions:
So this feature provides the way to dynamically populate the content of an email from Marketing Cloud with information from the form very dynamically.
Nieuwe meting aanmaken
Om een nieuw meet moment aan te maken open je een formulier in WordPress en ga je naar Instellingen -> Metingen. Klik vervolgens op de knop Nieuwe toevoegen. Dit opent een nieuw venster met de volgende opties:
Actie naam Vul hier een herkenbare naam in binnen het systeem. Deze naam zal niet getoond worden op de website of in een waarde van een meting.
Type event Kies hier uit één van de zes momenten waarop de meting moet plaatsvinden. Elk moment kan een Client Side call, een Server Side call of beiden uitvoeren. De momenten waaruit je kunt kiezen zijn:
Bij het laden van een formulier pagina Dit is het moment waarop een Gravity Forms-pagina wordt geladen. Dit is niet de WordPress-pagina waarop het formulier wordt geladen, maar de pagina/stap in het Gravity Form.
Bij het versturen van een formulier pagina Dit is het moment waarop een Gravity Forms-pagina/stap wordt ingediend. Op het moment dat u op de knop Volgende of Verzenden drukt, wordt deze gebeurtenis geactiveerd.
Bij het versturen van het complete formulier Dit is het moment waarop een Gravity Forms-formulier wordt ingediend. Deze gebeurtenis wordt pas geactiveerd na de laatste pagina wanneer uw formulier uit meerdere pagina’s bestaat.
Bij de formulier bevestigingstekst of pagina Deze gebeurtenis wordt geactiveerd wanneer een bezoeker op de bevestigingstekst of de bevestigingspagina terechtkomt. Wanneer u doorverwijst naar een interne pagina, wordt deze trigger uitgevoerd wanneer de WordPress-pagina wordt geladen. Wanneer u naar een externe URL doorverwijst, wordt deze trigger geactiveerd op de gebeurtenis: ‘Bij het versturen van het complete formulier’.
Na een webhook call van Findock v2 Deze gebeurtenis wordt geactiveerd bij een webhook-aanroep van Findock v2.0. Dit wordt ook wel de ‘Matched’ webhook genoemd en wordt geactiveerd wanneer een betalingsintentie wordt verwerkt. Dit moment ondersteunt alleen maar Server Side calls.
Na een succesvolle betaling Deze gebeurtenis wordt geactiveerd wanneer een betaling in Gravity Forms is ingesteld op succesvol. Dit moment ondersteunt alleen maar Server Side calls.
Aanbieders Kies hier welke aanbieders je iets wilt laten meten op het aangegeven moment. De opties hier zijn:
Facebook Dit is de Facebook Conversion API. De Conversions API is ontworpen om een directe verbinding te creëren tussen je marketinggegevens en de systemen die je helpen je advertentietargeting te optimaliseren, de kosten per actie te verlagen en resultaten te meten op Meta-technologieën. Deze aanbieder heeft alleen de mogelijkheid om Server Side calls uit te voeren. Om gebruik te maken van deze aanbieder moet je een Pixel ID en een Access token invullen bij de CampaignSuite instellingen.
Google Analytics 4 GA4 heeft de mogelijkheid om Client Side en Server Side calls uit te voeren. De Client Side calls maken gebruik van de datalayer.push() en de gtag() functies. De Server Side calls maken gebruik van het GA4 Measurement Protocol. Tevens kunnen hiermee e-commerce calls gemaakt worden. Om gebruik te kunnen maken van het GA4 Measurement Protocol moet je een Measurement ID en API secret invullen bij de CampaignSuite instellingen.
Squeezely Met Squeezely maak je out-of-the-box de meest geavanceerde buyer journeys en personalisatietoepassingen. Je werkt op basis van loepzuivere data en kan alles helemaal naar eigen inzicht inrichten. Deze aanbieder kan Client Side en Server Side calls maken. De Client Side calls maken gebruik van een datalayer.push() functie. De Server Side calls worden direct naar de API van Squeezely gestuurd. Om dit te kunnen gebruiken moet een Account ID en API-sleutel invullen bij de CampaignSuite instellingen.
Google Tag Manager Deze aanbieder ondersteunt Client Side calls en Server Side calls. De Client Side calls maken gebruik van de datalayer.push() functie. De Server Side calls zijn alleen beschikbaar als er een GTM SST URL is ingevuld in de CampaignSuite instellingen. Deze URL moet een link zijn naar een Google Tag Manager container die de verschillende paramaters kan afvangen in GTM.
Feed voorwaarde Het is tevens mogelijk om deze Feed actie conditioneel te maken. Dat houdt in dat de feed alleen zal worden uitgevoerd als er aan bepaalde condities wordt voldaan.
Als alle instellingen zijn gedaan klik je op Refresh om de mapping te tonen van de gekozen aanbieders. Deze mapping is nodig om het systeem te laten weten welke data waar te vinden is in het formulier. Kijk verder bij het artikel Mapping om te ontdekken welke mogelijkheden er zijn.
Create new measurement
To create a new measurement moment, open a form in WordPress and go to Settings -> Measurements. Then click the Add new button. This will open a new window with the following options:
Action name Enter a recognizable name within the system here. This name will not be displayed on the website or in a measurement value.
Type of event Choose here from one of the six moments at which the measurement should take place. An event can make a Client Side call, a Server Side call, or both. The moments you can choose from are:
On form page load This is the moment a Gravity Forms page is loaded. This is not the WordPress page the form is loaded on, but the page/step inside the Gravity Form.
On form page submit This is the moment a Gravity Forms page/step is submitted. The moment you press on the next or submit button, this event is triggered.
On complete form submit This is the moment a Gravity Forms form is submitted. This event will only trigger after the last page when your form consists of several pages.
On form confirmation text or page This event is triggered when a visitor ends up on the confirmation text or the confirmation page. When you redirect to an internal page, this trigger will be executed when the WordPress page is loaded. When you redirect to an external URL, this trigger will fire on the event: ‘On complete form submit’.
On Findock v2 webhook call This event is triggered on a webhook call from Findock v2.0. This is also called the ‘Matched’ webhook and is fired when a Payment Intent is processed.
After a successful payment This event is triggered when a payment in Gravity Forms is set to successful.
Providers Choose here which providers you want to have something measured on the specified event. The options here are:
Facebook This is the Facebook Conversion API. The Conversions API is designed to create a direct connection between your marketing data and the systems that help you optimize ad targeting, reduce cost per action, and measure results on Meta technologies. This provider only has the ability to perform Server Side calls. To use this provider, you need to enter a Pixel ID and an Access token in the CampaignSuite settings.
Google Analytics 4 GA4 can create Client Side and Server Side calls. The Client Side calls use the datalayer.push() and the gtag() functions. The Server Side calls use the GA4 Measurement Protocol. E-commerce calls can also be made with this. To use the GA4 Measurement Protocol you must enter a Measurement ID and API secret in the CampaignSuite settings.
Squeezely With Squeezely you can create the most advanced buyer journeys and personalization applications out-of-the-box. You work on the basis of flawless data and you can set it up entirely to your own liking. This provider can make Client Side and Server Side calls. The Client Side calls use a datalayer.push() function. The Server Side calls are sent directly to Squeezely’s API. To use this, you must enter an Account ID and API key in the CampaignSuite settings.
Google Tag Manager This provider supports Client Side calls and Server Side calls. The Client Side calls use the datalayer.push() function. The Server Side calls are only available if a GTM SST URL is entered in the CampaignSuite settings. This URL must be a link to a Google Tag Manager container that can capture the various parameters in GTM.
Feed condition It is also possible to make this Feed action conditional. This means that the feed will only be executed if certain conditions are met.
When all settings are done, click on Refresh to display the mapping of the chosen providers. This mapping is necessary to let the system know which data can be found where in the form. Look further at the article Mapping to discover the possibilities.
Voorbereiden van de installatie in GTM
Deze gids legt uit hoe je variabelen en triggers definieert, en hoe je evenementen instelt om formulierinteracties te volgen. Met deze instellingen kun je gebruikersacties en gegevenswijzigingen dynamisch vanuit je formulieren naar GA4 verzenden voor nauwkeurige meting en analyse.
1. Variabelen definiëren
Wat zijn variabelen in GTM?
Variabelen in GTM stellen je in staat om waarden (bijv. donation_amount, email_opt_in) uit de dataLayer of pagina-elementen te halen. Deze waarden kunnen vervolgens worden meegegeven als parameters in gebeurtenissen (zoals die naar GA4 worden verzonden).
Stappen om dataLayer-variabelen te maken in GTM:
Ga naar het tabblad Variabelen in GTM.
Klik op Nieuw → Geef de variabele een naam.
Kies Variabel Type: Data Layer Variabele
Voer in het veld Naam Data Layer Variabele de exacte sleutelnaam in:
Voorbeeld: donation_amount
Sla daarna de variabele op.
2. Stel gebeurtenistriggers in
Stappen om een trigger aan te maken in GTM:
Ga naar GTM → Triggers → Klik op Nieuw,
Geef je trigger een duidelijke naam, bijvoorbeeld Trigger – Formulier Verzonden (formulier_verzonden123)
Kies het type trigger
Trigger Type: Aangepast evenement
Configureer de trigger voor het aangepaste evenement
Eventnaam – form_submitted_1234 (schrijf hier jouw eventnaam)
Deze trigger wordt geactiveerd bij: Alle aangepaste evenementen (of kies “Sommige” om voorwaarden toe te voegen)
Als je wilt beperken wanneer de trigger afgaat, kies dan:
Sommige aangepaste evenementen
Voorbeeld van een voorwaarde:
formId is gelijk aan 123
OF een andere Data Layer-variabele die je controleert
Sla daarna en gebeurtenistriggers op.
3. Maak het evenement aan
Stappen om een GA4 event-tag aan te maken in GTM:
Ga naar GTM → Tags → Klik op Nieuw
Geef je tag een duidelijke naam
Stel het tagtype in op: Google Analytics: GA4 Event
Configuratietag: Kies je bestaande GA4-configuratietag
(Deze bevat jouw G-XXXXXXXXXX Measurement ID)
Stel de evenementnaam in
Evenementnaam:
Voorbeeld: form_submitted
(Dit is wat je later in GA4 terugziet)
Voeg event-variabelen toe
Zorg ervoor dat je deze Data Layer-variabelen al hebt aangemaakt.
Je kunt nu je trigger koppelen aan je GA4 Event-tag.
Sla het op
4. Publish changes
Stappen om wijzigingen te publiceren in GTM:
Open je container in GTM
Selecteer je account en container.
Controleer op niet-opgeslagen wijzigingen
Bovenaan zie je:
Indicator voor werkruimtewijzigingen.
Dit betekent dat je tags, triggers of variabelen hebt die nog niet zijn gepubliceerd.
Klik op Verzenden (rechtsboven)
Er opent een nieuw paneel om je container te publiceren.
Configureer versiegegevens
Versienaam: (optioneel, maar aanbevolen)
Voorbeeld: GA4 Event Tracking voor formulierinzendingen
Versiebeschrijving: (optioneel)
Voorbeeld: Tag toegevoegd om het form_submitted_1234-event naar GA4 te sturen met aangepaste parameters.
Klik op Publiceren
GTM maakt een nieuwe containerversie aan en zet je wijzigingen live.
Dit zorgt ervoor dat je tag-, trigger- en variabelewijzigingen actief zijn op je site.
Controleer gepubliceerde versies
Ga naar: Admin > Versies om eerdere versies te bekijken of terug te draaien indien nodig.
Bevestig dat het werkt:
Gebruik de preview-modus om je tags te testen vóór publicatie.
Gebruik GA4 DebugView en realtime rapporten om te controleren of de events en parameters correct binnenkomen.
Use Preview mode to test your tags before publishing.
Use GA4 DebugView and Realtime Reports to verify the events and parameters arrive correctly.
Preparing installation in GTM
This guide explains how to define variables and triggers, and how to set up events to track form interactions. These settings enable you to dynamically send user actions and data changes from your forms to GA4 for accurate measurement and analysis.
1. Define Variables
What are variables in GTM?
Variables in GTM allow you to extract values (e.g., donation_amount, email_opt_in) from the dataLayer or page elements. These values can then be passed as parameters in events (such as those sent to GA4).
Steps to create data layer variables in GTM:
Go to Variables tab in GTM.
Click New → Name the variable.
Choose Variable Type: Data Layer Variable
In the Data Layer Variable Name field, enter the exact key name:
Example: donation_amount
Then save variable.
2. Setup Event Triggers
Steps to create trigger in GTM:
Go to GTM → Triggers → Click New,
Name your trigger clearly, like Trigger – Form Submitted (form_submitted123)
Choose Trigger Type
Trigger Type: Custom Event
Configure Custom Event Trigger
Event Name – form_submitted_1234(write your event name)
This trigger fires on:All Custom Events(or select “Some” to add conditions)
If you want to limit when it fires, choose:
Some Custom Events
Condition example:
formIdequals123
OR any other Data Layer variable you’re checking
Save it.
3. Create Event
Steps to create GA4 event tag in GTM:
Go to GTM → Tags → Click New
Name your tag clearly
Set tag Type: Google Analytics: GA4 Event
Configuration Tag: Choose your existing GA4 Configuration Tag
(It has your G-XXXXXXXXXX Measurement ID)
Configure Event Name
Event Name:
Example: form_submitted
(This is what you’ll see in GA4 later)
Add Event Variables
Make sure you’ve already created these Data Layer Variables.
You can now attach your trigger to your GA4 Event Tag.
Save it
4. Publish changes
Steps to publish changes in GTM:
Open Your Container in GTM
Select your account and container.
Check for Unsaved Changes
At the top, you’ll see:
Workspace Changes indicator.
This means you have unpublished tags, triggers, or variables.
Click Submit (Top Right)
A new panel will open to publish your container.
Configure Version Details
Version Name: (Optional but recommended) Example: GA4 Event Tracking for Form Submissions
Version Description: (Optional) Example: Added tag to send form_submitted_1234 event to GA4 with custom parameters.
Click Publish
GTM will create a new container version and deploy your changes.
This makes your tag, trigger, and variable changes live on your site.
Check Published Versions
Go to: Admin > Versions to view or roll back previous versions if needed.
Confirm It Works:
Use Preview mode to test your tags before publishing.
Use GA4 DebugView and Realtime Reports to verify the events and parameters arrive correctly.
Instellingen
Wanneer er een verbinding tot stand is gebracht met Salesforce kunnen de volgende instellingen gewijzigd worden binnen CampaignSuite die invloed hebben op de manier waarop CampaignSuite communiceert met het CRM.
Betalingsinstellingen
Payment Connector Selecteer hier uw huidige Payment Connector binnen de Salesforce instantie. Momenteel ondersteunen wij Converse en Findock (v1 en v2).
Payment Endpoint Vul hier het correcte endpoint in wat gebruikt kan worden voor de communicatie met bijvoorbeeld Converse of Findock. Deze instellingen zijn vaak te vinden bij de Site instellingen van uw Salesforce instantie.
SF Account Name Syntax Standaard wordt de Naam van een Account samengesteld door {Contact.FirstName} {Contact.LastName}. Stel in dit veld een andere syntax in als de naam moet afwijken. Bijvoorbeeld Fam. {Contact.MiddleName} {Contact.LastName}.
SF Default Debit Day Wanneer een donateur een machtiging afgeeft is de start datum altijd de dag waarom de donatie wordt gedaan. Als dit een vaste dag van de maand moet zijn, vul dat dan in bij dit veld.
SF After Debit Day to 1st Wanneer hier een nummer van een dag wordt ingevoerd en een donateur geeft een machtiging af op een dag van de maand welke later is dan het opgegeven getal, zal de startdatum van een machtiging ingesteld worden op de 1e van de volgende maand.
Non Debit Campaign Field CampaignSuite bepaalt op basis van de Payment Connector en de Source Connector welke custom velden op er gebruikt moeten worden voor een niet-debetbetaling naar SalesForce. Als dit veld moet afwijken, vul dat dan hier in (bijv. copa__Originating_Campaign__c).
Debit Campaign Field CampaignSuite bepaalt op basis van de Payment Connector en de Source Connector welke custom velden op er gebruikt moeten worden voor een debetbetaling naar SalesForce. Als dit veld moet afwijken, vul dat dan hier in (bijv. copa__Originating_Campaign__c).
Machtiging betalingsvelden Wanneer er een periodieke betaling wordt gedaan, verbergt CampaignSuite automatisch de betaalmethodes Ideal, Paypal, Creditcard, Sofort en Bancontact. Vink hier de methodes aan die niet verborgen moeten worden.
Duplicate Check App Bij financiële en niet-financiële formulieren zal CampaignSuite standaard gebruik maken van de Relation API opties van Converse of Findock. Deze API houdt rekening met de Duplicate Rules van Salesforce. Mits uw instantie beschikt over de Plauti Duplicate Check App, vink dat dan hier aan. Elke verbinding m.b.t. een Contact en/of Account zal eerst via de App lopen. Daarna eventueel via de betalings-API.
Specifieke instellingen voor Duplicate Check
Wanneer CampaignSuite gebruik maakt van de Duplicate Check zal altijd eerst de API aangeroepen worden als er een Contact/Account combinatie moet worden opgeslagen. Het voordeel hiervan is, is dat uw zelf in de instellingen van de Duplicate Check App kunt bepalen wanneer er een duplicaat gevonden wordt of niet. Dit gaat op basis van scores. In deze CampaignSuite instellingen kunt u deze scores bepalen voor een Account en een Contact. Kijk op deze pagina voor meer informatie over het gebruik van scores.
Specifieke Findock instellingen
Als u als Payment Connector Findock heeft, kunt u kiezen uit v1 en v2. Naast deze instelling zijn er ook nog de volgende aanpassingen mogelijk:
Findock Version Geef hier aan of u gebruik wilt maken van v1 of v2 van Findock.
Findock Source Connector Kies hier de door u gebruikte Source Connector in de Findock configuratie.
Paypal Processor Als uw Paypal Processor afwijkt van de standaard, kan u dat hier aangeven. Deze instelling wordt alleen gebruikt met een terugkerende Paypal-betaling in Findock.
Ideal Processor Als uw Ideal Processor afwijkt van de standaard, kan u dat hier aangeven. Deze instelling wordt alleen gebruikt bij een eenmalige Mollie-betaling in Findock.
Findock Target Value Het Target veld is beschikbaar in de API call van Findock. Deze waarde wordt standaard toegevoegd met een machtiging bij een Findock-betaling.
Mautic
CampaignSuite kan gekoppeld worden met het Marketing Automation pakket Mautic. Als de koppeling gelegd is kan u Gravity Forms formulieren koppelen aan Mautic formulieren. De velden in de Mautic formulieren koppelt u dan vervolgens weer aan Mautic Contact velden. Op deze manier kunnen Leads aangemaakt worden via CampaignSuite door Gravity Forms.
Als uw website ook de Mautic pixel inlaadt, zorgt CampaignSuite ervoor dat de inzending gekoppeld zal worden een mogelijk bestaand Mautic contact o.b.v. het Mautic ID (mtcid). Op deze manier kunnen inzendingen automatisch gekoppeld worden aan bestaande of nieuwe Mautic contacten.
Om de Mautic connectie actief te krijgen hoeft u maar één handeling uit te voeren in Mautic:
De verbinding met Mautic wordt opgezet middels een OAuth 2 connectie. Voer onderstaande stappen uit om dit in te stellen:
Log in bij Mautic en klik op het radar-icoon rechts bovenin
Ga vervolgens naar API Verificatiegegevens
Klik op Nieuw in de rechter bovenhoek
Kies bij Autorisatie Protocol voor OAuth 2
Vul een voor u herkenbare naam in voor de connectie
Vul bij het laatste veld de volgende waarde in: https://api.campaignsuite.nl/v1/token/mautic/register Deze URL staat ook bij de instellingen van CampaignSuite.
Klik op Opslaan & sluiten
Kopieer in het daarop volgende scherm de Publieke Sleutel en Geheime Sleutel.
Ga nu naar de tab Mautic in de CampaignSuite instellingen en klik op Authenticeren.
Vul in dit scherm de URL in van uw Mautic instantie en de zojuist gekopieerde Public Key en Secret Key.
Klik al laatste op Authenticeren om bij het inlogscherm van Mautic te komen. Log in met uw inloggegevens om de verbinding te bevestigen.
Er is nu succesvol een connectie gemaakt met uw Mautic instantie.
Mautic instellingen
Het is aan te raden om dezelfde velden in het Gravity Forms formulier te hebben als het Mautic formulier. Maar u hoeft niet twee keer een formulier aan te maken. CampaignSuite heeft als optie om een Gravity Forms formulier in één keer te kopiëren naar een Mautic formulier.
Selecteer een formulier uit Gravity Forms en kies of het een Standalone of Campagne formulier moet worden in Mautic. Klik daarna op Maak een formulier.
Nu is er in Mautic een nieuw formulier aangemaakt met exact dezelfde velden als het Gravity Forms formulier.
Meldingen
Wanneer een bezoeker een formulier heeft voltooid kan er een melding verstuurd worden via de mail. Bij het aanmaken van een nieuw formulier wordt er standaard een melding aangemaakt voor de Wordpress admin (Beheerdersmelding). Deze melding stuurt een e-mail naar het admin-adres van Wordpress met als onderwerp Nieuwe inzending van {form_title}. Deze melding wordt direct verstuurd als de inzending wordt opgeslagen.
Zodra CampaignSuite is geactiveerd komen er vier extra ‘momenten’ bij waaruit je kunt kiezen om een melding te laten versturen:
CampaignSuite betaling is voltooid Wanneer de status van een betaling op voltooid wordt gezet (Collected) zal deze melding verstuurd worden.
CampaignSuite betaling is mislukt Wanneer de status van een betaling op mislukt wordt gezet (Failed) zal deze melding verstuurd worden.
CampaignSuite betaling is in behandeling Wanneer de status van een betaling in behandeling is (Pending) zal deze melding verstuurd worden.
CampaignSuite betaling is geannuleerd Wanneer de status van een betaling op geannuleerd wordt gezet (Cancelled) zal deze melding verstuurd worden.
Op deze manier is het dus mogelijk om pas een e-mail te versturen naar een donateur op het moment dat de betaling ook daadwerkelijk succesvol was.
Masker invoer
Invoermaskers bieden een visuele gids waarmee gebruikers gemakkelijker gegevens in een specifieke indeling kunnen invoeren, zoals datums en telefoonnummers. Maskers kunnen ingevuld worden op Tekstregels.
Eigenlijk forceer je de bezoeker een formulier veld op een bepaalde manier in te voeren. Denk hierbij aan een postcode (eerst vier nummers en dan twee letters) of een Nederlands telefoonnummer (tien cijfers). CampaignSuite voegt standaard het masker IBAN toe waar u uit kunt kiezen.
Dit is in te stellen in het tabblad Uiterlijk van een veld:
Mogelijke maskers kunnen zijn:
Beschrijving
Masker
Postcode
9999 aa
Datum
99-99-9999
Telefoonnummer
9999999999
Findock v1 en v2
Findock is beschikbaar in versie 1 en versie 2. Het grootste verschil tussen de versies zit vooral in de snelheid van het afhandelen van een API verzoek.
Findock v1
Bron: Findock documentatie
Bovenstaande afbeelding toont de flow van een API verzoek naar Findock v1. Samengevat komt het er op neer dat er gelijk na het API verzoek alle flows en acties binnen Salesforce uitgevoerd worden. Denk hierbij aan het verwerken van het Contact en Account, het opslaan van transactie objecten en het verzoek indienen en afhandelen bij de Payment Service Provider. Dit zorgt er voor dat het lang kan duren voordat CampaignSuite een reactie terug krijgt van de API.
Findock v2
Bron: Findock documentatie
Bij Findock v2 krijgt CampaignSuite zo snel mogelijk een reactie terug van Findock zodat de API call heel snel afgerond kan worden. Terwijl de donateur aan het betalen is worden achter de schermen in SalesForce alle benodigde acties uitgevoerd waaronder het aanmaken/aanpassen van Contacts en Accounts. Zodra deze acties voltooid zijn stuurt Findock middels een Webhook een seintje naar CampaignSuite zodat daar alle benodigde ID’s opgeslagen kunnen worden.
Schematisch zou dat er als volgt uit zien:
Neem contact op met uw Salesforce implementatie partij om een migratie te doen van v1 naar v2 in SalesForce. Binnen CampaignSuite kunt u eenvoudig tussen v1 en v2 schakelen zonder extra instellingen.
Webhook
Findock v1 en v2 maken allebei gebruik van Webhooks. Dat betekent dat ze allebei een seintje terug geven aan de website wanneer er een status veranderd van een betaling. CampaignSuite ontvangt deze seintjes en verwerkt ze bij de inzendingen van Gravity Forms. Op deze manier zie je bij de inzendingen altijd de juiste status van een betaling.
Client connecties
Als developer heb je de beschikking om de geautoriseerde verbindingen ook in je eigen thema te gebruiken. Er zijn een aantal voorgedefinieerde functies die je per connectie kunt gebruiken. Start elke connectie altijd eerst op de onderstaande manier:
Deze functie kan worden gebruikt om een lijst met objecten op te halen uit SalesForce of een enkele wanneer een ID wordt doorgegeven.
/**
* @param string $objectType Name of the Salesforce object
* @param string $id Optional Salesforce ID of the object
* @param array $fields Optional array with fields to return from the object
* @param array $where Optional array with filters
*/
function getObjects($objectType = '', $id = '', $fields = [], $where = []){}
getObjectStructure
Deze functie kan worden gebruikt om de structuur van een Salesforce-object op te halen.
/**
* @param string $objectType The name of the Salesforce object
* @return object $response The API response
*
*/
function getObjectStructure($objectType = ''){}
createCampaignMember
Deze functie doet een Post-verzoek aan de API voor een nieuw CampaignMember-object in Salesforce.
/**
* @param string $campaign_id Id of the Campaign
* @param string $contact_id Id of the Contact
* @return mixed
*/
function createCampaignMember($campaign_id, $contact_id){}
create
Functie om een nieuw record van een object in Salesforce te maken.
/**
* @param string $object Name of the Salesforce object
* @param array $data Data to save
*/
function create($object, $data){}
update
Functie om een record van een object in Salesforce bij te werken.
/**
* @param string $object Name of the Salesforce object
* @param string $id Id of the Salesforce object
* @param array $data Data to save
*/
function update($object, $id, $data){}
delete
Functie om een record van een object in Salesforce te verwijderen.
/**
* @param string $object Name of the Salesforce object
* @param string $id Id of the object to delete
*/
function delete($object, $id){}
Mautic
getForms
Functie om alle Mautic formulieren op te halen. Wanneer $id is doorgegeven, wordt slechts één formulier geretourneerd.
/**
* Function to retrieve all Mautic forms. When $id is passed, only one form is returned
*
* @param $id int Id of a Mautic form
* @return array $forms Returns an array of Mautic forms
*/
public function getForms($id = ''){}
createForm
Deze functie zal een nieuw Mautic-formulier creëren op basis van een Gravity Forms-formulier en zijn velden.
/**
* @param $type string Type can be Campaign or Standalone
* @param $form array The gravity Forms form as an array
*/
public function createForm($type, $form){}
postFormEntry
Deze functie stuurt rechtstreeks een wp_remote_post() verzoek naar Mautic. Dit is nodig omdat Mautic het IP-adres van de bezoeker nodig heeft om het contact te identificeren.
/**
* @param $form_id int Id of the Mautic form
* @param $data array Array of the data to post to the form
*/
public function postFormEntry($form_id, $data){}
updateEntry
Met deze functie wordt een Mautic-formulier inzending bijgewerkt op basis van bepaalde voorwaarden.
/**
* @param int $mautic_form_id The Mautic form ID
* @param array $where Array of conditions
* @param array $updates Array of fields to update
*/
function updateEntry($mautic_form_id, $where, $updates){}
cs_get_contact_filter_fields
Beschrijving
Met dit filter kunt u meer Salesforce-contactpersoonvelden toevoegen om te controleren wanneer een contactpersoon-ID wordt doorgegeven in de URL. Standaard wordt een contactpersoon alleen gevonden op basis van een contact-ID. Voor meer veiligheid is het mogelijk om meer velden aan deze controle toe te voegen.
Onderstaand voorbeeld voegt het veld Contact.Email toe als extra check in de URL.
					function cs_get_contact_filter_fields(){
    return ['Email'];
}
Mautic
CampaignSuite can be linked with the Marketing Automation package Mautic . When the link has been made, you can link Gravity Forms forms to Mautic forms. You then link the fields in the Mautic forms to Mautic Contact fields. In this way, Leads can be created via CampaignSuite by Gravity Forms.
If your website also loads the Mautic pixel, CampaignSuite will ensure that the submission will be linked to a possible existing Mautic contact based on the Mautic ID (mtcid). In this way, submissions can be automatically linked to existing or new Mautic contacts.
To activate the Mautic connection, you only need to perform one action in Mautic:
The connection to Mautic is established through a OAuth 2 connection. Follow the steps below to set this up:
Log in to Mautic and click on the radar icon at the top right
Then go to API Authentication Information
Click on New in the top right corner
Choose at Authorization Protocol for OAuth 2
Enter a name that is recognizable to you for the connection
Enter the following value in the last field: https://api.campaignsuite.nl/v1/token/mautic/register This URL can also be found in the CampaignSuite settings.
Click on Save & close
In the next screen, copy the Public Key and Secret Key.
Now go to the Mautic tab in the CampaignSuite settings and click on Authenticate.
In this screen enter the URL of your Mautic instance and the just copied Public Key and Secret Key .
Finally, click on Authenticate to get to the Mautic login screen. Log in with your credentials to confirm the connection.
A connection has now been successfully established with your Mautic instance.
Mautic settings
It is recommended to have the same fields in the Gravity Forms form as the Mautic form. But you don’t have to create a form twice. CampaignSuite has the option to copy a Gravity Forms form to a Mautic form in one go.
Select a form from Gravity Forms and choose whether it should be a Standalone or Campaign form in Mautic. Then click on Create a form .
Now a new form has been created in Mautic with exactly the same fields as the Gravity Forms form.
Settings
When a connection is established with Salesforce, the following settings can be changed within CampaignSuite that affect the way CampaignSuite communicates with the CRM.
Payment settings
Payment Connector Select your current Payment Connector within the Salesforce instance here. We currently support Converse and Findock (v1 and v2).
Payment Endpoint Enter the correct endpoint here which can be used for communication with, for example, Converse or Findock. These settings can often be found at the Site settings of your Salesforce instance.
SF Account Name Syntax By default, the Name of an Account is composed by {Contact.FirstName} {Contact.LastName} . Set a different syntax in this field if the name must be different. For example Fam. {Contact.MiddleName} {Contact.LastName}.
SF Default Debit Day When a donor issues an authorization, the start date is always the day the donation is made. If this should be a fixed day of the month, enter it in this field.
SF After Debit Day to 1st When a number of a day is entered here and a donor issues an authorization on a day of the month that is later than the specified number, the start date of an authorization will be set to the 1st of the following month.
Non Debit Campaign Field CampaignSuite determines on the basis of the Payment Connector and the Source Connector which custom fields should be used for a non-debit payment to SalesForce. If this field needs to be different, enter it here (e.g. copa__Originating_Campaign__c) .
Debit Campaign Field CampaignSuite determines based on the Payment Connector and the Source Connector which custom fields should be used for a debit payment to SalesForce. If this field needs to be different, enter it here (e.g. copa__Originating_Campaign__c) .
Payment field authorization When a recurring payment is made, CampaignSuite automatically hides the payment methods Ideal, Paypal, Creditcard, Sofort and Bancontact. Check here the methods that should not be hidden.
Duplicate Check App For financial and non-financial forms, CampaignSuite will by default use the Relation API options from Converse or Findock. This API takes into account the Salesforce Duplicate Rules. Provided your organization has the Plauti Duplicate Check App, tick it here. Every connection with regard to a Contact and / or Account will first go through the App. Then possibly via the payment API.
Specific settings for Duplicate Check
When CampaignSuite uses the Duplicate Check, the API will always be called first if a Contact / Account combination has to be stored. The advantage of this is that you can determine in the settings of the Duplicate Check App when a duplicate is found or not. This is based on scores. In these CampaignSuite settings you can determine these scores for an Account and a Contact. See this page for more information on using scores.
Specific Findock settings
If your Payment Connector has Findock, you can choose from v1 and v2 . In addition to this setting, the following adjustments are also possible:
Findock Version Indicate here whether you want to use Findock v1 or v2.
Findock Source Connector Select the Source Connector you are using in the Findock configuration.
Paypal Processor If your Paypal Processor deviates from the standard, you can indicate this here. This setting is only used with a recurring Paypal payment in Findock.
Ideal Processor If your Ideal Processor deviates from the standard, you can indicate this here. This setting is only used with a one-time Mollie payment in Findock.
Findock Target Value The Target field is available in Findock’s API call. This value is added by default with a Findock payment authorization.
Notifications
When a visitor has completed a form, a notification can be sent by email. When creating a new form, a notification is created by default for the Wordpress admin (Administrator notification). This notification will send an email to the Wordpress admin address with the subject New submission from {form_title} . This notification is sent immediately when the submission is saved.
Once CampaignSuite has been activated, four extra ‘moments’ will be added from which you can choose to have a notification sent:
CampaignSuite payment has been completed When the status of a payment is set to completed (Collected), this notification will be sent.
CampaignSuite payment failed When the status of a payment is set to Failed, this message will be sent.
CampaignSuite payment is pending When the status of a payment is pending (Pending), this notification will be sent.
CampaignSuite payment has been canceled When the status of a payment is canceled (Canceled), this notification will be sent.
In this way it is therefore possible to only send an e-mail to a donor when the payment was actually successful.
Mask input
Input masks provide a visual guide that makes it easier for users to enter information in a specific format, such as dates and phone numbers. Masks can be filled in on Text lines .
You are actually forcing the visitor to enter a form field in a certain way. Think of a postcode (first four numbers and then two letters) or a Dutch telephone number (ten digits). CampaignSuite adds the IBAN mask that you can choose from by default.
This can be set in the Appearance tab of a field:
Possible masks can be:
Description
Mask
Zipcode
9999 aa
Date
99-99-9999
Phone number
9999999999
Findock v1 and v2
Findock is available in version 1 and version 2. The main difference between the versions is mainly in the speed of handling an API request.
Findock v1
The image above shows the flow of an API request to Findock v1. In summary, it means that all flows and actions within Salesforce are executed immediately after the API request. This includes processing the Contact and Account, storing transaction objects and submitting and processing the request to the Payment Service Provider. This ensures that it can take a long time before CampaignSuite receives a response from the API.
Findock v2
With Findock v2, CampaignSuite receives a response from Findock as soon as possible so that the API call can be completed very quickly. While the donor is paying, all necessary actions are performed behind the scenes in SalesForce, including creating / adjusting Contacts and Accounts. As soon as these actions are completed, Findock sends a signal to CampaignSuite via a Webhook so that all necessary IDs can be stored there.
Schematically it would look like this:
Contact your Salesforce implementation party to do a migration from v1 to v2 in SalesForce. Within CampaignSuite you can easily switch between v1 and v2 without additional settings.
Webhook
Findock v1 and v2 both use Webhooks. This means that they both give a signal back to the website when a status of a payment changes. CampaignSuite receives these signals and processes them in the submissions of Gravity Forms. This way you will always see the correct status of a payment with the submissions.
Client connections
As a developer you have the disposal to use the authorized connections in your own theme. There are a number of predefined functions that you can use per connection. Always start each connection in the following way first:
This function can be used to get a list of objects from SalesForce or a single one when an ID is passed.
/**
* @param string $objectType Name of the Salesforce object
* @param string $id Optional Salesforce ID of the object
* @param array $fields Optional array with fields to return from the object
* @param array $where Optional array with filters
*/
function getObjects($objectType = '', $id = '', $fields = [], $where = []){}
getObjectStructure
This function can be used to get the structure of a Salesforce object.
/**
* @param string $objectType The name of the Salesforce object
* @return object $response The API response
*
*/
function getObjectStructure($objectType = ''){}
createCampaignMember
This function makes a Post request to the API for a new CampaignMember object in Salesforce.
/**
* @param string $campaign_id Id of the Campaign
* @param string $contact_id Id of the Contact
* @return mixed
*/
function createCampaignMember($campaign_id, $contact_id){}
create
Function to create a new record of an object in Salesforce.
/**
* @param string $object Name of the Salesforce object
* @param array $data Data to save
*/
function create($object, $data){}
update
Function to update a record of an object in Salesforce.
/**
* @param string $object Name of the Salesforce object
* @param string $id Id of the Salesforce object
* @param array $data Data to save
*/
function update($object, $id, $data){}
delete
Function to delete a record from an object in Salesforce.
/**
* @param string $object Name of the Salesforce object
* @param string $id Id of the object to delete
*/
function delete($object, $id){}
Mautic
getForms
Function to retrieve all Mautic forms. When $id is passed, only one form is returned.
/**
* Function to retrieve all Mautic forms. When $id is passed, only one form is returned
*
* @param $id int Id of a Mautic form
* @return array $forms Returns an array of Mautic forms
*/
public function getForms($id = ''){}
createForm
This function will create a new Mautic form from a Gravity Forms form and its fields.
/**
* @param $type string Type can be Campaign or Standalone
* @param $form array The gravity Forms form as an array
*/
public function createForm($type, $form){}
postFormEntry
This function sends a wp_remote_post () request directly to Mautic. This is necessary because Mautic needs the visitor’s IP address to identify the contact.
/**
* @param $form_id int Id of the Mautic form
* @param $data array Array of the data to post to the form
*/
public function postFormEntry($form_id, $data){}
updateEntry
This feature updates a Mautic form submission based on certain conditions.
/**
* @param int $mautic_form_id The Mautic form ID
* @param array $where Array of conditions
* @param array $updates Array of fields to update
*/
function updateEntry($mautic_form_id, $where, $updates){}
cs_get_contact_filter_fields
Description
With this filter, you can add more Salesforce contact fields to monitor when a contact ID is passed in the URL. By default, a contact is only found based on a contact ID. For more security it is possible to add more fields to this check.
The example below adds the Contact.Email field as an extra check in the URL.
function cs_get_contact_filter_fields(){
return ['Email'];
}
Gutenberg Dynamic Content
Als er een verbinding met Marketing Cloud is opgezet is het ook mogelijk om Dynamische Content uit een Marketing Cloud Page op een pagina te zetten in de website. Dit gaat aan de hand van een wrapper blok genaamd Dynamic Content Wrapper.
Dit blok heeft verschillenden instellingen in de rechterkolom:
Code type Dynamische content moet altijd opgehaald worden o.b.v. een campagne code. Deze waarde kan op verschillende manieren meegestuurd worden naar Marketing Cloud: Pagina veld De code zal worden opgehaald uit het veld Campagne Code onder het blok CampaignSuite instellingen van de pagina Custom De code kan handmatig ingevuld worden op het Dynamic Content Wrapper blok.
Maak campagne code dynamisch Het is ook mogelijk om de code uit de URL van de pagina te halen. Vink daarvoor deze optie aan en vul de parameter naam in uit de URL waar de campagne code in staat.
Content type Er zijn momenteel 3 content types beschikbaar voor dynamisch content: Formulier pagina Dit is content wat vaak te vinden is op een campagne pagina. Bedankpagina Dit is content wat getoond kan worden op de bedankpagina na een donatie Next best action Dit is content wat gebruikt kan worden voor mogelijke next best actions van een donateur.
Toon geavanceerde instellingen Onder geavanceerde instellingen is het mogelijk om een custom endpoint in te stellen. Dit endpoint zal dan het default ingesteld endpoint bij CampaignSuite instellingen overrulen. Tevens kan er gekozen worden of dit dynamische blok Client side of Server side gerenderd moet worden. Client side Standaard worden de teksten en afbeeldingen in een Dynamic Content Wrapper via javascript ingeladen. Om er voor te zorgen dat de bezoeker niet een verspringen van de content ziet, zal de volledige inhoud van de pagina eerst verborgen worden. Zodra alle dynamisch content is geladen zal de pagina zichtbaar worden. Server side Bij deze optie zal de server eerst een call doen naar Marketing Cloud om de dynamische content op te halen. Vervolgens zal alle content worden vervangen in de blokken. Uiteindelijk zal de complete pagina geladen worden.
Het grootste verschil tussen Server en Client side is het feit dat bij Server side de pagina ‘blijft laden’ totdat alle content is vervangen. Bij Client side is de pagina klaar met laden en zal de bezoeker nog een korte tijd (maximaal 1 seconde) een witte pagina zien. Tevens kunnen cache plugins er voor zorgen dat Server side pagina’s niet dynamisch gevuld kunnen worden.
Elementen met dynamisch content
De volgende Gutenberg blokken binnen een wrapper kunnen dynamische content bevatten:
Zodra één van de bovenstaande velden in een Dynamic Content Wrapper blok gezet wordt, verschijnt er in de rechter kolom de volgende optie:
Vink deze optie aan om aan te geven dat de content van het originele blok vervangen moet worden door content uit Marketing Cloud. Als er geen dynamische content opgehaald kan worden uit Marketing Cloud zal de originele content intact blijven.
Gutenberg Dynamic Content
If a connection with Marketing Cloud has been set up, it is also possible to place Dynamic Content from a Marketing Cloud Page on a page in the website. This is done using a wrapper block called Dynamic Content Wrapper.
This block has different settings in the right column:
Code type Dynamic content must always be retrieved based on a campaign code. This value can be sent to Marketing Cloud in several ways: Page field The code will be retrieved from the Campaign Code field below the block CampaignSuite page settings Custom The code can be entered manually on the Dynamic Content Wrapper block.
Make campaign code dynamic It is also possible to extract the code from the URL of the page. Check this option and enter the parameter name from the URL containing the campaign code.
Content type There are currently 3 content types available for dynamic content: Form page This is content that can often be found on a campaign page. Thank you page This is content that can be displayed on the thank you page after a donation Next best action This is content that can be used for possible next best actions from a donor.
Show advanced settings Under advanced settings it is possible to set a custom endpoint. This endpoint will then overrule the default endpoint in CampaignSuite settings. It is also possible to choose whether this dynamic block should be rendered Client side or Server side. Client side By default, the texts are and images loaded into a Dynamic Content Wrapper via javascript. To ensure that the visitor does not see a jump in the content, the entire content of the page will first be hidden. As soon as all dynamic content has been loaded, the page will become visible. Server side With this option, the server will first make a call to Marketing Cloud to fetch the dynamic content. Then all content will be replaced in the blocks. Eventually the complete page will be loaded.
The main difference between Server and Client side is the fact that with Server side the page ‘keeps loading’ until all content has been replaced. At the Client side, the page has finished loading and the visitor will see a white page for a short time (maximum 1 second). Also, cache plugins can prevent Server side pages from being populated dynamically.
Elements with dynamic content
The following Gutenberg blocks within a wrapper can contain dynamic content:
As soon as one of the above fields is placed in a Dynamic Content Wrapper block, the following option appears in the right column:
Check this option to specify that the content of the original block should be replaced with content from Marketing Cloud. If no dynamic content can be retrieved from Marketing Cloud, the original content will remain intact.
Mapping
Zodra er een event type is gekozen en er één of meerdere aanbieders zijn geselecteerd, verschijnt er per aanbieder een blok met opties om velden te mappen. Feitelijk ga je hier instellen welke paramaters welke waarden moeten hebben in de Client Side of Server Side call.
Elk blok bevat een keuze om de call Client Side of Server Side te laten plaatsen. Is één van deze opties niet zichtbaar, dan wordt deze niet ondersteunt door de aanbieder in combinatie met het gekozen event.
Client Side Hierbij wordt scriptcode uitgevoerd in de browser van de bezoeker. Dit is in het geval van CampaignSuite altijd een Javascript code.
Server Side Hierbij wordt scriptcode uitgevoerd op de server. Dit heeft als voordeel dat Server Side calls ook uitgevoerd kunnen worden als de bezoeker al lang niet meer op de website is zoals bij succesvolle betalingen. Deze worden dan ‘onder water’ op de server uitgevoerd.
Daarnaast heeft elk blok de mogelijkheid om parameters te mappen. De linkerkolom toont de beschikbaar parameter waardes (dat kan per aanbieder verschillen) en de rechterkolom toont alle beschikbare formuliervelden en diverse andere waarden die gebruikt kunnen worden.
Open invulvelden
Beide kolommen hebben de mogelijkheid om een open invulveld te tonen. In dit veld kan je een eigen waarde opgeven in plaats van de waarde uit één van de aangegeven opties. In de linkerkolom is dat de laatste optie in de dropdown genaamd Add Custom Key en in de rechterkolom is dat de laatste optie in de dropdown genaamd Add Custom Value.
Nesten van key waarden
In sommige gevallen moet er gebruik worden gemaakt van arrays (verzamelingen) in bijvoorbeeld Client Side calls. Onderstaande afbeelding toont een voorbeeld van een dergelijke verzameling:
Hier is duidelijk te zien dat transactionProducts een verzameling is van producten. Door het koppelen van keys met een punt kan dit gedaan worden. Dat ziet er dan als volgt uit in de mapping van een meting:
Mapping
As soon as an event type has been chosen and one or more providers have been selected, a block will appear for each provider with options to map fields. In fact, here you are going to set which parameters should have which values in the Client Side or Server Side call.
Each block contains an option to place the call Client Side or Server Side. If one of these options is not visible, it is not supported by the provider in combination with the selected event.
Client Side It executes script code in the visitor’s browser. In the case of CampaignSuite, this is always a Javascript code.
Server Side Executes script code on the server. This has the advantage that Server Side calls can also be performed if the visitor has not been on the website for a long time, such as with successful payments. These are then executed ‘under water’ on the server.
In addition, each block has the ability to map parameters. The left column shows the available parameter values (this can vary per provider) and the right column shows all available form fields and various other values that can be used.
Open input fields
Both columns have the option of showing an open input field. In this field you can enter your own value instead of the value from one of the indicated options. In the left column this is the last option in the dropdown called Add Custom Key and in the right column it is the last option in the dropdown called Add Custom Value.
Nesting key values
In some cases, arrays (collections) must be used in, for example, Client Side calls. The image below shows an example of such a collection:
It is clear here that transactionProducts is a collection of products. This can be done by linking keys with a period. It then looks like this in the mapping of a measurement:
Salesforce
Zodra CampaignSuite een verbinding heeft opgezet met Salesforce verschijnt er bij elk formulier onder Instellingen een tab genaamd Salesforce. Hier kunnen alle instellingen gedaan worden voor de verbinding naar Salesforce. Denk hierbij aan:
Het aanmaken van een CampaignMember object
Plauti Duplicate Check opties instellen
Betalingsvelden koppelen voor een transactie naar Converse of Findock
Synchronisatie van CampaignMember objecten of Memberships
Mappen van Contact en Account velden
In deze documentatie zullen we langs alle opties gaan en uitleggen wat u ermee kunt doen.
De verbinding met Salesforce wordt altijd gemaakt wanneer de bezoeker het formulier helemaal heeft ingevuld. Behalve wanneer u het formulier vooraf in wilt vullen Contact gegevens (zie het artikel Prefillen o.b.v. ContactIdvoor meer informatie hierover).
Geef bij de Salesforce instellingen van het formulier aan dat er een Salesforce verbinding gemaakt moet worden.
Bestemmings-ID
Kies hier één van de beschikbare bestemmingen uit SalesForce. Een bestemming is een verplicht veld bij een transactie naar Converse.
Campagne-ID
Kies een campagne uit Salesforce om of een transactie aan te koppelen of een Contact (als deze aangemaakt of gevonden wordt). Een campagne is ook verplicht bij een transactie naar Converse.
Creëer Campaign Member
Als u deze optie aanvinkt zal er een CampaignMember object aangemaakt worden nadat de bezoeker het formulier in heeft gevuld. Als het Contact reeds een lid is van de campagne, dan zal er niks gebeuren.
Verwijder inzending direct
Het is mogelijk om bij een formulier in te stellen dat de aangemaakt inzending direct verwijderd moet worden nadat de bezoeker het formulier heeft ingevuld. Dit wordt vaak gebruikt bij Preference centers. Daarmee kan bijvoorbeeld een Contact zijn/haar gegevens updaten (of nieuwsbrief inschrijvingen). Om te voorkomen dat er teveel inzendingen komen, kunnen deze direct verwijderd worden.
LET OP: dit kan niet ongedaan gemaakt worden.
Afhankelijk van uw Customer Payment Management platform (Converse of Findock) verschijnen er nog enkele opties in deze lijst.
Converse
Sta ontdubbeling toe
Standaard staat deze optie op Ja en is gekoppeld aan het Converse API veld AllowDeduplication.
Sta gegevensverrijking toe
Standaard staat deze optie op Ja en is gekoppeld aan het Converse API veld AllowDataEnrichment.
Findock v1
Contact opties
Kies hier wat er moet gebeuren als Findock een bestaand Contact vindt. Overschrijven, vul alleen lege velden of doe niets
Account opties
Kies hier wat er moet gebeuren als Findock een bestaand Account vindt. Overschrijven, vul alleen lege velden of doe niets
Sta ontdubbeling toe
Standaard staat deze optie op Ja en is gekoppeld aan het Findock API veld allowDeduplication.
Let op
De Converse en Findock optie zoals hierboven vermeld zijn, worden verborgen zodra u in de CampaignSuite instellingen kiest om gebruik te maken van de Plauti Duplicate Check App. Dat komt omdat de App dan alle logica overneemt van het opslaan van het Contact en Account en niet Converse of Findock.
Betalingsvelden
Wanneer er een betaling gedaan moet worden in het formulier geeft u dat aan bij het blok Betalingsvelden. Het is de bedoeling dat u de juiste Gravity Forms velden gaat koppelen aan de instellingen velden. Bij betalingsvelden zijn dat:
Bedrag Koppel hier een veld wat als waarde altijd een getal heeft. Dit kan een tekstveld zijn waar je alleen een nummer in kunt vullen of een radio veld met bedrag keuzes. Als er meerdere radio velden zijn met bedragen (zoals eenmalig of maandelijks) koppel dan altijd het Totaal bedrag veld hier.
Financieel of niet-financieel
Een formulier controleert op basis van dit Bedrag veld of een het een transactie moet maken of niet. Dat kan zijn wanneer dit veld niet is gekoppeld of wanneer de waarde van het gekoppelde veld 0 is. Dan gaat de inzending automatisch verder als niet-financiële inzending.
Betaalmethode Koppel hier een veld waar men een betaalmethode kan kiezen. De waardes van dit veld moeten altijd één van de volgende waardes zijn: Ideal, Direct debit, Creditcard, Sofort, Bancontact of Paypal. Het maakt niet uit wat de labels zijn, als de waardes maar gelijk zijn aan één van de bovengenoemde opties.
Frequentie Koppel hier een veld waar men kan kiezen uit een betaal frequentie. De waardes van dit veld moeten altijd één van de volgende waardes zijn: One-time, Monthly, Quarterly of Yearly. Het maakt niet uit wat de labels zijn, als de waardes maar gelijk zijn aan één van de bovengenoemde opties.
Bank selectie Koppel hier een veld waar men kan kiezen uit een bank. De opties die ondersteunt worden zijn: – ABN Amro (ABNANL2A) – ASN Bank (ASNBNL21) – ING (INGBNL2A) – KNAB bank (KNABNL2H) – Rabobank (RABONL2U) – Regiobank (RBRBNL21) – SNS Bank (SNSBNL2A) – Triodos bank (TRIONL2U) – Van Lanschot (FVLBNL22)
IBAN Koppel hier een veld waar men het IBAN nummer kan invoeren van zijn/haar bank.
Naam rekeninghouder Dit veld is niet verplicht om te koppelen maar kan optioneel gekoppeld worden aan een tekstveld waar de bezoeker een naam in kan vullen van de rekeninghouder. Als die veld niet gekoppeld wordt of leeg blijft zal CampaignSuite automatisch de voornaam en achternaam invullen van de inzender.
Dynamische bestemming Het is (naast een vaste bestemming) ook mogelijk om een veld te koppelen waar de donateur kan kiezen voor een bestemming. Maar hier een dropdown veld van met bij de opties als Label een naam van de bestemming en als waarde (value) het bestemmings-ID uit Salesforce. Op deze manier kunnen dynamisch donaties gekoppeld worden aan bestemmingen.
Dynamische campagne Dit veld werkt hetzelfde als het veld Dynamische bestemming. Koppel hier een dropdown waar de donateur kan kiezen uit verschillende campagnes.
Account Record Type Het is mogelijk om in uw formulier te vragen of de donateur een particulieren donatie doet of namens een organisatie. Koppel hier een veld waar de bezoeker een keuze heeft uit Particulier of Organisatie. Zorg er voor dat de waarden van de keuzes altijd is Household of Organisation.
Let op
De waardes van het Account Record Type kunnen per Salesforce instantie afwijken. Neem voor de zekerheid contact op met uw implementatie partij om na te gaan wat de exacte naamgevingen zijn van het Account Record Type.
Converse
Converse is de voorloper van Findock en maakt het mogelijk om via hun API endpoints Relaties en Transacties naar Salesforce te sturen. Deze dienst maakt het voor CampaignSuite mogelijk om formulier inzendingen als transactie of relatie naar SalesForce te versturen. Het verloop van een dergelijk verzoek kan verschillen als je gebruik maakt van Plauti Duplicate Check of niet. Wanneer u Plauti niet gebruikt ziet de flow van Converse er zo uit:
Gravity Forms stuurt een inzending naar de API van CampaignSuite. Deze bepaalt o.b.v. de velden en waarden die hij binnen krijgt of het een transactie is of niet. Converse heeft aparte endpoints die aangeroepen moeten worden voor een transactie of relatie. In dit scenario zal altijd gekozen worden voor òf de Relation API òf de Transaction API.
Relation API
In dit geval worden er alleen een Account en Contact aangemaakt of aangepast. CampaignSuite krijgt altijd als reactie van de Relation API een Contact ID en een Account ID terug. Deze waarden zijn ook terug te vinden bij de inzending binnen Gravity Forms in de rechter kolom.
Transaction API
Bij een transactie worden ook Contact en Account gegevens naar Converse gestuurd maar ook transactie waarden zoals bedrag, frequentie en betaalmethode. Converse gaat op zijn beurt allerlei acties uitvoeren om het Contact en Account netjes weg te schrijven om vervolgens een betalingsverzoek aan te maken bij de gekoppelde Payment Provider (bijvoorbeeld Mollie of Buckaroo). CampaignSuite krijgt naast een Contact ID en een Account ID ook een Installment ID (bij eenmalige transacties) of Recurring ID (bij periodieke transacties). Deze informatie is altijd terug te vinden bij de inzendingen van Gravity Forms:
Duplicate Rules Salesforce
Bij het gebruik van de Converse Relation API zal Converse gebruik maken van de Salesforce Duplicate Rules die u heeft ingesteld binnen het CRM.
Wanneer u Plauti Duplicate Check gebruikt zal het schema er als volgt uitzien:
Niet financieel
Bij een niet financiële inzending zal CampaignSuite alleen contact maken met de Plauti Duplicate Check App. CampaignSuite ontvangt dan een Contact ID en Account ID en stopt daarna de flow.
Financieel
Eerst zal CampaignSuite via de Plauti Duplicate Check App het Contact en Account afhandelen. Daarna zal CampaignSuite de Transaction API aanroepen met alleen het Contact en Account ID en uiteraard de transactie velden en waarden.
In alle gevallen zullen alle ID’s die CampaignSuite terug krijgt van Converse of de Plauti Duplicate Check App opslaan bij de inzending.
Webhook betalingsstatus
In tegenstelling tot Findock heeft Converse geen automatische Webhook die ervoor zorgt dat CampaignSuite een seintje krijgt van Salesforce als er een wijziging plaatsvindt in de status van een Installment. Daarom zal CampaignSuite een uur lang elke vijf minuten de status ophalen van het aangemaakt Installment. Zodra dit Collected is zal CampaignSuite stoppen met controleren. Op deze manier zorgt CampaignSuite er voor dat de status van de betalingen in Gravity Forms gelijk zijn aan de betalingen in Salesforce.
Findock v1 en v2
Findock is beschikbaar in versie 1 en versie 2. Het grootste verschil tussen de versies zit vooral in de snelheid van het afhandelen van een API verzoek.
Findock v1
Bron: Findock documentatie
Bovenstaande afbeelding toont de flow van een API verzoek naar Findock v1. Samengevat komt het er op neer dat er gelijk na het API verzoek alle flows en acties binnen Salesforce uitgevoerd worden. Denk hierbij aan het verwerken van het Contact en Account, het opslaan van transactie objecten en het verzoek indienen en afhandelen bij de Payment Service Provider. Dit zorgt er voor dat het lang kan duren voordat CampaignSuite een reactie terug krijgt van de API.
Findock v2
Bron: Findock documentatie
Bij Findock v2 krijgt CampaignSuite zo snel mogelijk een reactie terug van Findock zodat de API call heel snel afgerond kan worden. Terwijl de donateur aan het betalen is worden achter de schermen in SalesForce alle benodigde acties uitgevoerd waaronder het aanmaken/aanpassen van Contacts en Accounts. Zodra deze acties voltooid zijn stuurt Findock middels een Webhook een seintje naar CampaignSuite zodat daar alle benodigde ID’s opgeslagen kunnen worden.
Schematisch zou dat er als volgt uit zien:
Neem contact op met uw Salesforce implementatie partij om een migratie te doen van v1 naar v2 in SalesForce. Binnen CampaignSuite kunt u eenvoudig tussen v1 en v2 schakelen zonder extra instellingen.
Webhook
Findock v1 en v2 maken allebei gebruik van Webhooks. Dat betekent dat ze allebei een seintje terug geven aan de website wanneer er een status veranderd van een betaling. CampaignSuite ontvangt deze seintjes en verwerkt ze bij de inzendingen van Gravity Forms. Op deze manier zie je bij de inzendingen altijd de juiste status van een betaling.
Plauti Duplicate Check
Standaard gebruikt Salesforce zijn eigen Duplicate Rules wanneer CampaignSuite communiceert met Converse of Findock. Een simpel voorbeeld is bijvoorbeeld dat je kunt instellen dat een het e-mailadres van een Contact uniek moet zijn. Converse en Findock zullen dan duplicaten zoeken o.b.v. een e-mailadres.
Als u in CampaignSuite heeft aangegeven dat Plauti Duplicate Check gebruikt moet worden, zal CampaignSuite in sommige gevallen eerst langs deze App gaan zodat de Duplicate Rules daarvan gebruikt worden.
U heeft de mogelijkheid om per formulier in te stellen wat de score voor scenario’s moeten zijn. Meer informatie over scores en scenario’s kunt u vinden in de documentatie van Plauti. Om deze functie te kunnen gebruiken is het wel belangrijk dat het scenario toegepast os op DATA API!
De threshold in de DC Setup van uw Salesforce instantie geeft alleen aan vanaf welk matching percentage een record als duplicate bestempeld wordt. Met de Duplicate Score in CampaignSsuite kan u aangeven vanaf welk matching percentage u een bestaande record wilt updaten.
Voorbeeld: U heeft de Duplicate Check Threshold op 75% staan en Duplicate Score in CampaignSuite op 90. Wanneer u een record inschiet via CampaignSuite, dan wordt het scenario gebruikt om te kijken of er een duplicaat is. Stel er is een duplicaat record met een matching percentage van 80% dan wordt er een nieuwe record aangemaakt (die wel als een duplicate beschouwd wordt) en wordt deze in een DC Job geplaatst. Als er een matching percentage van 90% of hoger was, dan wordt het bestaande record geupdate (doordat de Duplicate Score op 90 staat).
Als een formulier een afwijkende Score moet gebruiken dan de instellingen die u heeft gedaan bij CampaignSuite, dan kan u dat hier instellen. Schakel deze optie dan in en voer nieuwe scores in.
Synchronisatievelden
Synchronisatievelden kunnen worden gebruikt om een sync te maken tussen een Gravity Forms checkbox veld en CampaignMember objecten of soco__Membership__c objecten in SalesForce.
Beide objecten in Salesforce worden vaak gebruikt voor bijvoorbeeld abonnementen of nieuwsbrief inschrijvingen. Daarom kan deze feature van CampaignSuite met name gebruikt worden voor een “Preference center” waar iemand aan kan geven welke nieuwsbrieven hij/zij nog wilt ontvangen.
Checkbox veld
Als u een veld koppelt voor synchronisatie, dan moet dat een checkbox veld zijn. Deze ziet dan bijvoorbeeld zo uit:
Het belangrijkste is dat de de gegevens in de kolom Waarde exact hetzelfde is als het ID in Salesforce.
CampaignMember
Wanneer u een CampaignMember veld koppelt moeten hier de ID’s van de Campagnes in staan.
Membership
Wanneer u een Membership veld koppelt moeten hier de ID’s van de Products in staan.
Prefillen
Het is ook mogelijk om een formulier met synchronisatievelden te laten prefillen met gegevens uit Salesforce. Daarvoor is het nodig om in de URL van de pagina waar het formulier op staat als parameter ?contact={ContactId} mee te sturen. Meer informatie hierover kan u vinden in het artikel Prefillen o.b.v. ContactID.
Salesforce objecten
In dit gedeelte van de Salesforce instellingen heeft u de mogelijkheid om de velden van Salesforce objecten te koppelen aan velden in uw Gravity Forms formulier. Op deze manier weet CampaignSuite precies welke informatie in welk veld van welk object opgeslagen moet worden.
Momenteel worden er 4 objecten ondersteunt om hier te koppelen:
1. Contact
Alle velden van het object Contact uit Salesforce worden hier getoond en kunt u koppelen aan een Gravity Forms veld.
2. Account
Alle velden van het object Account uit Salesforce worden hier getoond en kunt u koppelen aan een Gravity Forms veld.
3. Niet-debet velden
Het object wat hier gekoppeld kan worden is afhankelijk van de Salesforce configuratie van de Payment Connector (Converse, Findock, NPSP, etc). In de regel moet u hier denken aan het Installment object zoals cpm__Installment__c of soco__Installments__c. Alle velden hiervan zullen dan hier getoond worden zodat u deze kunt vullen met een waarde uit het formulier.
4. Machtiging
Dit object hangt ook (net zoals het niet-debet veld) af van de Payment Connector. Objecten waar u kunt denken zijn bijvoorbeeld soco__Payment__c, soco__Agreement__c of cpm__Recurring_Payment__c.
Wist u dat?
Door middel van de toets combinatie ctrl+shift+s is het mogelijk om deze lange lijsten van velden te filteren op alleen de gekoppelde velden. Zo krijgt u in één opslag te zien welke velden u heeft gekoppeld.
Prefillen o.b.v. ContactID
Als CampaignSuite een verbinding heeft gemaakt met Salesforce is het mogelijk om een formulier te prefillen met waardes van een Contact of Account uit Salesforce.
Uiteraard moet u hiervoor bij de instellingen van het formulier bij Salesforce eerste de juiste velden aan elkaar koppelen onder Salesforce objecten. Op deze manier weet CampaignSuite welke informatie in welke velden getoond moeten worden.
Om alle gegevens op te halen uit Salesforce voegt u simpelweg het ID van het Contact toe aan de URL:
Vervang in de URL {ContactId} door een ID uit Salesforce.
Het is technisch ook mogelijk om deze controle veiliger te maken door meerdere velden verplicht in de URL te laten zetten (zoals Email). Dan zoekt CampaignSuite naar het Contact waar het ID overeenkomt en het e-mailadres. Neem contact op met Gopublic als u deze aanvulling wenst.
Prefill HTML en textarea
CampaignSuite maakt het mogelijk om een tekstvak of HTML veld in uw formulier automatisch te laten vullen met waarden uit andere velden in het formulier. Dit kan vooral handig zijn om op uw laatste pagina van het formulier een uitgebreide samenvatting te tonen van de ingevulde informatie van het formulier.
Let op
Deze functionaliteit werkt alleen als uw formulier uit meer dan 1 pagina bestaat. De velden worden namelijk gevuld wanneer de bezoeker van pagina wisselt in het formulier.
Onderstaande afbeeldingen tonen twee voorbeelden van de manier waarop je een tekstvak en HTML veld kunt vullen.
De waarden van de velden kunnen worden ingevoerd door de syntax:
{input_field_id}
Waarbij field_id het ID is van het veld in uw formulier.
Wist u dat?
Als u de parameter ?cs_post=true toevoegt aan de URL van de pagina waar uw formulier op staat, ziet u (wanneer u op de knop onderaan het formulier klikt) precies welke veld ID’s en waarden u kunt gebruiken bij het prefillen van tekstvakken en HTML velden.
Timber plugin
Het is ook mogelijk om bepaalde logica toe te passen op de code in de velden. Als u de plugin Timber heeft geïnstalleerd is het ook mogelijk om de gebruik te maken van .twig logica. Kijk op deze website voor een uitleg van de mogelijkheden.
Enkele voorbeelden van .twig logica zijn:
{% if "{input_1}" == "Ideal" %}
Dit is een Ideal betaling
{% else %}
Dit is geen Ideal betaling
{% endif %}
{% switch "{input_3}" %}
{% case 'Ideal' %}
<p>Ideal betaling</p>
{% case 'Direct debit' %}
<p>Machtiging</p>
{% case 'Creditcard' %}
{% case 'Sofort' %}
<p>Andere betaalmethode</p>
{% default %}
<p>Geen betaalmethode bekend</p>
{% endswitch %}
Plauti Duplicate Check
Standaard gebruikt Salesforce zijn eigen Duplicate Rules wanneer CampaignSuite communiceert met Converse of Findock. Een simpel voorbeeld is bijvoorbeeld dat je kunt instellen dat een het e-mailadres van een Contact uniek moet zijn. Converse en Findock zullen dan duplicaten zoeken o.b.v. een e-mailadres.
Als u in CampaignSuite heeft aangegeven dat Plauti Duplicate Check gebruikt moet worden, zal CampaignSuite in sommige gevallen eerst langs deze App gaan zodat de Duplicate Rules daarvan gebruikt worden.
U heeft de mogelijkheid om per formulier in te stellen wat de score voor scenario’s moeten zijn. Meer informatie over scores en scenario’s kunt u vinden in de documentatie van Plauti. Om deze functie te kunnen gebruiken is het wel belangrijk dat het scenario toegepast os op DATA API!
De threshold in de DC Setup van uw Salesforce instantie geeft alleen aan vanaf welk matching percentage een record als duplicate bestempeld wordt. Met de Duplicate Score in CampaignSsuite kan u aangeven vanaf welk matching percentage u een bestaande record wilt updaten.
Voorbeeld: U heeft de Duplicate Check Threshold op 75% staan en Duplicate Score in CampaignSuite op 90. Wanneer u een record inschiet via CampaignSuite, dan wordt het scenario gebruikt om te kijken of er een duplicaat is. Stel er is een duplicaat record met een matching percentage van 80% dan wordt er een nieuwe record aangemaakt (die wel als een duplicate beschouwd wordt) en wordt deze in een DC Job geplaatst. Als er een matching percentage van 90% of hoger was, dan wordt het bestaande record geupdate (doordat de Duplicate Score op 90 staat).
Als een formulier een afwijkende Score moet gebruiken dan de instellingen die u heeft gedaan bij CampaignSuite, dan kan u dat hier instellen. Schakel deze optie dan in en voer nieuwe scores in.
Endpoints
Wanneer CampaignSuite geactiveerd is komen er een aantal nieuwe endpoints bij binnen Wordpress. Deze endpoints kunnen aangeroepen worden door software van derden. Hieronder staan deze endpoints uitgelegd met de daarbij behorende parameters.
gp_webhook_path
Dit endpoint kan benaderd worden door Findock en handelt alle webhook aanroepen af met betrekking tot wijzigingen van een betaling (of in het geval van Findock 2 mutaties in het PaymentIntent). CampaignSuite bepaalt zelf automatisch op basis van de inhoud van de call of het voor Findock v1 of v2 is. Bij elke API call richting Findock voegt CampaignSuite automatisch deze URL toe als WebhookURL.
Dit endpoint kan worden gebruikt om een Mautic Lead Integration te verwijderen. Dit endpoint is alleen toegankelijk met een POST-aanvraag met de volgende parameters:
Parameter
Beschrijving
email
Het e-mailadres van een Mautic lead
entityId
Het Mautic entiteit om te verwijderen
entityId
De ID van de Salesforce-entiteit (bijv. Campaign ID)
Dit endpoint kan worden gebruikt om een Mautic Lead Integration te verwijderen. Dit endpoint is alleen toegankelijk met een POST-aanvraag met de volgende parameters:
Het is mogelijk om Pardot aan te sluiten op CampaignSuite. Na deze koppeling op basis van een Connected App in Salesforce heeft u de mogelijkheid om een Gravity Forms inzending naar een Form of Form Handler in Pardot te sturen.
Hierbij heeft u ook de keuze om deze inzending naar Pardot pas uit te voeren als er bijvoorbeeld een betaling succesvol is voltooid naar Salesforce.
Om een verbinding met Pardot te maken moet u een connectie opzetten met een Connected App in Salesforce.
Voer onderstaande stappan uit om de Connected App toe te voegen aan Salesforce.
Ga naar de Setup van Salesforce en zoek naar App.
Klik dan in de zoek resultaten op App manager
Klik rechts bovenin op New Connected App
Vul een Connected App Name in en een contact e-mailadres.
Vink de checkbox Enable OAuth Settings aan onder het kopje API (Enable OAuth Settings)
Vul bij Callback URL de volgende link in: https://api.campaignsuite.nl/v1/token/pardot/register Deze link is te vinden in de CampaignSuite instellingen onder het tabblad Pardot.
Voeg bij Selected OAuth Scopes de volgende 3 rechten toe: – Access and manage your data (api) – Perform requests on your behalf at any time (refresh_token, offline_access) – Pardot-services openen (pardot_api)
Klik onderaan de pagina op save
Het kan gemiddeld 10 minuten duren voor dat instellingen zijn verwerkt in Salesforce. Kopieer in de tussentijd alvast de Consumer Key en Consumer Secret van de zojuist aangemaakt App. Deze gaan we straks instellen bij CampaignSuite.
Koppeling CampaignSuite
Als de Connected App is aangemaakt kan u deze koppelen aan CampaignSuite. Doorloop de volgende stappen om dit te doen:
Ga in Wordpress naar Instellingen > CampaignSuite > Pardot
Klik op Authenticeren
Selecter in de popup of u wilt verbinden met een Test, Dev of Live omgeving.
Vul de Connected App Consumer Key,Connected App Consumer Secret en Business Unit ID in klik op Authenticeren. (Klik hier om te lezen waar u het Business Unit ID kunt vinden).
Vul in het daarop volgende scherm de login gegevens in van een Salesforce user en log in op Salesforce
Wanneer u vervolgens terugkeert is de verbinding tot stand gebracht en kan u klikken op Sluit venster. De pagina zal dan automatisch vernieuwd worden en zullen de Pardot instellingen worden getoond.
Momenteel zijn er geen extra instellingen beschikbaar voor de Pardot connectie.
Pardot
It is possible to connect Pardot to CampaignSuite. After this link based on a Connected App in Salesforce, you have the option to send a Gravity Forms submission to a Form or Form Handler in Pardot.
You also have the choice to make this submission to Pardot only if, for example, a payment has been successfully completed to Salesforce.
To establish a connection with Pardot, you must establish a connection with a Connected App in Salesforce.
Follow the steps below to add the Connected App to Salesforce.
Go to Salesforce Setup and search for App .
Click in the search results on App manager
Click on New Connected App in the top right corner
Enter a Connected App Name and a contact email address.
Check the checkbox Enable OAuth Settings under the heading API (Enable OAuth Settings)
Enter the following link at Callback URL : https://api.campaignsuite.nl/v1/token/pardot/register This link can be found in the CampaignSuite settings under the Pardot tab.
Add the following 3 rights to Selected OAuth Scopes : – Access and manage your data (api) – Perform requests on your behalf at any time (refresh_token, offline_access) – Open Pardot Services (pardot_api)
Click on save at the bottom of the page
It can take an average of 10 minutes for settings to be processed in Salesforce. In the meantime, copy the Consumer Key and Consumer Secret from the newly created App. We will soon set this up at CampaignSuite.
Connection CampaignSuite
Once the Connected App has been created, you can link it to CampaignSuite. Go through the following steps to do this:
In Wordpress go to Settings > CampaignSuite > Pardot
Click on Authenticate
Select in the popup whether you want to connect to a Test, Dev or Live environment.
Enter the Connected App Consumer Key, Connected App Consumer Secret and Business Unit ID click Authenticate. (Click here to find out where to find the Business Unit ID).
In the next screen enter the login details of a Salesforce user and log in to Salesforce
When you return the connection is established and you can click on Close window. The page will then be refreshed automatically and the Pardot settings will be displayed.
Currently there are no additional settings available for the Pardot connection.
Salesforce
Once CampaignSuite has set up a connection with Salesforce, a tab named Salesforce will appear with each form under Settings . Here all settings can be made for the connection to Salesforce. Think about:
Creating a CampaignMember object
Set Plauti Duplicate Check options
Link payment fields for a transaction to Converse or Findock
Synchronization of CampaignMember objects or Memberships
Folders of Contact and Account fields
In this documentation we will go through all the options and explain what you can do with them.
The connection to Salesforce is always established when the visitor has completed the form completely. Unless you want to pre-fill the form Contact details (see the article Prefills based on ContactId for more information about this).
Indicate in the Salesforce settings of the form that a Salesforce connection must be established.
Destination ID Select one of the available destinations from SalesForce here. A destination is a required field for a transaction to Converse.
Campaign ID Choose a campaign from Salesforce to either associate a transaction or a Contact (if one is created or found). A campaign is also required for a transaction to Converse.
Create Campaign Member If you check this option, a CampaignMember object will be created after the visitor has completed the form. If the Contact is already a member of the campaign, nothing will happen.
Delete submission immediately It is possible to set a form that the created submission must be deleted immediately after the visitor has completed the form. This is often used at Preference centers. This allows, for example, a Contact to update his / her data (or newsletter registrations). To prevent too many entries, these can be deleted immediately. PLEASE NOTE : this cannot be undone.
Depending on your Customer Payment Management platform (Converse or Findock), a few more options will appear in this list.
Converse
Allow deduplication By default this option is set to Yes and is linked to the Converse API field AllowDeduplication .
Allow data enrichment By default this option is set to Yes and is linked to the Converse API field AllowDataEnrichment .
Findock v1
Contact options Choose what to do if Findock finds an existing Contact. Overwrite, fill in empty fields only or do nothing
Account options Choose what to do if Findock finds an existing Account. Overwrite, fill in empty fields only or do nothing
Allow deduplication By default this option is set to Yes and is linked to the Findock API field allowDeduplication .
Note
The Converse and Findock options mentioned above will be hidden as soon as you choose in the CampaignSuite settings to use the Plauti Duplicate Check App. That is because the App then takes over all the logic of saving the Contact and Account and not Converse or Findock.
Payment fields
When a payment has to be made in the form, indicate this in the block Payment fields . The intention is that you will link the correct Gravity Forms fields to the settings fields. For payment fields these are:
Amount Link here a field that has the value always a number. This can be a text field where you can only enter a number or a radio field with amount options. If there are multiple radio fields with amounts (such as one-off or monthly) always link the Total amount field here.
Notice Message! Your message here
A form checks on the basis of this Amount field whether it should make a transaction or not. This can be when this field is not linked or when the value of the linked field is 0. Then the submission will automatically continue as a non-financial submission.
Payment method Link a field here where you can choose a payment method. The values of this field must always be one of the following values: Ideal, Direct debit, Creditcard, Sofort, Bancontact or Paypal. It doesn’t matter what the labels are, as long as the values are equal to one of the above options.
Frequency Link a field here where you can choose a payment frequency. The values of this field must always be one of the following values: One-time, Monthly, Quarterly or Yearly. It doesn’t matter what the labels are, as long as the values are equal to one of the above options.
Bank selection Link a field here where you can choose from a bank. The options that are supported are: – ABN Amro (ABNANL2A) – ASN Bank (ASNBNL21) – ING (INGBNL2A) – KNAB bank (KNABNL2H) – Rabobank (RABONL2U) – Regional bank (RBRBNL21) – SNS Bank (SNSBNL2A) – Triodos bank (TRIONL2U) – Van Lanschot (FVLBNL22)
IBAN Link a field here where one can enter the IBAN number of his / her bank.
Account holder name This field is not mandatory to link but can optionally be linked to a text field where the visitor can enter the name of the account holder. If that field is not linked or is left empty, CampaignSuite will automatically fill in the first and last name of the submitter.
Dynamic destination In addition to a fixed destination, it is also possible to link a field where the donor can choose a destination. But here is a dropdown field with the options as Label a name of the destination and as value (value) the destination ID from Salesforce. In this way, donations can be dynamically linked to destinations.
Dynamic campaign This field works the same as the Dynamic destination field. Link a dropdown here where the donor can choose from different campaigns.
Account Record Type It is possible to ask in your form whether the donor is making a private donation or on behalf of an organization. Link a field here where the visitor can choose from Private or Organization. Make sure the values of the choices are always Household or Organization .
Note
The values of the Account Record Type can differ per Salesforce instance. To be sure, contact your implementation party to find out the exact names of the Account Record Type.
Converse
Converse is the predecessor of Findock and makes it possible to send Relations and Transactions to Salesforce endpoints via their API. This service makes it possible for CampaignSuite to send form submissions as a transaction or relation to SalesForce. The course of such a request may differ if you use Plauti Duplicate Check or not. When you are not using Plauti, the flow of Converse looks like this:
Gravity Forms sends a submission to the CampaignSuite API. This determines on the basis of the fields and values it receives whether it is a transaction or not. Converse has separate endpoints that must be called for a transaction or relationship. In this scenario, either the Relation API or the Transaction API will always be chosen.
Relation API
In this case, only an Account and Contact will be created or modified. CampaignSuite always receives a Contact ID and an Account ID in response from the Relation API. These values can also be found in the submission within Gravity Forms in the right column.
Duplicate Rules Salesforce
When using the Converse Relation API, Converse will use the Salesforce Duplicate Rules that you have set within the CRM.
When using Plauti Duplicate Check the scheme will look like this:
Not financial
For a non-financial submission, CampaignSuite will only contact the Plauti Duplicate Check App. CampaignSuite will then receive a Contact ID and Account ID and then the flow will stop.
Financial
First, CampaignSuite will handle the Contact and Account via the Plauti Duplicate Check App. After that CampaignSuite will call the Transaction API with only the Contact and Account ID and of course the transaction fields and values.
In all cases, all IDs that CampaignSuite gets back from Converse or the Plauti Duplicate Check App will save with the submission.
Webhook Payment Status
Unlike Findock, Converse does not have an automatic Webhook that causes CampaignSuite to notify from Salesforce when there is a change in the status of an Installment. Therefore, CampaignSuite will fetch the status of the created Installment every five minutes for an hour. Once this is Collected CampaignSuite will stop checking. In this way, CampaignSuite ensures that the status of the payments in Gravity Forms are the same as the payments in Salesforce.
Findock v1 and v2
Findock is available in version 1 and version 2. The main difference between the versions is mainly in the speed of handling an API request.
Findock v1
The image above shows the flow of an API request to Findock v1. In summary, it means that all flows and actions within Salesforce are executed immediately after the API request. This includes processing the Contact and Account, storing transaction objects and submitting and processing the request to the Payment Service Provider. This ensures that it can take a long time before CampaignSuite receives a response from the API.
Findock v2
With Findock v2, CampaignSuite receives a response from Findock as soon as possible so that the API call can be completed very quickly. While the donor is paying, all necessary actions are performed behind the scenes in SalesForce, including creating / adjusting Contacts and Accounts. As soon as these actions are completed, Findock sends a signal to CampaignSuite via a Webhook so that all necessary IDs can be stored there.
Schematically it would look like this:
Contact your Salesforce implementation party to do a migration from v1 to v2 in SalesForce. Within CampaignSuite you can easily switch between v1 and v2 without additional settings.
Webhook
Findock v1 and v2 both use Webhooks. This means that they both give a signal back to the website when a status of a payment changes. CampaignSuite receives these signals and processes them in the submissions of Gravity Forms. This way you will always see the correct status of a payment with the submissions.
Plauti Duplicate check
By default, Salesforce uses its own Duplicate Rules when CampaignSuite communicates with Converse or Findock. A simple example is, for example, that you can set the e-mail address of a Contact to be unique. Converse and Findock will then look for duplicates based on an email address.
If you have indicated in CampaignSuite that Plauti Duplicate Check should be used, CampaignSuite will in some cases first go through this App so that its Duplicate Rules are used.
You have the option of setting per form what the score for scenarios should be. More information about scores and scenarios can be found in Plauti’s documentation . To be able to use this function it is important that the scenario is applied to DATA API!
The threshold in the DC Setup of your Salesforce instance only indicates from which matching percentage a record is considered duplicate. With the Duplicate Score in CampaignSsuite you can indicate from which matching percentage you want to update an existing record.
Example: You have the Duplicate Check Threshold set at 75% and Duplicate Score in CampaignSuite at 90. When you submit a record via CampaignSuite, the scenario is used to see if there is a duplicate. Suppose there is a duplicate record with a matching percentage of 80%, a new record is created (which is considered a duplicate) and placed in a DC Job. If there was a matching percentage of 90% or higher, the existing record will be updated (because the Duplicate Score is at 90).
If a form must use a different Score than the settings you have made with CampaignSuite, you can set it here. Then enable this option and enter new scores.
Synchronisation fields
Syncchronisation fields can be used to sync between a Gravity Forms checkbox field and CampaignMember objects or soco__Membership__c objects in SalesForce.
Both objects in Salesforce are often used for, for example, subscriptions or newsletter subscriptions. That is why this feature of CampaignSuite can be used in particular for a “Preference center” where someone can indicate which newsletters he / she still wants to receive.
Checkbox field
If you link a field for synchronization, it must be a checkbox field. This will look like this, for example:
Most importantly, the data in the Value column must be exactly the same as the ID in Salesforce.
CampaignMember
When you link a CampaignMember field, it must contain the Campaign IDs.
Membership
When you link a Membership field, it must contain the ID’s of the Products.
Prefills
It is also possible to prefill a form with sync fields with data from Salesforce. For this it is necessary to include in the URL of the page where the form is on as parameter ?contact={ContactId}. More information about this can be found in the article Prefills based on ContactID .
Salesforce objecten
In this section of the Salesforce settings you have the option to link the fields of Salesforce objects to fields in your Gravity Forms form. In this way CampaignSuite knows exactly which information should be stored in which field of which object.
Currently 4 objects are supported to link here:
1. Contact
All fields of the Contact object from Salesforce are shown here and can be linked to a Gravity Forms field.
2. Account
All fields of the Account object from Salesforce are shown here and can be linked to a Gravity Forms field.
3. Non-debit fields
The object that can be linked here depends on the Salesforce configuration of the Payment Connector (Converse, Findock, NPSP, etc). As a rule, you should think of the Installment object such as cpm__Installment__c or soco__Installments__c . All fields of this will then be shown here so that you can fill them with a value from the form.
4. Authorization
This object also depends (just like the non-debit field) on the Payment Connector. Objects you can think about include soco__Payment__c, soco__Agreement__c or cpm__Recurring_Payment__c .
Did you know?
By means of the key combination ctrl+shift+s it is possible to filter these long lists of fields on only the linked fields. This way, you will be able to see at a glance which fields you have linked.
Prefilling based on ContactID
When CampaignSuite has established a connection with Salesforce, it is possible to prefill a form with values from a Contact or Account from Salesforce.
Of course, you must first link the correct fields to each other under Salesforce objects in the settings of the Salesforce form. In this way CampaignSuite knows which information should be displayed in which fields.
To retrieve all data from Salesforce, simply add the Contact ID to the URL:
https://www.website.nl/form?contact={ContactId}
In the URL, replace {ContactId} with an ID from Salesforce.
It is also technically possible to make this check more secure by making multiple fields mandatory in the URL (such as Email). Then CampaignSuite searches for the Contact where the ID matches and the email address. If you would like this supplement, please contact Gopublic.
Prefill HTML and textarea
CampaignSuite makes it possible to have a text box or HTML field in your form automatically filled with values from other fields in the form. This can be especially useful for showing a detailed summary of the information entered on the form on your last page of the form.
Note
This functionality only works if your form consists of more than 1 page. The fields are filled when the visitor switches pages in the form.
The images below show two examples of how you can fill a text box and HTML field.
The values of the fields can be entered by the syntax:
{input_field_id}
Where field_id is the ID of the field in your form.
Did you know
If you add the parameter ?cs_post=true to the URL of the page where your form is located, you will see (when you click the button at the bottom of the form) exactly which field IDs and values you can use when prefilling text boxes and HTML fields.
Timber plugin
It is also possible to apply some logic to the code in the fields. If you have installed the plugin Timber it is also possible to use .twig logic. See this website for an explanation of the possibilities.
Some examples of .twig logic are:
{% if "{input_1}" == "Ideal" %}
This is an Ideal payment
{% else %}
This is not an Ideal payment
{% endif %}
{% switch "{input_3}" %}
{% case 'Ideal' %}
<p>Ideal payment</p>
{% case 'Direct debit' %}
<p>Debit</p>
{% case 'Creditcard' %}
{% case 'Sofort' %}
<p>Other payment method</p>
{% default %}
<p>Unknown payment method</p>
{% endswitch %}
Plauti Duplicate check
By default, Salesforce uses its own Duplicate Rules when CampaignSuite communicates with Converse or Findock. A simple example is, for example, that you can set the e-mail address of a Contact to be unique. Converse and Findock will then look for duplicates based on an email address.
If you have indicated in CampaignSuite that Plauti Duplicate Check should be used, CampaignSuite will in some cases first go through this App so that its Duplicate Rules are used.
You have the option of setting per form what the score for scenarios should be. More information about scores and scenarios can be found in Plauti’s documentation . To be able to use this function it is important that the scenario is applied to DATA API!
The threshold in the DC Setup of your Salesforce instance only indicates from which matching percentage a record is considered duplicate. With the Duplicate Score in CampaignSsuite you can indicate from which matching percentage you want to update an existing record.
Example: You have the Duplicate Check Threshold set at 75% and Duplicate Score in CampaignSuite at 90. When you submit a record via CampaignSuite, the scenario is used to see if there is a duplicate. Suppose there is a duplicate record with a matching percentage of 80%, a new record is created (which is considered a duplicate) and placed in a DC Job. If there was a matching percentage of 90% or higher, the existing record will be updated (because the Duplicate Score is at 90).
If a form must use a different Score than the settings you have made with CampaignSuite, you can set it here. Then enable this option and enter new scores.
Endpoints
When CampaignSuite is activated, a number of new endpoints will be added within Wordpress. These endpoints can be accessed by third party software. These endpoints are explained below with the associated parameters.
gp_webhook_path
This endpoint can be accessed by Findock and handles all webhook calls related to changes to a payment (or in the case of Findock 2 changes in the PaymentIntent). CampaignSuite automatically determines whether it is for Findock v1 or v2 based on the content of the call. With every API call to Findock, CampaignSuite automatically adds this URL as WebhookURL.
Example
Met dit filter kunt u eigen custom JSON toevoegen aan de API call richting Findock of Converse. Deze JSON zal toegevoegd worden aan de root van het JSON object.
Onderstaand voorbeeld loopt door Woocommerce items in een winkelwagen en controleert of er Destination ID’s gezet zijn. Als dat het geval is zullen deze worden meegegeven in de JSON call naar de CampaignSuite API.
					function custom_json()
{
    global $woocommerce;
    if ($woocommerce) {
        $items = $woocommerce->cart->get_cart();
        if ($items) {
            $jsonItems = [];
            foreach ($items as $values) {
                $price = get_post_meta($values['product_id'], '_price',true);
                $destination_id = get_post_meta($values['product_id'], '_sf_destination_id', true);
                if ($destination_id) {
                    $jsonItems[] = [
                        'DestinationId' => $destination_id,
                        'Amount' => $price
                    ];
                }
            }
            if ($jsonItems) {
                return [
                    'TransactionInfo' => [
                        'Gifts' => $jsonItems
                    ]
                ];
            }
        }
    }
    return [];
}
cs_add_custom_json
Description
With this filter you can add your own custom JSON to the API call to Findock or Converse. This JSON will be added to the root of the JSON object.
The example below loops through Woocommerce items in a shopping cart and checks whether Destination IDs have been set. If so, these will be passed in the JSON call to the CampaignSuite API.
					function custom_json()
{
    global $woocommerce;
    if ($woocommerce) {
        $items = $woocommerce->cart->get_cart();
        if ($items) {
            $jsonItems = [];
            foreach ($items as $values) {
                $price = get_post_meta($values['product_id'], '_price',true);
                $destination_id = get_post_meta($values['product_id'], '_sf_destination_id', true);
                if ($destination_id) {
                    $jsonItems[] = [
                        'DestinationId' => $destination_id,
                        'Amount' => $price
                    ];
                }
            }
            if ($jsonItems) {
                return [
                    'TransactionInfo' => [
                        'Gifts' => $jsonItems
                    ]
                ];
            }
        }
    }
    return [];
}
Facebook
The provider Facebook gives you the ability to only make Server Side API calls to the Facebook Conversion API. This can be done at any of the six available event moments. Click here to get more information about the Facebook Conversion API.
To use the Facebook provider in Measurements you must have entered a Pixel ID and an Access token in the CampaignSuite settings. Without these two values it is not possible to use this provider. More information about setting up a Pixel can be found at this page.
The Facebook Conversion API works on the basis of events. CampaignSuite will create a JSON based on the mapping made in the Feed action, which will be sent via a POST request to Facebook’s API. See the example below of the mapping in CampaignSuite and the JSON sent to Facebook.
event_id The event_id parameter is automatically filled with a combination of the form ID and the entry ID (1_346).
action_source The parameter action_source will be automatically filled with the value website provided it is not mapped with its own value.
event_time The parameter event_time is filled by default with the date and time of submission in the form.
custom_data.currency The parameter < strong>custom_data.currency is filled by default with the event type After a successful payment.
Custom parameters
In addition to the predefined parameters, it is also possible to send parameters yourself. Click here for a list of the available parameters for Facebook. For example, to add a city field to user_data you must enter as key value: data.user_data.ct. This will then automatically in the JSON. In the example above, the phone number field custom has been added.
Facebook
De aanbieder Facebook geeft je de mogelijkheid om alleen Server Side API calls uit te voeren naar de Facebook Conversion API. Dit kan op elk van de zes beschikbare event momenten. Klik hier om meer informatie te verkrijgen over de Facebook Conversion API.
Om gebruik te maken van de Facebook aanbieder in Metingen moet je een Pixel ID en een Access token hebben ingevoerd in de CampaignSuite instellingen. Zonder deze twee waarden is het niet mogelijk om deze aanbieder te gebruiken. Meer informatie over het instellen van een Pixel kan je vinden op deze pagina.
De Facebook Conversion API werkt op basis van events. CampaignSuite zal op basis van de mapping die is gemaakt in de Feed actie een JSON maken die via een POST request verstuurd wordt naar de API van Facebook. Zie het voorbeeld hieronder van de mapping in CampaignSuite en de JSON die verstuurd wordt naar Facebook.
event_id De parameter event_id wordt automatisch gevuld met een combinatie van het formulier ID en de inzending ID (1_346).
action_source De parameter action_source zal automatisch gevuld worden met de waarde website mits deze niet is gemapped met een eigen waarde.
event_time De parameter event_time wordt standaard gevuld met de datum en tijd van de inzending in het formulier.
custom_data.currency De parameter custom_data.currency wordt standaard gevuld bij het event type Na een succesvolle betaling.
Custom parameters
Naast de voorgedefinieerde parameters is het ook mogelijk om zelf parameters mee te sturen. Klik hier voor een lijst met de beschikbare parameters voor Facebook. Om bijvoorbeeld een woonplaats veld toe te voegen aan user_data moet je als key waarde invullen: data.user_data.ct. Dit zal dan automatisch in de JSON gezet worden. In het bovenstaande voorbeeld is het telefoonnummer veld custom toegevoegd.
Mautic
Mautic is een volwaardig marketing automation systeem wat is in te zetten in B2B en B2C. Oneindig veel verschillende marketing taken kunnen met Mautic worden geautomatiseerd. Van het simpel door sturen van een formulier tot complexe leadnurturing of remarketing / upsell campagnes.
CampaignSuite biedt de mogelijkheid om een Gravity Forms inzending naar een Mautic formulier te versturen. Op deze manier is het mogelijk bezoeker een start te laten maken met bijvoorbeeld een journey in Mautic.
Als u in Mautic contactvelden koppelt aan de formuliervelden, worden automatisch inzending gekoppeld aan nieuwe of bestaande contacten (leads) in Mautic.
Schakel de verbinding met Mautic om CampaignSuite een inzending aan te laten maken in een Mautic formulier. Kies vervolgens één van de Mautic formulieren. Om de Mautic velden op te halen klikt u op de button Refresh.
In de linker kolom staan alle velden van Gravity Forms en rechts in elke dropdown de velden van het Mautic formulier. Koppel vervolgens alle benodigde velden aan elkaar.
Bij Overige instellingen kunt u het Gravity Forms Entry-ID koppelen en het veld waar een betaalstatus in moet worden opgeslagen. Koppel deze velden als u ervoor wilt zorgen dat de status van een betaling ook naar Mautic gestuurd wordt.
Let op
U moet de velden Gravity Forms Entry-ID en Update betalingsstatus koppelen om ervoor te zorgen dat een verandering van een status goed naar Mautic gestuurd wordt.
Synchronisatievelden
Synchronisatievelden kunnen worden gebruikt om een sync te maken tussen een Gravity Forms checkbox veld en CampaignMember objecten of soco__Membership__c objecten in SalesForce.
Beide objecten in Salesforce worden vaak gebruikt voor bijvoorbeeld abonnementen of nieuwsbrief inschrijvingen. Daarom kan deze feature van CampaignSuite met name gebruikt worden voor een “Preference center” waar iemand aan kan geven welke nieuwsbrieven hij/zij nog wilt ontvangen.
Checkbox veld
Als u een veld koppelt voor synchronisatie, dan moet dat een checkbox veld zijn. Deze ziet dan bijvoorbeeld zo uit:
Het belangrijkste is dat de de gegevens in de kolom Waarde exact hetzelfde is als het ID in Salesforce.
CampaignMember
Wanneer u een CampaignMember veld koppelt moeten hier de ID’s van de Campagnes in staan.
Membership
Wanneer u een Membership veld koppelt moeten hier de ID’s van de Products in staan.
Prefillen
Het is ook mogelijk om een formulier met synchronisatievelden te laten prefillen met gegevens uit Salesforce. Daarvoor is het nodig om in de URL van de pagina waar het formulier op staat als parameter ?contact={ContactId} mee te sturen. Meer informatie hierover kan u vinden in het artikel Prefillen o.b.v. ContactID.
One-click-payment
One-click-payment is een manier om via een URL direct een donatie te maken waarbij de bezoeker in één keer doorgestuurd wordt naar zijn/haar bank-pagina. Het voordeel hiervan is is dat de complete flow identiek is aan het invullen van een donatie formulier, echter zonder tussenkomst van de pagina waar het formulier op staat.
Om One-Click-Payment te laten werken moet u minstens voldoen aan de volgende punten:
Er moet een formulier aangemaakt zijn welke volledig gekoppeld is aan een Salesforce betaling
Het formulier moet wel op een pagina (desnoods verborgen) staan voor het geval de donateur zijn/haar donatie beëindigd.
Er moet een bedank bericht of bedank pagina ingesteld staan voor het succesvol afvangen van de donateur.
De velden van het formulier die u wilt vullen moeten ingesteld zijn om dynamisch gevuld te mogen worden. Lees meer informatie hierover op deze website.
Als bovenstaande punten ingesteld zijn kan de URL voor een One-Click-Payment er als volgt uit zien:
Er zijn een aantal verplichte parameters in de URL:
amount Vul hier het bedrag in voor de donatie
form_id Vul hier het ID in van het Gravity Forms formulier waar de betaling afgehandeld moet worden
contact (optioneel) Vul hier een ID in van een Salesforce Contact
Als u geen Salesforce Contact ID mee stuurt in de URL zijn een voornaam, achternaam en e-mailadres ook verplicht om mee te sturen in de URL.
Zodra men op de link klikt zal het formulier vooraf ingevuld worden met de benodigde waarden en verstuurd worden via de API. Als er velden missen of fouten plaatsvinden dan worden die direct in beeld getoond.
Mautic
Mautic is a full-fledged marketing automation system that can be used in B2B and B2C. An infinite number of different marketing tasks can be automated with Mautic. From simple forwarding of a form to complex lead nurturing or remarketing / upsell campaigns.
CampaignSuite offers the possibility to send a Gravity Forms submission to a Mautic form. In this way it is possible to allow the visitor to start a journey in Mautic, for example.
If you link contact fields to the form fields in Mautic, submissions are automatically linked to new or existing contacts (leads) in Mautic.
Switch the connection to Mautic to have CampaignSuite create a submission in a Mautic form. Then choose one of the Mautic forms. To retrieve the Mautic fields, click on the Refresh button.
The left column contains all the fields of Gravity Forms and the right side of each dropdown contains the fields of the Mautic form. Then link all necessary fields together.
At Other settings you can link the Gravity Forms Entry ID and the field in which a payment status should be stored. Link these fields if you want to ensure that the status of a payment is also sent to Mautic.
Note
You must map the fields Gravity Forms Entry ID and Update Payment Status to ensure that a status change is properly sent to Mautic.
Synchronisation fields
Syncchronisation fields can be used to sync between a Gravity Forms checkbox field and CampaignMember objects or soco__Membership__c objects in SalesForce.
Both objects in Salesforce are often used for, for example, subscriptions or newsletter subscriptions. That is why this feature of CampaignSuite can be used in particular for a “Preference center” where someone can indicate which newsletters he / she still wants to receive.
Checkbox field
If you link a field for synchronization, it must be a checkbox field. This will look like this, for example:
Most importantly, the data in the Value column must be exactly the same as the ID in Salesforce.
CampaignMember
When you link a CampaignMember field, it must contain the Campaign IDs.
Membership
When you link a Membership field, it must contain the ID’s of the Products.
Prefills
It is also possible to prefill a form with sync fields with data from Salesforce. For this it is necessary to include in the URL of the page where the form is on as parameter ?contact={ContactId}. More information about this can be found in the article Prefills based on ContactID .
One-click-payment
One-click payment is a way to make a direct donation via a URL where the visitor is redirected to his / her bank page in one go. The advantage of this is that the complete flow is identical to filling in a donation form, but without going through the page containing the form.
In order for One-Click-Payment to work, you must at least meet the following points:
A form must be created which is fully linked to a Salesforce payment
The form must be on a page (hidden if necessary) in case the donor terminates his / her donation.
A thank you message or thank you page must be set up for successful donor capture.
The fields of the form you want to fill must be set to be filled dynamically. Read more information about this at this website .
If the above points are set, the URL for a One-Click-Payment can look like this:
There are a number of mandatory parameters in the URL:
amount
Enter the amount for the donation here
form_id
Enter the ID of the Gravity Forms form where the payment should be handled here
contact (optional)
Enter an ID of a Salesforce Contact
here
If you do not include a Salesforce Contact ID in the URL, a first name, last name, and email address are also required to include in the URL.
As soon as you click on the link, the form will be pre-filled with the required values and sent via the API. If fields are missing or errors occur, they will be displayed immediately.
Marketing Cloud
Marketing Cloud is het marketing automation pakket van Salesforce. CampaignSuite biedt een aantal uitbreidingen op Gravity Forms waarmee er verschillende verbindingen gemaakt kunnen worden met Marketing Cloud. Denk hierbij aan:
Het creëeren van een Transactional Email event
Het creëeren van een Journey event
Het prefillen van een formulier op basis van Marketing Cloud Contact data
Dynamische content uit Marketing Cloud gebruiken op pagina’s op basis van unieke parameters
Het prefillen van data en het ophalen van dynamische content uit Marketing Cloud vereisen wel specifieke Cloud Pages. Als u hier gebruik van wilt maken, neem dan contact met ons op.
De verbinding met Marketing Cloud wordt opgezet middels een OAuth 2 connectie. Voer onderstaande stappen uit om dit in te stellen:
Ga naar de tab Marketing Cloud in de CampaignSuite instellingen en klik op Authenticeren.
Vul de volgende gegevens in van het formulier: – Subdomein ID Dit is een uniek ID wat te vinden is in de URL van Marketing Cloud. Het is belangrijk dat u hier alleen het ID invult, en niet de rest van de URL. – Account ID Vul hier uw Marketing Cloud Account ID in – Client ID Vul hier uw Marketing Cloud Client ID in – Client Secret Vul hier uw Marketing Cloud Secret in
Klik op Authenticeren.
De verbinding is succesvol tot stand gebracht.
Marketing Cloud opties
Als u de beveiligde verbinding met Marketing Cloud tot stand hebt gebracht verschijnen er diverse opties in het tabblad Marketing Cloud.
Prefill-pagina Endpoint
Hier kunt u een URL invullen van een openbare Marketing Cloud Page. Deze pagina bevat logica die op basis van parameters in de URL (bijvoorbeeld id en hash) Contact data kan ophalen uit de database van Marketing Cloud. Deze data moet worden getoond als JSON data.
Als u gebruik wilt maken van deze functionaliteit, neem dan contact met ons op.
Marketing Cloud
Marketing Cloud is the marketing automation package from Salesforce. CampaignSuite offers a number of extensions to Gravity Forms that allow various connections to be made with Marketing Cloud. Think about:
Creating a Transactional Email event
Creating a Journey event
Prefilling a form based on Marketing Cloud Contact data
Use dynamic content from Marketing Cloud on pages based on unique parameters
Prefilling data and retrieving dynamic content from Marketing Cloud does require specific Cloud Pages. If you want to make use of this, please contact us.
The connection to Marketing Cloud is established through a OAuth 2 connection. Follow the steps below to set this up:
Go to the tab Marketing Cloud in the CampaignSuite settings and click on Authenticate.
Enter the following information in the form: – Subdomain ID This is a unique ID that can be found in the URL of Marketing Cloud. It is important that you only enter the ID here, and not the rest of the URL. – Account ID Enter your Marketing Cloud Account ID here – Client ID Enter your Marketing Cloud Client ID here – Client Secret Enter your Marketing Cloud Secret here
Click Authenticate.
The connection has been established successfully.
Marketing Cloud options
Once you have established the secure connection to Marketing Cloud, several options will appear in the Marketing Cloud tab.
Prefill Endpoint page
Here you can enter a URL of a public Marketing Cloud Page. This page contains logic that can retrieve Contact data from Marketing Cloud’s database based on parameters in the URL (for example, id and hash). This data must be displayed as JSON data.
If you would like to use this functionality, please contact us.
Verberg vooraf ingevulde velden
Bij elk Gravity Forms veld kan u er voor kiezen om deze te verbergen als de waarde ervan vooraf ingevuld is. Doorloop onderstaande stappen om dit in te stellen bij een veld:
Bewerk een formulier
Klik op een veld
Klik in de rechterkolom op het tabblad Geavanceerd
Klik op de optie Verberg indien vooraf ingevuld
Hiermee is nu aangegeven dat het veld wordt verborgen als de waarde vooraf is ingevuld. Dat geldt ook voor de Gravity Forms optie Toestaan dat veld dynamisch wordt gevuld.
Wanneer u dit instelt zal het veld ook worden verborgen als daarvan de waarde in de URL is meegegeven.
Marketing Cloud en Salesforce
Deze functie werkt ook als de waarde van de velden door data worden ingevuld vanuit Marketing Cloud of Salesforce
Hide prefilled fields
With each Gravity Forms field you can choose to hide it if its value is pre-filled. Follow the steps below to set this up for a field:
Edit a form
Click on a field
Click in the right column on the tab Advanced
Click the option Hide if pre-filled
This now indicates that the field will be hidden if the value is pre-filled. This also applies to the Gravity Forms option Allow field to be filled dynamically.
When you set this, the field will also be hidden if its value is given in the URL.
Marketing Cloud and Salesforce
This function also works if the value of the fields is filled in by data from Marketing Cloud or Salesforce
Google Analytics 4
Met de aanbieder Google Analytics 4 (GA4) is het mogelijk om Client Side en Server Side calls uit te voeren. Dit kan voor alle zes de verschillende event types. Alleen bij de event types Na een webhook call van Findock v2 en Na een succesvolle betaling kan een Server Side call uitgevoerd worden en niet Client Side.
Client Side
Wij adviseren gebruik te maken van de Client Side calls in GA4 als je niet beschikt over Google Tag Manager. Wanneer je namelijk gebruik maakt van de Client Side call voert CampaignSuite javascript functies uit door middel van gtag(); Hierbij is het wel noodzakelijk dat Google Tag geïnstalleerd is op de website:
<!-- Google tag (gtag.js) -->
<script async src="https://www.googletagmanager.com/gtag/js?id=GA_TRACKING_ID"></script>
<script>
  window.dataLayer = window.dataLayer || [];
  function gtag(){window.dataLayer.push(arguments);}
  gtag('js', new Date());
  gtag('config', 'GA_TRACKING_ID');
</script>
Vervang in de bovenstaande code GA_TRACKING_ID door jouw eigen tracking ID van Google Analytics.
Als CampaignSuite een Client Side GA4 call uitvoert zal er een javascript code aangeroepen worden in de browser van de bezoeker. Lees hier meer over de code die wij hier voor gebruiken. De calls naar GA4 maken gebruiken van events. Een voorbeeld van een simpele pagina wisseling in Gravity Forms kan er als volgt uit zien:
Bovenstaande code maakt gebruik van de Javascript function gtag().
Server Side
Technisch is het mogelijk om voor alle zes de event types een Server Side call te laten uitvoeren naar GA4. Dit is alleen beschikbaar als er een Measurement ID en een API secret zijn ingevuld bij de instellingen van CampaignSuite. Deze zijn te vinden in het admin gedeelte van jouw Google Analytics account -> Account Settings -> Data Streams. Klik op de stream en kopieer hier het Measurement ID. De waarde van de API secret kan gevonden worden onder het kopje Measurement Protocol API secrets.
De Server Side call van GA4 maken gebruik van de Measurement Protocol API van Google. Ook deze API werkt op basis van het versturen van events via een POST request naar een endpoint (https://www.google-analytics.com/mp/collect).
Onderstaande afbeeldingen tonen een voorbeeld van een GA4 Server Side call bij een succesvolle betaling in CampaignSuite:
With the provider Google Analytics 4 (GA4) it is possible to perform Client Side and Server Side calls. This is possible for all six different event types. Only with the event types After a webhook call from Findock v2 and After a successful payment a Server Side call can be performed and not Client Side.
Client Side
We recommend using the Client Side calls in GA4 if you don’t have Google Tag Manager. When you use the Client Side call, CampaignSuite executes javascript functions by means of gtag(); This requires that Google Tag is installed on the website:
<!-- Google tag (gtag.js) -->
<script async src="https://www.googletagmanager.com/gtag/js?id=GA_TRACKING_ID"></script>
<script>
  window.dataLayer = window.dataLayer || [];
  function gtag(){window.dataLayer.push(arguments);}
  gtag('js', newDate());
  gtag('config', 'GA_TRACKING_ID');
</script>
In the above code, replace GA_TRACKING_ID with your own tracking ID from Google Analytics.
When CampaignSuite executes a Client Side GA4 call, a javascript code will be executed in the visitor’s browser. Read here more about the code we use for this. The calls to GA4 use events. An example of a simple page change in Gravity Forms might look like this:
The above code uses the Javascript function gtag().
Server Side
Technically it is possible to have a Server Side call made to GA4 for all six event types. This is only available if a Measurement ID and an API secret are entered in the CampaignSuite settings. These can be found in the admin section of your Google Analytics account -> Account Settings -> Data Streams. Click on the stream and copy the Measurement ID here. The value of the API secret can be found under the heading Measurement Protocol API secrets.
GA4’s Server Side calls use the Measurement Protocol API from Google. This API also works on the basis of sending events via a POST request to an endpoint (https://www.google-analytics.com/mp/collect).
The images below show an example of a GA4 Server Side call upon a successful payment in CampaignSuite:
Deze tab toont in één overzicht alle formulieren in Gravity Forms. Per resultaat ziet u welke connecties er ingesteld zijn bij het formulier (zoals Salesforce of Mautic). In de laatste kolom staat een directe link naar de eerst gevonden pagina waarom dit formulier te zien is. Op deze manier kunt u snel naar een bepaalde pagina gaan om het formulier te testen.
Tevens kunt u aangeven of er standaard bij elk formulier een witte overlay getoond moet worden zodra de bezoeker het formulier verzend. Deze overlay zorgt er ook voor dat de bezoeker niet per ongeluk twee keer het formulier verzend.
Salesforce objecten
In dit gedeelte van de Salesforce instellingen heeft u de mogelijkheid om de velden van Salesforce objecten te koppelen aan velden in uw Gravity Forms formulier. Op deze manier weet CampaignSuite precies welke informatie in welk veld van welk object opgeslagen moet worden.
Momenteel worden er 4 objecten ondersteunt om hier te koppelen:
1. Contact
Alle velden van het object Contact uit Salesforce worden hier getoond en kunt u koppelen aan een Gravity Forms veld.
2. Account
Alle velden van het object Account uit Salesforce worden hier getoond en kunt u koppelen aan een Gravity Forms veld.
3. Niet-debet velden
Het object wat hier gekoppeld kan worden is afhankelijk van de Salesforce configuratie van de Payment Connector (Converse, Findock, NPSP, etc). In de regel moet u hier denken aan het Installment object zoals cpm__Installment__c of soco__Installments__c. Alle velden hiervan zullen dan hier getoond worden zodat u deze kunt vullen met een waarde uit het formulier.
4. Machtiging
Dit object hangt ook (net zoals het niet-debet veld) af van de Payment Connector. Objecten waar u kunt denken zijn bijvoorbeeld soco__Payment__c, soco__Agreement__c of cpm__Recurring_Payment__c.
Wist u dat?
Door middel van de toets combinatie ctrl+shift+s is het mogelijk om deze lange lijsten van velden te filteren op alleen de gekoppelde velden. Zo krijgt u in één opslag te zien welke velden u heeft gekoppeld.
Pardot
Pardot is een Salesforce applicatie die specifiek is ontworpen voor B2B marketing automation. Met Pardot krijgen marketing- en salesafdelingen de beschikking over een reeks krachtige tools om data te gebruiken voor automatische marketing, om meer en betere leads te genereren en om de ROI van hun campagnes te berekenen.
Wanneer CampaignSuite gekoppeld is aan Pardot heeft u de mogelijkheid om Gravity Forms inzendingen direct te versturen naar Pardot formulieren of Pardot Form Handlers.
De makkelijkste manier om Gravity Forms formulieren te koppelen aan Pardot is via een bestaand Pardot formulier. Dit kunt u doen bij de formulier instellingen onder het tabblad Pardot.
Pardot connectie
Vink deze checkbox aan om aan te geven dat er een Pardot koppeling gemaakt moet worden.
Submit opties
Wanneer uw formulier eindigt in een betaling (met bijvoorbeeld Converse of Findock) kunt u hier instellen dat er pas een Pardot formulier inzending wordt aangemaakt zodra de betaling ook daadwerkelijk succesvol is. Hiermee kan u succesvolle journeys starten in Pardot voor donateurs.
Form Handler Endpoint
Het is mogelijk om een formulier naar een Form Handler te versturen. Plak hier een Form Handler URL uit Pardot. Deze staan in de kolom URL in het overzicht van Form Handlers in Pardot.
Zodra u een URL heeft ingevuld, klikt up op Refresh zodat u de velden kunt mappen.
Zodra u een URL heeft ingevoerd, en op Refresh heeft geklikt kunt u alle velden handmatig mappen met de Pardot formulier velden.
LET OP: het is belangrijk dat u exact dezelfde naam invult van het Pardot formulier veld bij de kolom key.
Pardot Form Handler
Form Handlers in Pardot zijn een alternatief voor Pardot-formulieren. U kunt een Form Handler gebruiken om uw formulieren van derden of aangepaste formulieren met Pardot te integreren om inzendingsgegevens bij te houden.
Bij het gebruiken van Form Handlers is het niet mogelijk om eenvoudig Gravity Forms velden te mappen met Form Handler velden. Deze moet u stuk voor stuk handmatig invoeren in de Pardot instellingen van het Gravity Forms formulier.
Kopieer en plak het Endpoint URL van de Form Handler in het veld Form Handler Endpoint van de Gravity Forms Pardot instellingen.
Klik op Instellingen bijwerken
Onderaan verschijnt er nu een mogelijkheid om zelf velden te mappen. In de linkerkolom vult u het External Field Name in van Pardot en in de rechterkolom selecteert u een veld uit het Gravty Forms formulier. De Pardot veld aliassen kunt u vinden onder het kopje Form Field Mappings als u de Form Handler opent in Pardot:
Klik op het plusje rechts van de velden om meerdere velden handmatig te mappen. Zodra alle velden gekoppeld zijn klikt u Instellingen bijwerken om het op te slaan.
Gravity Forms
This tab shows all forms in Gravity Forms in one overview. For each result you can see which connections have been set up in the form (such as Salesforce or Mautic). The last column contains a direct link to the first page found on which this form can be viewed. This way you can quickly go to a particular page to test the form.
You can also indicate whether a white overlay should be shown with each form by default as soon as the visitor sends the form. This overlay also ensures that the visitor does not accidentally submit the form twice.
Pardot
Pardot is a Salesforce application specifically designed for B2B marketing automation. With Pardot, marketing and sales departments have access to a range of powerful tools to use data for automatic marketing, generate more and better leads and calculate the ROI of their campaigns.
When CampaignSuite is linked to Pardot you have the option to send Gravity Forms submissions directly to Pardot forms or Pardot Form Handlers.
The easiest way to link Gravity Forms forms to Pardot is through an existing Pardot form. You can do this in the form settings under the tab Pardot .
Pardot connection Select this checkbox to indicate that a Pardot link must be made.
Submit options When your form ends in a payment (with Converse or Findock, for example), you can set here that a Pardot form submission is only created once the payment is actually successful. This allows you to start successful journeys in Pardot for donors.
Form Handler Endpoint It is possible to send a form to a Form Handler. Paste a Form Handler URL from Pardot here. These can be found in the URL column in the overview of Form Handlers in Pardot. Once you have entered a URL, click on Refresh so that you can map the fields.
Once you have entered a URL and clicked Refresh you can manually map all fields with the Pardot form fields.
NOTE: it is important that you enter the exact same name of the Pardot form field in the column key .
Pardot Form Handler
Form Handlers in Pardot are an alternative to Pardot forms. You can use a Form Handler to integrate your third-party or custom forms with Pardot to track submission data.
When using Form Handlers it is not possible to easily map Gravity Forms fields with Form Handler fields. You have to enter these manually one by one in the Pardot settings of the Gravity Forms form.
Copy and paste the Endpoint URL of the Form Handler into the Form Handler Endpoint field of the Gravity Forms Pardot settings.
Click on Update settings
At the bottom you will now see a possibility to map fields yourself. In the left column enter the External Field Name of Pardot and in the right column select a field from the Gravty Forms form. The Pardot field aliases can be found under the heading Form Field Mappings when you open the Form Handler in Pardot:
Click the plus sign to the right of the fields to manually map multiple fields. Once all fields are linked, click Update Settings to save it.
Salesforce objecten
In this section of the Salesforce settings you have the option to link the fields of Salesforce objects to fields in your Gravity Forms form. In this way CampaignSuite knows exactly which information should be stored in which field of which object.
Currently 4 objects are supported to link here:
1. Contact
All fields of the Contact object from Salesforce are shown here and can be linked to a Gravity Forms field.
2. Account
All fields of the Account object from Salesforce are shown here and can be linked to a Gravity Forms field.
3. Non-debit fields
The object that can be linked here depends on the Salesforce configuration of the Payment Connector (Converse, Findock, NPSP, etc). As a rule, you should think of the Installment object such as cpm__Installment__c or soco__Installments__c . All fields of this will then be shown here so that you can fill them with a value from the form.
4. Authorization
This object also depends (just like the non-debit field) on the Payment Connector. Objects you can think about include soco__Payment__c, soco__Agreement__c or cpm__Recurring_Payment__c .
Did you know?
By means of the key combination ctrl+shift+s it is possible to filter these long lists of fields on only the linked fields. This way, you will be able to see at a glance which fields you have linked.
Squeezely
Met Squeezely maak je out-of-the-box de meest geavanceerde buyer journeys en personalisatie toepassingen. Je werkt op basis van loepzuivere data en kan alles helemaal naar eigen inzicht inrichten. Deze tool maakt gebruik van zowel een tracking pixel op jouw website of kan events inschieten via hun API. Deze mogelijkheid biedt CampaignSuite in Metingen. Squeezely werkt op basis van events. Elke meting die je instelt in CampaignSuite moet een event zijn.
Om gebruik te maken van de Server Side calls via de Squeezely aanbieder moet je een Account ID en een API-sleutel invullen in de CampaignSuite instellingen. De Client Side calls van Squeezely werken met een datalayer.push() en zullen alleen werken als de Squeezely pixel op de website is geïnstalleerd:
Omdat de Squeezely pixel is ingeladen in de website zal dit event worden afgevangen in Squeezely.
Server Side
Server Side calls kunnen worden ingesteld in alle zes de metingen momenten. Het is bij Server Side calls echter wel verplicht om een unieke identifier mee te sturen in de paramaters anders weet Squeezely niet aan wie de data gekoppeld moet worden in hun systeem.
Onderstaande afbeelding toont een Server Side call na een succesvolle donatie. Deze call wordt ‘onder water’ naar Squeezely gestuurd op het moment dat een betaling succesvol is afgerond.
Squeezely heeft een tool waarmee je kunt controleren of Server Side API calls goed binnen komen. Deze is te vinden op: https://app.squeezely.tech/data/events.
Squeezely
With Squeezely you can create the most advanced buyer journeys and personalization applications out-of-the-box. You work on the basis of flawless data and can arrange everything entirely according to your own insight. This tool uses both a tracking pixel on your website or can shoot events via their API. CampaignSuite offers this option in Measurements. Squeezely works on the basis of events. Every measure you set in CampaignSuite must be an event.
To use the Server Side calls via the Squeezely provider you must enter an Account ID and an API key in the CampaignSuite settings. Squeezely’s Client Side calls work with a datalayer.push() and will only work if the Squeezely pixel is installed on the website:
Because the Squeezely pixel is loaded into the website, this event will be captured in Squeezely.
Server Side
Server Side calls can be set in all six measurement moments. However, with Server Side calls it is mandatory to send a unique identifier in the parameters, otherwise Squeezely will not know to whom the data should be linked in their system.
The image below shows a Server Side call after a successful donation. This call is sent ‘underwater’ to Squeezely when a payment is successfully completed.
Squeezely has a tool that allows you to check whether Server Side API calls are coming in properly. It can be found at: https://app.squeezely.tech/data/events.
Prefillen o.b.v. ContactID
Als CampaignSuite een verbinding heeft gemaakt met Salesforce is het mogelijk om een formulier te prefillen met waardes van een Contact of Account uit Salesforce.
Uiteraard moet u hiervoor bij de instellingen van het formulier bij Salesforce eerste de juiste velden aan elkaar koppelen onder Salesforce objecten. Op deze manier weet CampaignSuite welke informatie in welke velden getoond moeten worden.
Om alle gegevens op te halen uit Salesforce voegt u simpelweg het ID van het Contact toe aan de URL:
Vervang in de URL {ContactId} door een ID uit Salesforce.
Het is technisch ook mogelijk om deze controle veiliger te maken door meerdere velden verplicht in de URL te laten zetten (zoals Email). Dan zoekt CampaignSuite naar het Contact waar het ID overeenkomt en het e-mailadres. Neem contact op met Gopublic als u deze aanvulling wenst.
Prefilling based on ContactID
When CampaignSuite has established a connection with Salesforce, it is possible to prefill a form with values from a Contact or Account from Salesforce.
Of course, you must first link the correct fields to each other under Salesforce objects in the settings of the Salesforce form. In this way CampaignSuite knows which information should be displayed in which fields.
To retrieve all data from Salesforce, simply add the Contact ID to the URL:
https://www.website.nl/form?contact={ContactId}
In the URL, replace {ContactId} with an ID from Salesforce.
It is also technically possible to make this check more secure by making multiple fields mandatory in the URL (such as Email). Then CampaignSuite searches for the Contact where the ID matches and the email address. If you would like this supplement, please contact Gopublic.
Marketing Cloud
Zodra er een verbinding is opgezet met Marketing Cloud zullen er verschillende functies getoond worden in Gravity Forms. Enkele voorbeelden van deze functies zijn:
Het aanmaken van Marketing Cloud feed acties voor Transactionele e-mails en journeys.
Gebruik maken van prefill mogelijkheden op velden.
Dynamische content instellen voor Marketing Cloud e-mails.
Het kunnen instellen van Prefill variabelen bij Gravity Forms bevestigingen.
Alle onderdelen zullen worden behandeld in onderstaande artikelen.
Om Gravity Forms inzending naar Marketing Cloud te versturen moeten er Feed acties ingesteld worden. Het is eventueel mogelijk om meerdere acties in te stellen op verschillende momenten bij een inzending o.b.v. conditionele logica.
Voer onderstaande stappen uit om een koppeling te maken tussen een formulier en Marketing Cloud:
Ga naar Instellingen van het Gravity Forms formulier en klik op het tabblad Marketing Cloud.
Klik op de button Nieuwe toevoegen om een nieuwe actie toe te voegen.
Onderstaande scherm komt dan in beeld:
Vul een voor u herkenbare naam in voor deze Feed actie bij het veld Actie naam.
Kies een moment van uitvoering voor de actie.Een Marketing Cloud Feed actie kan op 3 verschillende momenten uitgevoerd worden:
Onmiddellijk na het invullen van het formulier Dit is het moment vlak nadat er een nieuwe Gravity Forms inzending is aangemaakt. Deze actie vindt plaats in de browser van de bezoeker.
Na een matched Findock v2 Webhook-call (bijv. Contact/Account gevonden) Findock v2 geeft onder water een seintje aan de website middels een Webhook wanneer het een Contact en Account heeft aangemaakt of gevonden. Als u voor dit moment kiest zal er op dat moment een call naar Marketing Cloud worden verstuurd. Dit gebeurt asynchroon met de Gravity Forms inzending.
Na een succesvolle betaling Findock v2 geeft onder water een seintje aan de website middels een Webhook wanneer eer transactie succesvol is afgerond in Salesforce. Kies dit moment als u alleen wilt dat er een call naar Marketing Cloud gaat als de betaling succesvol is.
Kies het type Marketing Cloud call
Zodra u een type call heeft geselecteerd verschijnt er een dropdown met een keuzelijst van alle events die momenteel beschikbaar zijn in Marketing Cloud. Selecteer een event om verder te gaan.
Bij Feed voorwaarde heeft u de mogelijkheid om condities in te stellen voor de actie. U kunt bijvoorbeeld de actie pas uit laten voeren als een bepaald veld is ingevuld in het formulier.
Klik op Instellingen opslaan om alles op te slaan.
Als er een Data Extensions gevonden is bij het gekozen event zal er na het opslaan een lijst verschijnen van alle beschikbare Data Extensie velden:
Koppel als laatste de juiste Data Extensie velden aan de Gravity Forms velden. Velden met een rode asterisk (*) moeten gemapped worden anders zal er een foutmelding plaatsvinden bij de API call.
Inzendingen
Bij inzendingen worden notities opgeslagen wanneer er Marketing Cloud API calls uitgevoerd worden. Op deze manier kan u altijd zien welke acties er hebben plaatsgevonden bij bepaalde inzendingen:
Prefillen van velden
CampaignSuite biedt de mogelijkheid om Gravity Forms velden vooraf te laten vullen met Contact data uit Marketing Cloud. Om gebruik te maken van deze functionaliteit is het noodzakelijk dat er een specifieke Cloud Page bestaat in Marketing Cloud. Deze pagina genereert een JSON met daarin de beschikbare velden om op te halen.
Een voorbeeld van een dergelijke JSON is:
In de algemene CampaignSuite instellingen kan het Endpoint ingesteld worden voor deze Cloud Page (Prefill-pagina Endpoint). Daarnaast is het ook mogelijk om per formulier deze URL te overschrijven.
Doorloop de volgende stappen om velden te laten prefillen met Marketing Cloud data:
Ga naar de Instellingen van een formulier en klik op het tabblad MC Prefill.
Klik op de eerste checkbox om prefillen in te schakelen voor dit formulier
Stel vervolgens alle parameters in die nodig zijn in de URL van de pagina om een record op te halen in Marketing Cloud. In deze afbeelding staat er bijvoorbeeld 2 parameters ingesteld. De URL van de pagina waar het formulier op komt te staan moet er dan bijvoorbeeld als volgt uit zien: https://www.test.nl/formulier-pagina?id=5847&hash=fjd837hjd93
Geef aan of het formulier verborgen moet worden als er op basis van de opgegeven parameters en hun waarde geen record gevonden kan worden in Marketing Cloud. U kunt ook een bericht typen wat getoond moet worden in plaats van het formulier als deze verborgen wordt.
Het is eventueel mogelijk om het standaard Prefill Endpoint te overschrijven met een andere. Doet die bij het veld Custom prefill URL.
Velden mappen
Als laatste stap is het noodzakelijk om velden uit Marketing Cloud te koppelen aan uw Gravity Forms velden. Op deze manier bepaalt u welke data in welk veld gezet moet worden.
Bevestigingen personaliseren
Wanneer u gebruik maakt van de prefill mogelijkheid zullen deze velden ook te gebruiken zijn bij formulier bevestigingen (zoals een bevestiging tekst of redirect URL).
Bevestiging tekst
Alle Marketing Cloud Prefill velden kunnen gebruikt worden in het bericht van een bevestiging. Klik hiervoor op de accolades rechts van de editor en kies daar één van de prefill velden.
Redirect pagina of URL
Het is ook mogelijk om de prefill velden te gebruiken in een querystring:
Dynamische content in e-mails
Marketing Cloud kan e-mails versturen in een Transactioneel E-mail event. In deze mails is het technisch mogelijk om dynamisch content te zetten wat ingesteld kan worden bij het formulier. Het is hierbij wel noodzakelijk dat u deze technische oplossing in Marketing Cloud hebt ingesteld. Mocht u interesse hebben in deze feature, neem dan contact met ons op.
Voer onderstaande stappen uit om dynamische content in te stellen voor Marketing Cloud E-mails:
Ga naar de Instellingen van het formulier en klik op het tabblad MC Email Content.
Vul een unieke identifier in voor de connectie tussen Marketing Cloud en CampaignSuite. Deze waarde mag geen spaties bevatten maar alleen kleine letters. Later is het ook mogelijk om deze identifier te mappen aan een Marketing Cloud veld bij een Feed actie.
Vul de tekst in die op de plek in de e-mail moet worden gezet.
Kies eventueel ook een afbeelding die gebruikt kan worden in de e-mail.
Klik op Instellingen opslaan om alles op te slaan
Technisch is het nu mogelijk om via de Endpoints die getoond worden in dit tabblad deze dynamische content te gebruiken in e-mails van Marketing Cloud.
Mappen van unieke identifier
Wanneer u een unieke identifier heeft ingevuld kan u dit veld mappen aan een Data Extensie veld bij de Marketing Cloud Feed acties:
Deze functie biedt dus de manier om heel dynamisch de content van een e-mail uit Marketing Cloud dynamisch te vullen met informatie uit het formulier.
Gutenberg Dynamic Content
Als er een verbinding met Marketing Cloud is opgezet is het ook mogelijk om Dynamische Content uit een Marketing Cloud Page op een pagina te zetten in de website. Dit gaat aan de hand van een wrapper blok genaamd Dynamic Content Wrapper.
Dit blok heeft verschillenden instellingen in de rechterkolom:
Code type Dynamische content moet altijd opgehaald worden o.b.v. een campagne code. Deze waarde kan op verschillende manieren meegestuurd worden naar Marketing Cloud: Pagina veld De code zal worden opgehaald uit het veld Campagne Code onder het blok CampaignSuite instellingen van de pagina Custom De code kan handmatig ingevuld worden op het Dynamic Content Wrapper blok.
Maak campagne code dynamisch Het is ook mogelijk om de code uit de URL van de pagina te halen. Vink daarvoor deze optie aan en vul de parameter naam in uit de URL waar de campagne code in staat.
Content type Er zijn momenteel 3 content types beschikbaar voor dynamisch content: Formulier pagina Dit is content wat vaak te vinden is op een campagne pagina. Bedankpagina Dit is content wat getoond kan worden op de bedankpagina na een donatie Next best action Dit is content wat gebruikt kan worden voor mogelijke next best actions van een donateur.
Toon geavanceerde instellingen Onder geavanceerde instellingen is het mogelijk om een custom endpoint in te stellen. Dit endpoint zal dan het default ingesteld endpoint bij CampaignSuite instellingen overrulen. Tevens kan er gekozen worden of dit dynamische blok Client side of Server side gerenderd moet worden. Client side Standaard worden de teksten en afbeeldingen in een Dynamic Content Wrapper via javascript ingeladen. Om er voor te zorgen dat de bezoeker niet een verspringen van de content ziet, zal de volledige inhoud van de pagina eerst verborgen worden. Zodra alle dynamisch content is geladen zal de pagina zichtbaar worden. Server side Bij deze optie zal de server eerst een call doen naar Marketing Cloud om de dynamische content op te halen. Vervolgens zal alle content worden vervangen in de blokken. Uiteindelijk zal de complete pagina geladen worden.
Het grootste verschil tussen Server en Client side is het feit dat bij Server side de pagina ‘blijft laden’ totdat alle content is vervangen. Bij Client side is de pagina klaar met laden en zal de bezoeker nog een korte tijd (maximaal 1 seconde) een witte pagina zien. Tevens kunnen cache plugins er voor zorgen dat Server side pagina’s niet dynamisch gevuld kunnen worden.
Elementen met dynamisch content
De volgende Gutenberg blokken binnen een wrapper kunnen dynamische content bevatten:
Zodra één van de bovenstaande velden in een Dynamic Content Wrapper blok gezet wordt, verschijnt er in de rechter kolom de volgende optie:
Vink deze optie aan om aan te geven dat de content van het originele blok vervangen moet worden door content uit Marketing Cloud. Als er geen dynamische content opgehaald kan worden uit Marketing Cloud zal de originele content intact blijven.
Marketing Cloud
Once a connection has been established with Marketing Cloud, various functions will be displayed in Gravity Forms. Some examples of these features are:
Creating Marketing Cloud feed actions for Transactional emails and journeys.
Use prefill options on fields.
Set up dynamic content for Marketing Cloud emails.
Being able to set Prefill variables with Gravity Forms confirmations.
To send Gravity Forms submission to Marketing Cloud, Feed actions must be set up. It is possible to set multiple actions at different times during a submission based on the conditional logic.
Follow the steps below to create a link between a form and Marketing Cloud:
Go to Settings of the Gravity Forms form and click on the tab Marketing Cloud.
Click on the button Add new to add a new action.
The screen below will then appear:
Enter a recognizable name for this Feed action in the Action name field.
Choose a moment of execution for the action. A Marketing Cloud Feed action can be executed at 3 different moments:
Immediately after filling out the form This is the moment right after a new Gravity Forms submission is created. This action takes place in the visitor’s browser.
After a matched Findock v2 Webhook call (e.g. Contact/Account found) Findock v2 notifies the website underwater through a Webhook when it has created or found a Contact and Account. If you choose this moment, a call will be sent to Marketing Cloud at that moment. This happens asynchronously with the Gravity Forms submission.
After a successful payment Findock v2 notifies the website underwater through a Webhook when a transaction has been successfully completed in Salesforce. Choose this moment if you only want a call to go to Marketing Cloud if the payment is successful.
Choose the type of Marketing Cloud call
Once you have selected a call type, a dropdown will appear with a list of all events currently available in Marketing Cloud. Please select an event to continue.
At Feed condition you have the option to set conditions for the action. For example, you will not execute an action until a certain field is filled out in the form.
Click on Save Settings to save everything.
If a Data Extensions is found for the selected event, a list of all available Data Extension fields will appear after saving:
Finally, link the correct Data Extension fields to the Gravity Forms fields. Fields with a red asterisk (*) must be mapped otherwise an error will occur at the API call.
Submissions
Notes are saved on submissions when Marketing Cloud API calls are made. This way you can always see which actions have taken place with certain submissions:
Prefilling fields
CampaignSuite offers the possibility to prefill Gravity Forms fields with Contact data from Marketing Cloud. To use this functionality it is necessary that a specific Cloud Page exists in Marketing Cloud. This page generates a JSON containing the available fields to retrieve.
An example of such a JSON is:
In the general CampaignSuite settings, the Endpoint can be set for this Cloud Page (Prefill page Endpoint). In addition, it is also possible to overwrite this URL per form.
Follow these steps to prefill fields with Marketing Cloud data:
Go to the Settings of a form and click on the tab MC Prefill.
Click on the first checkbox to enable prefilling for this form.
Then set all parameters needed in the URL of the page to retrieve a record in Marketing Cloud. For example, in this image there are 2 parameters set. The URL of the page where the form will be placed on could look like this: https://www.test.nl/formulier-pagina?id=5847&hash=fjd837hjd93
Specify whether to hide the form if no record can be found in Marketing Cloud based on the specified parameters and their value. You can also type a message to be shown instead of the form if it is hidden.
It is possible to overwrite the default Prefill Endpoint with another one. Add it to the field Custom prefill URL.
Map fields
As a final step, it is necessary to link fields from Marketing Cloud to your Gravity Forms fields. In this way you determine which data should be placed in which field.
Personalize confirmations
When you use the prefill option, these fields can also be used for form confirmations (such as confirmation text or redirect URL).
Confirmation text
All Marketing Cloud Prefill fields can be used in the confirmation message. To do this, click on the curly brackets to the right of the editor and select one of the prefill fields.
Redirect page or URL
It is also possible to use the prefill fields in a querystring:
Dynamic content in emails
Marketing Cloud can send emails in a Transactional Email event. In these emails it is technically possible to use dynamic content that can be set in the form. However, it is necessary that you have set up this technical solution in Marketing Cloud. If you are interested in this feature, please contact us.
Follow the steps below to set up dynamic content for Marketing Cloud Emails:
Go to the Settings of the form and click on the MC Email Content tab.
Enter a unique identifier for the connection between Marketing Cloud and CampaignSuite. This value cannot contain spaces, only lowercase letters. Later it is also possible to map this identifier to a Marketing Cloud field with a Feed action.
Enter the text to be placed in the email.
You can also choose an image that can be used in the email.
Click on Save Settings to save everything
Technically it is now possible to use this dynamic content in emails from Marketing Cloud via the Endpoints shown in this tab.
Mapping of unique identifier
When you have entered a unique identifier you can map this field to a Data Extension field in the Marketing Cloud Feed actions:
So this feature provides the way to dynamically populate the content of an email from Marketing Cloud with information from the form very dynamically.
Gutenberg Dynamic Content
If a connection with Marketing Cloud has been set up, it is also possible to place Dynamic Content from a Marketing Cloud Page on a page in the website. This is done using a wrapper block called Dynamic Content Wrapper.
This block has different settings in the right column:
Code type Dynamic content must always be retrieved based on a campaign code. This value can be sent to Marketing Cloud in several ways: Page field The code will be retrieved from the Campaign Code field below the block CampaignSuite page settings Custom The code can be entered manually on the Dynamic Content Wrapper block.
Make campaign code dynamic It is also possible to extract the code from the URL of the page. Check this option and enter the parameter name from the URL containing the campaign code.
Content type There are currently 3 content types available for dynamic content: Form page This is content that can often be found on a campaign page. Thank you page This is content that can be displayed on the thank you page after a donation Next best action This is content that can be used for possible next best actions from a donor.
Show advanced settings Under advanced settings it is possible to set a custom endpoint. This endpoint will then overrule the default endpoint in CampaignSuite settings. It is also possible to choose whether this dynamic block should be rendered Client side or Server side. Client side By default, the texts are and images loaded into a Dynamic Content Wrapper via javascript. To ensure that the visitor does not see a jump in the content, the entire content of the page will first be hidden. As soon as all dynamic content has been loaded, the page will become visible. Server side With this option, the server will first make a call to Marketing Cloud to fetch the dynamic content. Then all content will be replaced in the blocks. Eventually the complete page will be loaded.
The main difference between Server and Client side is the fact that with Server side the page ‘keeps loading’ until all content has been replaced. At the Client side, the page has finished loading and the visitor will see a white page for a short time (maximum 1 second). Also, cache plugins can prevent Server side pages from being populated dynamically.
Elements with dynamic content
The following Gutenberg blocks within a wrapper can contain dynamic content:
As soon as one of the above fields is placed in a Dynamic Content Wrapper block, the following option appears in the right column:
Check this option to specify that the content of the original block should be replaced with content from Marketing Cloud. If no dynamic content can be retrieved from Marketing Cloud, the original content will remain intact.
Google Tag Manager
Google Tag Manager (GTM) is een tool van Google waarmee je als online marketeer, ondernemer of social media specialist minder afhankelijk wordt van je developers of een extern bureau. Door middel van Google Tag Manager zorg je er namelijk voor dat je handige tags zoals Google Analytics of de Meta Pixel kan laten werken zonder dat je je webbouwer moet vragen om de tags in de code van je website te plaatsen.
In Metingen heb je de mogelijkheid om Client Side en Server Side calls uit te voeren voor GTM. Client Side calls zijn niet beschikbaar voor de events Na een webhook call van Findockv2 en Na een succesvolle betaling. De Client Side calls maken gebruik van de datalayer.push() functie. De data kan vervolgens worden uitgelezen door de GTM pixel op jouw website:
<!-- Google Tag Manager -->
<script>(function(w,d,s,l,i){w[l]=w[l]||[];w[l].push({'gtm.start':
new Date().getTime(),event:'gtm.js'});var f=d.getElementsByTagName(s)[0],
j=d.createElement(s),dl=l!='dataLayer'?'&l='+l:'';j.async=true;j.src=
'https://www.googletagmanager.com/gtm.js?id='+i+dl;f.parentNode.insertBefore(j,f);
})(window,document,'script','dataLayer','UNIQUE_ID');</script>
<!-- End Google Tag Manager -->
Vervang in de bovenstaande code UNIQUE_ID door jouw eigen Google Tag Manager ID.
Server Side calls zijn alleen beschikbaar als in de CampaignSuite instellingen een waarde is ingevuld bij het veld GTM SST URL (Google Tag Manager Serder Side Tracking URL). Deze URL (ook wel Tag Manager server container genoemd) is aan te maken in Google Tag Manager. Lees hier meer informatie over hoe je een Tag Manager server container kunt aanmaken. Wanneer je het veld Measurement ID invult met het ID uit GTM zal deze automatisch meegestuurd worden in de Server Side calls in de parameter tid.
Client Side
Wanneer er een Client Side call wordt uitgevoerd via de Google Tag Manager aanbieder detecteert CampaignSuite automatisch of het om een E-commerce Measurement call gaat of niet. Dit doen wij o.b.v. de mapping van de paramater Prijs van het product. Als deze paramater gemapped is, zal de datalayer.push() een e-commerce syntax hebben. In alle andere gevallen zal het een simpele versie van een datalayer.push() zijn. Hieronder 2 voorbeelden van een simpele en een e-commerce Client Side call.
Voorbeeld van de mapping (simpel):
Voorbeeld van de datalayer.push() Javascript code:
Het is alleen mogelijk om Server Side calls te maken als er een Tag Manager server container is aangemaakt en ingesteld. Deze container is middels een aparte URL te benaderen (bijvoorbeeld: https://sst.testwebsite.nl/g/collect) welke ingesteld moet worden bij de CampaignSuite instellingen onder GTM SST URL.
De paramaters die gemapped zijn in het blok van Google Tag Manager bij Metingen zullen meegestuurd worden in de URL die CampaignSuite aanroept via een GET request. Bekijk deze pagina om te zien welke parameters ondersteunt worden.
Onderstaand voorbeeld toont een Server Side call bij een succesvolle betaling:
Alle product velden worden samengevoegd en alle losse parameters worden achter de URL geplakt. Op deze manier vindt er een Server Side call plaatst voor Google Tag Manager.
Deze gids legt uit hoe je variabelen en triggers definieert, en hoe je evenementen instelt om formulierinteracties te volgen. Met deze instellingen kun je gebruikersacties en gegevenswijzigingen dynamisch vanuit je formulieren naar GA4 verzenden voor nauwkeurige meting en analyse.
1. Variabelen definiëren
Wat zijn variabelen in GTM?
Variabelen in GTM stellen je in staat om waarden (bijv. donation_amount, email_opt_in) uit de dataLayer of pagina-elementen te halen. Deze waarden kunnen vervolgens worden meegegeven als parameters in gebeurtenissen (zoals die naar GA4 worden verzonden).
Stappen om dataLayer-variabelen te maken in GTM:
Ga naar het tabblad Variabelen in GTM.
Klik op Nieuw → Geef de variabele een naam.
Kies Variabel Type: Data Layer Variabele
Voer in het veld Naam Data Layer Variabele de exacte sleutelnaam in:
Voorbeeld: donation_amount
Sla daarna de variabele op.
2. Stel gebeurtenistriggers in
Stappen om een trigger aan te maken in GTM:
Ga naar GTM → Triggers → Klik op Nieuw,
Geef je trigger een duidelijke naam, bijvoorbeeld Trigger – Formulier Verzonden (formulier_verzonden123)
Kies het type trigger
Trigger Type: Aangepast evenement
Configureer de trigger voor het aangepaste evenement
Eventnaam – form_submitted_1234 (schrijf hier jouw eventnaam)
Deze trigger wordt geactiveerd bij: Alle aangepaste evenementen (of kies “Sommige” om voorwaarden toe te voegen)
Als je wilt beperken wanneer de trigger afgaat, kies dan:
Sommige aangepaste evenementen
Voorbeeld van een voorwaarde:
formId is gelijk aan 123
OF een andere Data Layer-variabele die je controleert
Sla daarna en gebeurtenistriggers op.
3. Maak het evenement aan
Stappen om een GA4 event-tag aan te maken in GTM:
Ga naar GTM → Tags → Klik op Nieuw
Geef je tag een duidelijke naam
Stel het tagtype in op: Google Analytics: GA4 Event
Configuratietag: Kies je bestaande GA4-configuratietag
(Deze bevat jouw G-XXXXXXXXXX Measurement ID)
Stel de evenementnaam in
Evenementnaam:
Voorbeeld: form_submitted
(Dit is wat je later in GA4 terugziet)
Voeg event-variabelen toe
Zorg ervoor dat je deze Data Layer-variabelen al hebt aangemaakt.
Je kunt nu je trigger koppelen aan je GA4 Event-tag.
Sla het op
4. Publish changes
Stappen om wijzigingen te publiceren in GTM:
Open je container in GTM
Selecteer je account en container.
Controleer op niet-opgeslagen wijzigingen
Bovenaan zie je:
Indicator voor werkruimtewijzigingen.
Dit betekent dat je tags, triggers of variabelen hebt die nog niet zijn gepubliceerd.
Klik op Verzenden (rechtsboven)
Er opent een nieuw paneel om je container te publiceren.
Configureer versiegegevens
Versienaam: (optioneel, maar aanbevolen)
Voorbeeld: GA4 Event Tracking voor formulierinzendingen
Versiebeschrijving: (optioneel)
Voorbeeld: Tag toegevoegd om het form_submitted_1234-event naar GA4 te sturen met aangepaste parameters.
Klik op Publiceren
GTM maakt een nieuwe containerversie aan en zet je wijzigingen live.
Dit zorgt ervoor dat je tag-, trigger- en variabelewijzigingen actief zijn op je site.
Controleer gepubliceerde versies
Ga naar: Admin > Versies om eerdere versies te bekijken of terug te draaien indien nodig.
Bevestig dat het werkt:
Gebruik de preview-modus om je tags te testen vóór publicatie.
Gebruik GA4 DebugView en realtime rapporten om te controleren of de events en parameters correct binnenkomen.
Use Preview mode to test your tags before publishing.
Use GA4 DebugView and Realtime Reports to verify the events and parameters arrive correctly.
Google Tag Manager
Google Tag Manager (GTM) is a tool from Google that allows you as an online marketer, entrepreneur or social media specialist to become less dependent on your developers or an external agency. By means of Google Tag Manager you ensure that you can make useful tags such as Google Analytics or the Meta Pixel work without having to ask your web builder to place the tags in the code of your website.
In Measurements you have the option to make Client Side and Server Side calls for GTM. Client Side calls are not available for the events After a webhook call from Findockv2 and After a successful payment. The Client Side calls use the datalayer.push() function. The data can then be read by the GTM pixel on your website:
<!-- Google Tag Manager -->
<script>(function(w,d,s,l,i){w[l]=w[l]||[];w[l].push({' gtm.start':
new Date().getTime(),event:'gtm.js'});var f=d.getElementsByTagName(s)[0],
j=d.createElement(s),dl=l!='dataLayer'?'&l='+l:'';j.async=true;j.src=
'https://www.googletagmanager.com/gtm.js?id='+i+dl;f.parentNode.insertBefore(j,f);
})(window,document,'script','dataLayer','UNIQUE_ID');</script>
<!-- End Google Tag Manager -->
In the above code, replace UNIQUE_ID with your own Google Tag Manager ID.
Server Side calls are only available if a value is entered in the CampaignSuite settings for the field GTM SST URL (Google Tag Manager Server Side Tracking URL). This URL (also called Tag Manager server container) can be created in Google Tag Manager. Read here to learn more about how to create a Tag Manager server container. When you fill in the Measurement ID field with the ID from GTM, it will automatically be included in the Server Side calls in the parameter tid.
Client Side
When a Client Side call is made via the Google Tag Manager provider, CampaignSuite automatically detects whether it is an E-commerce Measurement call or not. We do this based on the mapping of the Price parameter of the product. If this parameter is mapped, the datalayer.push() will have an e-commerce syntax. In all other cases it will be a simple version of a datalayer.push(). Below are 2 examples of a simple and an e-commerce Client Side call.
It is only possible to make Server Side calls if there is a Tag Managa server container has been created and set up. This container can be accessed via a separate URL (for example: https://sst.testwebsite.nl/g/collect) which must be set in the CampaignSuite settings under GTM SST URL.
The parameters mapped in the block of Google Tag Manager at Measurements will be sent in the URL that CampaignSuite calls via a GET request. Check out this page to see which parameters are supported .
The example below shows a Server Side call upon successful payment:
All product fields are merged and all individual parameters are pasted after the URL. In this way a Server Side call is made for Google Tag Manager.
Feed acties
Het is mogelijk (mits u de permissie op CampaignSuite heeft) om Feed acties in te stellen. Een feed actie is een actie welke uitgevoerd kan worden door CampaignSuite vlak nadat er een nieuwe inzending is gemaakt in Gravity Forms. Acties kunnen in twee verschillende categorieën worden ingedeeld:
1. Creëer een Salesforce object
Met CampaignSuite is het mogelijk om een nieuw record in Salesforce aan te maken voor elk Object wat beschikbaar is. Denk bijvoorbeeld aan een Case, Campagne of Bestemming. Het is zelfs mogelijk om meerdere Feed acties na elkaar uit te laten voeren en de gegenereerde ID’s die er per Feed gemaakt worden te gebruiken in de mapping van de velden.
Onderstaande screenshot toont een voorbeeld van een Feed actie waar een Case wordt aangemaakt. Hierbij is ook een Feed voorwaarde ingesteld. Dat houdt in dat deze feed alleen wordt uitgevoerd als aan alle condities wordt voldaan.
Feed naam
Vul hier een herkenbare naam in voor de feed
Type actie
Selecteer hier de actie die u wilt laten uitvoeren
Moment vanuitvoering
Bij sommige acties kan het zijn dat er een Contact ID nodig is. Kies in dat geval voor de optie Aan het eind zodat er op het moment van uitvoeren een Contact ID bestaat.
Salesforce Object
Dit ziet u alleen wanneer u kiest voor de type actie “Maak een nieuw record in Salesforce”. Kies hier een object uit uw Salesforce instantie.
Feed voorwaarde
Deze voorwaarden werken exact hetzelfde als de voorwaarden die in te stellen zijn bij formulier velden.
Als u een actie kiest wat gekoppeld is aan een Salesforce object verschijnen er bij Instellingen alle velden van dit object. Koppel deze aan de juiste Gravity Forms velden om de waarden op de juiste manier in Salesforce te krijgen.
2. Een custom actie gemaakt door Gopublic
Het is ook mogelijk dat Gopublic in overleg met u custom acties maakt. Denk bijvoorbeeld aan het aanmaken van Webshop orders of het wegschrijven van Cadeaus naar Salesforce. Neem gerust contact met ons op als u hiervan gebruikt wilt maken.
Feed actions
It is possible (if you have the permission on CampaignSuite) to set up Feed actions. A feed action is an action that can be performed by CampaignSuite shortly after a new submission has been made in Gravity Forms. Actions can be divided into two different categories:
1. Create a Salesforce object
With CampaignSuite it is possible to create a new record in Salesforce for every Object that is available. Consider, for example, a Case, Campaign or Destination. It is even possible to have multiple Feed actions executed one after the other and to use the generated IDs that are created per Feed in the mapping of the fields.
The screenshot below shows an example of a Feed action where a Case is created. A Feed condition has also been set. This means that this feed will only run if all conditions are met.
Feed name Enter a recognizable name for the feed here
Type of action Select the action you want to have performed here
Moment of execution Some actons may require a Contact ID. In that case, choose the option At the end so that a Contact ID exists at the time of execution.
Salesforce Object You will only see this when you choose the action type “Create a new record in Salesforce”. Choose an object from your Salesforce instance here.
Feed condition These conditions work exactly the same as the conditions that can be set with form fields.
If you choose an action that is linked to a Salesforce object, all fields of this object will appear at Settings . Link these to the correct Gravity Forms fields to get the values correctly in Salesforce.
2. A custom action made by Gopublic
It is also possible that Gopublic makes custom actions in consultation with you. Consider, for example, creating Webshop orders or writing Gifts to Salesforce. Feel free to contact us if you would like to make use of this.
CS E-commerce
Als CampaignSuite is geactiveerd én het formulier maakt een transactie zal er bij het bedankt-bericht van het Gravity Forms formulier standaard een Google E-commerce script worden toegevoegd.
Wanneer u als formulier bevestiging niet Tekst heeft maar Pagina, dan is het ook mogelijk om op de pagina waar de donateur op terecht komt na een succesvolle betaling een shortcode te gebruiken om zo toch het Google E-commerce script uit te laten voeren. Voeg op deze pagina dan het volgende toe:
[ecommerce]
Geavanceerde E-commerce instellingen
Een uitgebreide feature van CampaignSuite is om meer instellingen te kunnen doen aan de E-commerce code. Deze feature zit niet in het basis pakket. Neem contact met ons op als u geïnteresseerd bent naar deze uitbreiding.
Bij E-commerce instellingen kan u alle velden van het E-commerce script instellen. Deze optie wordt vaak gebruikt met verborgen velden in het formulier. Deze velden ziet de bezoeker niet, maar u kunt deze wel vooraf laten invullen met waarden. Deze koppelt u vervolgens bij de instellingen aan het E-commerce veld.
CS E-commerce
If CampaignSuite is activated and the form makes a transaction, a Google E-commerce script will be added by default to the thank you message of the Gravity Forms form.
If your form confirmation does not have Text but Page , then it is also possible to use a shortcode on the page where the donor ends up after a successful payment in order to still have the Google E-commerce script executed. Then add the following to this page:
[ecommerce]
Advanced E-commerce Settings
An extensive feature of CampaignSuite is to be able to make more settings for the E-commerce code. This feature is not included in the basic package. Please contact us if you are interested in this extension.
In E-commerce settings you can set all fields of the E-commerce script. This option is often used with hidden fields in the form. The visitor does not see these fields, but you can have them pre-filled with values. You then link this to the E-commerce field in the settings.
Inzendingen
Bij inzendingen ziet u een lijst weergave van alle inzendingen van het formulier. U kunt de kolommen die getoond worden instellen met het radar-icoon rechts bovenin de lijst.
U kunt teven de inzendingen filteren op de velden die in het formulier staan. CampaignSuite biedt ook de mogelijkheid om te filteren op betalingsstatus. Op deze manier kunt u dus een lijst krijgen met alle succesvolle betalingen. De eerste kolom is altijd klikbaar om naar de gedetailleerde weergave te gaan van de inzending.
Opmerkingen
Wanneer u in de detailweergave bent van een inzending vindt u in de linker kolom onder de velden een blok met Opmerkingen. Op verschillende momenten bij het aanmaken van de inzending (het versturen van een formulier) kan CampaignSuite eem opmerking bij de inzending zetten. Enkele voorbeelden hiervan zijn:
Salesforce-call geïnitieerd
Salesforce-betaling succesvol afgerond
Status Mautic formulier inzending veranderd naar: ‘Collected’
Ook wanner er een onverwachte fout optreedt, zal dat hier bij de opmerkingen te vinden zijn.
Details betaling
Wanneer er een transactie heeft plaatsgevonden, vindt u de status hiervan terug in de rechterkolom onder het kopje Details betaling.
Salesforce en Mautic
Ook alle informatie met betrekking tot Salesforce of Mautic worden in deze kolom getoond.
Entries
With entries you will see a list of all entires of the form. You can set the columns that are shown with the radar icon at the top right of the list.
You can also filter the entries on the fields in the form. CampaignSuite also offers the option to filter by payment status. So this way you can get a list of all successful payments. The first column is always clickable to go to the detailed view of the entry.
Comments
When you are in the detailed view of an entry, you will find a block with Comments in the left column below the fields. At various times during the creation of the entry (sending a form), CampaignSuite may add a comment to the entry. Some examples of this are:
Salesforce call initiated
Salesforce payment completed successfully
Status Mautic form entry changed to: ‘Collected’
Even if an unexpected error occurs, it will be found here in the comments.
Payment details
When a transaction has taken place, you will find its status in the right column under the heading Payment details.
Salesforce and Mautic
All information related to Salesforce or Mautic is also shown in this column.
Squeezely
Squeezely Customer Data Platform helpt marketeers efficiënt klantgegevens te verzamelen, campagnes via meerdere kanalen op te zetten en resultaten op één plek te analyseren. CampaignSuite biedt een mogelijkheid om parameters te genereren die ingezet kunnen worden voor Squeezely.
Ga naar de Instellingen van een formulier en klik op het tabblad Squeezely.
Schakel de Squeezely functionaliteit in om gebruik te maken van de functie.
Selecteer een veld uit het formulier om de hash mee te berekenen die gebruikt wordt in Squeezely (vaak is dat bijvoorbeeld een e-mail veld)
Vul een parameter naam in welke gebruikt kan worden door CampaignSuite om automatisch aan URL toe te voegen. Denk hierbij bijvoorbeeld aan een Succes URL voor een iDeal betaling via Findock.
Geef eventueel aan of alle redirect URL’s in dit formulier automatisch aangevuld moeten worden door de naam van de parameter en de waarde van het hash veld.
Handmatig toevoegen van parameter
Het is mogelijk om bij formulier bevestigingen handmatig de Squeezely parameter toe te voegen als u de functionaliteit hebt geactiveerd en ingesteld. Dat kan er als volgt uit zien:
Squeezely
Squeezely Customer Data Platform helps marketers efficiently collect customer data, build multi-channel campaigns, and analyze results in one place. CampaignSuite offers a possibility to generate parameters that can be used for Squeezely.
Go to the Settings of a form and click on the tab Squeezely.
Enable the Squeezely functionality to use the feature.
Select a field from the form to calculate the hash used in Squeezely (often this is an email field, for example)
Enter a parameter name which can be used by CampaignSuite to automatically append to URL. Think, for example, of a Success URL for an iDeal payment via Findock.
Optionally indicate whether all redirect URLs in this form should be auto-completed with the name of the parameter and the value of the hash field.
Manually adding parameter
It is possible to manually add the Squeezely parameter to form confirmations if you have enabled and set up the functionality. That might look like this:
Metingen
CampaignSuite bevat een zeer uitgebreid systeem om metingen bij formulieren in te stellen. Denk hierbij aan bijvoorbeeld Client Side en Server Side events op bepaalde momenten in een formulier. Deze momenten kunnen bijvoorbeeld zijn wanneer je van pagina wisselt in een formulier of als er een succesvolle betaling heeft plaatsgevonden.
Er zijn in totaal 6 momenten waarop je kunt bepalen dat er iets gemeten moet worden door één van de vier aanbieders (Facebook, Google Analytics 4, Squeezely of Google Tag Manager). Het is mogelijk om meerdere acties aan te maken per formulier.
Bekijk onderstaande artikelen om meer informatie te verkrijgen over de opties van metingen.
Om een nieuw meet moment aan te maken open je een formulier in WordPress en ga je naar Instellingen -> Metingen. Klik vervolgens op de knop Nieuwe toevoegen. Dit opent een nieuw venster met de volgende opties:
Actie naam Vul hier een herkenbare naam in binnen het systeem. Deze naam zal niet getoond worden op de website of in een waarde van een meting.
Type event Kies hier uit één van de zes momenten waarop de meting moet plaatsvinden. Elk moment kan een Client Side call, een Server Side call of beiden uitvoeren. De momenten waaruit je kunt kiezen zijn:
Bij het laden van een formulier pagina Dit is het moment waarop een Gravity Forms-pagina wordt geladen. Dit is niet de WordPress-pagina waarop het formulier wordt geladen, maar de pagina/stap in het Gravity Form.
Bij het versturen van een formulier pagina Dit is het moment waarop een Gravity Forms-pagina/stap wordt ingediend. Op het moment dat u op de knop Volgende of Verzenden drukt, wordt deze gebeurtenis geactiveerd.
Bij het versturen van het complete formulier Dit is het moment waarop een Gravity Forms-formulier wordt ingediend. Deze gebeurtenis wordt pas geactiveerd na de laatste pagina wanneer uw formulier uit meerdere pagina’s bestaat.
Bij de formulier bevestigingstekst of pagina Deze gebeurtenis wordt geactiveerd wanneer een bezoeker op de bevestigingstekst of de bevestigingspagina terechtkomt. Wanneer u doorverwijst naar een interne pagina, wordt deze trigger uitgevoerd wanneer de WordPress-pagina wordt geladen. Wanneer u naar een externe URL doorverwijst, wordt deze trigger geactiveerd op de gebeurtenis: ‘Bij het versturen van het complete formulier’.
Na een webhook call van Findock v2 Deze gebeurtenis wordt geactiveerd bij een webhook-aanroep van Findock v2.0. Dit wordt ook wel de ‘Matched’ webhook genoemd en wordt geactiveerd wanneer een betalingsintentie wordt verwerkt. Dit moment ondersteunt alleen maar Server Side calls.
Na een succesvolle betaling Deze gebeurtenis wordt geactiveerd wanneer een betaling in Gravity Forms is ingesteld op succesvol. Dit moment ondersteunt alleen maar Server Side calls.
Aanbieders Kies hier welke aanbieders je iets wilt laten meten op het aangegeven moment. De opties hier zijn:
Facebook Dit is de Facebook Conversion API. De Conversions API is ontworpen om een directe verbinding te creëren tussen je marketinggegevens en de systemen die je helpen je advertentietargeting te optimaliseren, de kosten per actie te verlagen en resultaten te meten op Meta-technologieën. Deze aanbieder heeft alleen de mogelijkheid om Server Side calls uit te voeren. Om gebruik te maken van deze aanbieder moet je een Pixel ID en een Access token invullen bij de CampaignSuite instellingen.
Google Analytics 4 GA4 heeft de mogelijkheid om Client Side en Server Side calls uit te voeren. De Client Side calls maken gebruik van de datalayer.push() en de gtag() functies. De Server Side calls maken gebruik van het GA4 Measurement Protocol. Tevens kunnen hiermee e-commerce calls gemaakt worden. Om gebruik te kunnen maken van het GA4 Measurement Protocol moet je een Measurement ID en API secret invullen bij de CampaignSuite instellingen.
Squeezely Met Squeezely maak je out-of-the-box de meest geavanceerde buyer journeys en personalisatietoepassingen. Je werkt op basis van loepzuivere data en kan alles helemaal naar eigen inzicht inrichten. Deze aanbieder kan Client Side en Server Side calls maken. De Client Side calls maken gebruik van een datalayer.push() functie. De Server Side calls worden direct naar de API van Squeezely gestuurd. Om dit te kunnen gebruiken moet een Account ID en API-sleutel invullen bij de CampaignSuite instellingen.
Google Tag Manager Deze aanbieder ondersteunt Client Side calls en Server Side calls. De Client Side calls maken gebruik van de datalayer.push() functie. De Server Side calls zijn alleen beschikbaar als er een GTM SST URL is ingevuld in de CampaignSuite instellingen. Deze URL moet een link zijn naar een Google Tag Manager container die de verschillende paramaters kan afvangen in GTM.
Feed voorwaarde Het is tevens mogelijk om deze Feed actie conditioneel te maken. Dat houdt in dat de feed alleen zal worden uitgevoerd als er aan bepaalde condities wordt voldaan.
Als alle instellingen zijn gedaan klik je op Refresh om de mapping te tonen van de gekozen aanbieders. Deze mapping is nodig om het systeem te laten weten welke data waar te vinden is in het formulier. Kijk verder bij het artikel Mapping om te ontdekken welke mogelijkheden er zijn.
Mapping
Zodra er een event type is gekozen en er één of meerdere aanbieders zijn geselecteerd, verschijnt er per aanbieder een blok met opties om velden te mappen. Feitelijk ga je hier instellen welke paramaters welke waarden moeten hebben in de Client Side of Server Side call.
Elk blok bevat een keuze om de call Client Side of Server Side te laten plaatsen. Is één van deze opties niet zichtbaar, dan wordt deze niet ondersteunt door de aanbieder in combinatie met het gekozen event.
Client Side Hierbij wordt scriptcode uitgevoerd in de browser van de bezoeker. Dit is in het geval van CampaignSuite altijd een Javascript code.
Server Side Hierbij wordt scriptcode uitgevoerd op de server. Dit heeft als voordeel dat Server Side calls ook uitgevoerd kunnen worden als de bezoeker al lang niet meer op de website is zoals bij succesvolle betalingen. Deze worden dan ‘onder water’ op de server uitgevoerd.
Daarnaast heeft elk blok de mogelijkheid om parameters te mappen. De linkerkolom toont de beschikbaar parameter waardes (dat kan per aanbieder verschillen) en de rechterkolom toont alle beschikbare formuliervelden en diverse andere waarden die gebruikt kunnen worden.
Open invulvelden
Beide kolommen hebben de mogelijkheid om een open invulveld te tonen. In dit veld kan je een eigen waarde opgeven in plaats van de waarde uit één van de aangegeven opties. In de linkerkolom is dat de laatste optie in de dropdown genaamd Add Custom Key en in de rechterkolom is dat de laatste optie in de dropdown genaamd Add Custom Value.
Nesten van key waarden
In sommige gevallen moet er gebruik worden gemaakt van arrays (verzamelingen) in bijvoorbeeld Client Side calls. Onderstaande afbeelding toont een voorbeeld van een dergelijke verzameling:
Hier is duidelijk te zien dat transactionProducts een verzameling is van producten. Door het koppelen van keys met een punt kan dit gedaan worden. Dat ziet er dan als volgt uit in de mapping van een meting:
Facebook
De aanbieder Facebook geeft je de mogelijkheid om alleen Server Side API calls uit te voeren naar de Facebook Conversion API. Dit kan op elk van de zes beschikbare event momenten. Klik hier om meer informatie te verkrijgen over de Facebook Conversion API.
Om gebruik te maken van de Facebook aanbieder in Metingen moet je een Pixel ID en een Access token hebben ingevoerd in de CampaignSuite instellingen. Zonder deze twee waarden is het niet mogelijk om deze aanbieder te gebruiken. Meer informatie over het instellen van een Pixel kan je vinden op deze pagina.
De Facebook Conversion API werkt op basis van events. CampaignSuite zal op basis van de mapping die is gemaakt in de Feed actie een JSON maken die via een POST request verstuurd wordt naar de API van Facebook. Zie het voorbeeld hieronder van de mapping in CampaignSuite en de JSON die verstuurd wordt naar Facebook.
event_id De parameter event_id wordt automatisch gevuld met een combinatie van het formulier ID en de inzending ID (1_346).
action_source De parameter action_source zal automatisch gevuld worden met de waarde website mits deze niet is gemapped met een eigen waarde.
event_time De parameter event_time wordt standaard gevuld met de datum en tijd van de inzending in het formulier.
custom_data.currency De parameter custom_data.currency wordt standaard gevuld bij het event type Na een succesvolle betaling.
Custom parameters
Naast de voorgedefinieerde parameters is het ook mogelijk om zelf parameters mee te sturen. Klik hier voor een lijst met de beschikbare parameters voor Facebook. Om bijvoorbeeld een woonplaats veld toe te voegen aan user_data moet je als key waarde invullen: data.user_data.ct. Dit zal dan automatisch in de JSON gezet worden. In het bovenstaande voorbeeld is het telefoonnummer veld custom toegevoegd.
Google Analytics 4
Met de aanbieder Google Analytics 4 (GA4) is het mogelijk om Client Side en Server Side calls uit te voeren. Dit kan voor alle zes de verschillende event types. Alleen bij de event types Na een webhook call van Findock v2 en Na een succesvolle betaling kan een Server Side call uitgevoerd worden en niet Client Side.
Client Side
Wij adviseren gebruik te maken van de Client Side calls in GA4 als je niet beschikt over Google Tag Manager. Wanneer je namelijk gebruik maakt van de Client Side call voert CampaignSuite javascript functies uit door middel van gtag(); Hierbij is het wel noodzakelijk dat Google Tag geïnstalleerd is op de website:
<!-- Google tag (gtag.js) -->
<script async src="https://www.googletagmanager.com/gtag/js?id=GA_TRACKING_ID"></script>
<script>
  window.dataLayer = window.dataLayer || [];
  function gtag(){window.dataLayer.push(arguments);}
  gtag('js', new Date());
  gtag('config', 'GA_TRACKING_ID');
</script>
Vervang in de bovenstaande code GA_TRACKING_ID door jouw eigen tracking ID van Google Analytics.
Als CampaignSuite een Client Side GA4 call uitvoert zal er een javascript code aangeroepen worden in de browser van de bezoeker. Lees hier meer over de code die wij hier voor gebruiken. De calls naar GA4 maken gebruiken van events. Een voorbeeld van een simpele pagina wisseling in Gravity Forms kan er als volgt uit zien:
Bovenstaande code maakt gebruik van de Javascript function gtag().
Server Side
Technisch is het mogelijk om voor alle zes de event types een Server Side call te laten uitvoeren naar GA4. Dit is alleen beschikbaar als er een Measurement ID en een API secret zijn ingevuld bij de instellingen van CampaignSuite. Deze zijn te vinden in het admin gedeelte van jouw Google Analytics account -> Account Settings -> Data Streams. Klik op de stream en kopieer hier het Measurement ID. De waarde van de API secret kan gevonden worden onder het kopje Measurement Protocol API secrets.
De Server Side call van GA4 maken gebruik van de Measurement Protocol API van Google. Ook deze API werkt op basis van het versturen van events via een POST request naar een endpoint (https://www.google-analytics.com/mp/collect).
Onderstaande afbeeldingen tonen een voorbeeld van een GA4 Server Side call bij een succesvolle betaling in CampaignSuite:
Met Squeezely maak je out-of-the-box de meest geavanceerde buyer journeys en personalisatie toepassingen. Je werkt op basis van loepzuivere data en kan alles helemaal naar eigen inzicht inrichten. Deze tool maakt gebruik van zowel een tracking pixel op jouw website of kan events inschieten via hun API. Deze mogelijkheid biedt CampaignSuite in Metingen. Squeezely werkt op basis van events. Elke meting die je instelt in CampaignSuite moet een event zijn.
Om gebruik te maken van de Server Side calls via de Squeezely aanbieder moet je een Account ID en een API-sleutel invullen in de CampaignSuite instellingen. De Client Side calls van Squeezely werken met een datalayer.push() en zullen alleen werken als de Squeezely pixel op de website is geïnstalleerd:
Omdat de Squeezely pixel is ingeladen in de website zal dit event worden afgevangen in Squeezely.
Server Side
Server Side calls kunnen worden ingesteld in alle zes de metingen momenten. Het is bij Server Side calls echter wel verplicht om een unieke identifier mee te sturen in de paramaters anders weet Squeezely niet aan wie de data gekoppeld moet worden in hun systeem.
Onderstaande afbeelding toont een Server Side call na een succesvolle donatie. Deze call wordt ‘onder water’ naar Squeezely gestuurd op het moment dat een betaling succesvol is afgerond.
Squeezely heeft een tool waarmee je kunt controleren of Server Side API calls goed binnen komen. Deze is te vinden op: https://app.squeezely.tech/data/events.
Google Tag Manager
Google Tag Manager (GTM) is een tool van Google waarmee je als online marketeer, ondernemer of social media specialist minder afhankelijk wordt van je developers of een extern bureau. Door middel van Google Tag Manager zorg je er namelijk voor dat je handige tags zoals Google Analytics of de Meta Pixel kan laten werken zonder dat je je webbouwer moet vragen om de tags in de code van je website te plaatsen.
In Metingen heb je de mogelijkheid om Client Side en Server Side calls uit te voeren voor GTM. Client Side calls zijn niet beschikbaar voor de events Na een webhook call van Findockv2 en Na een succesvolle betaling. De Client Side calls maken gebruik van de datalayer.push() functie. De data kan vervolgens worden uitgelezen door de GTM pixel op jouw website:
<!-- Google Tag Manager -->
<script>(function(w,d,s,l,i){w[l]=w[l]||[];w[l].push({'gtm.start':
new Date().getTime(),event:'gtm.js'});var f=d.getElementsByTagName(s)[0],
j=d.createElement(s),dl=l!='dataLayer'?'&l='+l:'';j.async=true;j.src=
'https://www.googletagmanager.com/gtm.js?id='+i+dl;f.parentNode.insertBefore(j,f);
})(window,document,'script','dataLayer','UNIQUE_ID');</script>
<!-- End Google Tag Manager -->
Vervang in de bovenstaande code UNIQUE_ID door jouw eigen Google Tag Manager ID.
Server Side calls zijn alleen beschikbaar als in de CampaignSuite instellingen een waarde is ingevuld bij het veld GTM SST URL (Google Tag Manager Serder Side Tracking URL). Deze URL (ook wel Tag Manager server container genoemd) is aan te maken in Google Tag Manager. Lees hier meer informatie over hoe je een Tag Manager server container kunt aanmaken. Wanneer je het veld Measurement ID invult met het ID uit GTM zal deze automatisch meegestuurd worden in de Server Side calls in de parameter tid.
Client Side
Wanneer er een Client Side call wordt uitgevoerd via de Google Tag Manager aanbieder detecteert CampaignSuite automatisch of het om een E-commerce Measurement call gaat of niet. Dit doen wij o.b.v. de mapping van de paramater Prijs van het product. Als deze paramater gemapped is, zal de datalayer.push() een e-commerce syntax hebben. In alle andere gevallen zal het een simpele versie van een datalayer.push() zijn. Hieronder 2 voorbeelden van een simpele en een e-commerce Client Side call.
Voorbeeld van de mapping (simpel):
Voorbeeld van de datalayer.push() Javascript code:
Het is alleen mogelijk om Server Side calls te maken als er een Tag Manager server container is aangemaakt en ingesteld. Deze container is middels een aparte URL te benaderen (bijvoorbeeld: https://sst.testwebsite.nl/g/collect) welke ingesteld moet worden bij de CampaignSuite instellingen onder GTM SST URL.
De paramaters die gemapped zijn in het blok van Google Tag Manager bij Metingen zullen meegestuurd worden in de URL die CampaignSuite aanroept via een GET request. Bekijk deze pagina om te zien welke parameters ondersteunt worden.
Onderstaand voorbeeld toont een Server Side call bij een succesvolle betaling:
Alle product velden worden samengevoegd en alle losse parameters worden achter de URL geplakt. Op deze manier vindt er een Server Side call plaatst voor Google Tag Manager.
Measurement
CampaignSuite contains a very extensive system for setting measurements on forms. Think for example of Client Side and Server Side events at certain moments in a form. These moments can be, for example, when you switch pages in a form or when a successful payment has taken place.
There are a total of 6 moments when you can determine that something needs to be measured by one of the four providers (Facebook, Google Analytics 4, Squeezely or Google Tag Manager). It is possible to create multiple actions per form.
Check out the articles below to learn more about measurement options.
To create a new measurement moment, open a form in WordPress and go to Settings -> Measurements. Then click the Add new button. This will open a new window with the following options:
Action name Enter a recognizable name within the system here. This name will not be displayed on the website or in a measurement value.
Type of event Choose here from one of the six moments at which the measurement should take place. An event can make a Client Side call, a Server Side call, or both. The moments you can choose from are:
On form page load This is the moment a Gravity Forms page is loaded. This is not the WordPress page the form is loaded on, but the page/step inside the Gravity Form.
On form page submit This is the moment a Gravity Forms page/step is submitted. The moment you press on the next or submit button, this event is triggered.
On complete form submit This is the moment a Gravity Forms form is submitted. This event will only trigger after the last page when your form consists of several pages.
On form confirmation text or page This event is triggered when a visitor ends up on the confirmation text or the confirmation page. When you redirect to an internal page, this trigger will be executed when the WordPress page is loaded. When you redirect to an external URL, this trigger will fire on the event: ‘On complete form submit’.
On Findock v2 webhook call This event is triggered on a webhook call from Findock v2.0. This is also called the ‘Matched’ webhook and is fired when a Payment Intent is processed.
After a successful payment This event is triggered when a payment in Gravity Forms is set to successful.
Providers Choose here which providers you want to have something measured on the specified event. The options here are:
Facebook This is the Facebook Conversion API. The Conversions API is designed to create a direct connection between your marketing data and the systems that help you optimize ad targeting, reduce cost per action, and measure results on Meta technologies. This provider only has the ability to perform Server Side calls. To use this provider, you need to enter a Pixel ID and an Access token in the CampaignSuite settings.
Google Analytics 4 GA4 can create Client Side and Server Side calls. The Client Side calls use the datalayer.push() and the gtag() functions. The Server Side calls use the GA4 Measurement Protocol. E-commerce calls can also be made with this. To use the GA4 Measurement Protocol you must enter a Measurement ID and API secret in the CampaignSuite settings.
Squeezely With Squeezely you can create the most advanced buyer journeys and personalization applications out-of-the-box. You work on the basis of flawless data and you can set it up entirely to your own liking. This provider can make Client Side and Server Side calls. The Client Side calls use a datalayer.push() function. The Server Side calls are sent directly to Squeezely’s API. To use this, you must enter an Account ID and API key in the CampaignSuite settings.
Google Tag Manager This provider supports Client Side calls and Server Side calls. The Client Side calls use the datalayer.push() function. The Server Side calls are only available if a GTM SST URL is entered in the CampaignSuite settings. This URL must be a link to a Google Tag Manager container that can capture the various parameters in GTM.
Feed condition It is also possible to make this Feed action conditional. This means that the feed will only be executed if certain conditions are met.
When all settings are done, click on Refresh to display the mapping of the chosen providers. This mapping is necessary to let the system know which data can be found where in the form. Look further at the article Mapping to discover the possibilities.
Mapping
As soon as an event type has been chosen and one or more providers have been selected, a block will appear for each provider with options to map fields. In fact, here you are going to set which parameters should have which values in the Client Side or Server Side call.
Each block contains an option to place the call Client Side or Server Side. If one of these options is not visible, it is not supported by the provider in combination with the selected event.
Client Side It executes script code in the visitor’s browser. In the case of CampaignSuite, this is always a Javascript code.
Server Side Executes script code on the server. This has the advantage that Server Side calls can also be performed if the visitor has not been on the website for a long time, such as with successful payments. These are then executed ‘under water’ on the server.
In addition, each block has the ability to map parameters. The left column shows the available parameter values (this can vary per provider) and the right column shows all available form fields and various other values that can be used.
Open input fields
Both columns have the option of showing an open input field. In this field you can enter your own value instead of the value from one of the indicated options. In the left column this is the last option in the dropdown called Add Custom Key and in the right column it is the last option in the dropdown called Add Custom Value.
Nesting key values
In some cases, arrays (collections) must be used in, for example, Client Side calls. The image below shows an example of such a collection:
It is clear here that transactionProducts is a collection of products. This can be done by linking keys with a period. It then looks like this in the mapping of a measurement:
Facebook
The provider Facebook gives you the ability to only make Server Side API calls to the Facebook Conversion API. This can be done at any of the six available event moments. Click here to get more information about the Facebook Conversion API.
To use the Facebook provider in Measurements you must have entered a Pixel ID and an Access token in the CampaignSuite settings. Without these two values it is not possible to use this provider. More information about setting up a Pixel can be found at this page.
The Facebook Conversion API works on the basis of events. CampaignSuite will create a JSON based on the mapping made in the Feed action, which will be sent via a POST request to Facebook’s API. See the example below of the mapping in CampaignSuite and the JSON sent to Facebook.
event_id The event_id parameter is automatically filled with a combination of the form ID and the entry ID (1_346).
action_source The parameter action_source will be automatically filled with the value website provided it is not mapped with its own value.
event_time The parameter event_time is filled by default with the date and time of submission in the form.
custom_data.currency The parameter < strong>custom_data.currency is filled by default with the event type After a successful payment.
Custom parameters
In addition to the predefined parameters, it is also possible to send parameters yourself. Click here for a list of the available parameters for Facebook. For example, to add a city field to user_data you must enter as key value: data.user_data.ct. This will then automatically in the JSON. In the example above, the phone number field custom has been added.
Google Analytics 4
With the provider Google Analytics 4 (GA4) it is possible to perform Client Side and Server Side calls. This is possible for all six different event types. Only with the event types After a webhook call from Findock v2 and After a successful payment a Server Side call can be performed and not Client Side.
Client Side
We recommend using the Client Side calls in GA4 if you don’t have Google Tag Manager. When you use the Client Side call, CampaignSuite executes javascript functions by means of gtag(); This requires that Google Tag is installed on the website:
<!-- Google tag (gtag.js) -->
<script async src="https://www.googletagmanager.com/gtag/js?id=GA_TRACKING_ID"></script>
<script>
  window.dataLayer = window.dataLayer || [];
  function gtag(){window.dataLayer.push(arguments);}
  gtag('js', newDate());
  gtag('config', 'GA_TRACKING_ID');
</script>
In the above code, replace GA_TRACKING_ID with your own tracking ID from Google Analytics.
When CampaignSuite executes a Client Side GA4 call, a javascript code will be executed in the visitor’s browser. Read here more about the code we use for this. The calls to GA4 use events. An example of a simple page change in Gravity Forms might look like this:
The above code uses the Javascript function gtag().
Server Side
Technically it is possible to have a Server Side call made to GA4 for all six event types. This is only available if a Measurement ID and an API secret are entered in the CampaignSuite settings. These can be found in the admin section of your Google Analytics account -> Account Settings -> Data Streams. Click on the stream and copy the Measurement ID here. The value of the API secret can be found under the heading Measurement Protocol API secrets.
GA4’s Server Side calls use the Measurement Protocol API from Google. This API also works on the basis of sending events via a POST request to an endpoint (https://www.google-analytics.com/mp/collect).
The images below show an example of a GA4 Server Side call upon a successful payment in CampaignSuite:
With Squeezely you can create the most advanced buyer journeys and personalization applications out-of-the-box. You work on the basis of flawless data and can arrange everything entirely according to your own insight. This tool uses both a tracking pixel on your website or can shoot events via their API. CampaignSuite offers this option in Measurements. Squeezely works on the basis of events. Every measure you set in CampaignSuite must be an event.
To use the Server Side calls via the Squeezely provider you must enter an Account ID and an API key in the CampaignSuite settings. Squeezely’s Client Side calls work with a datalayer.push() and will only work if the Squeezely pixel is installed on the website:
Because the Squeezely pixel is loaded into the website, this event will be captured in Squeezely.
Server Side
Server Side calls can be set in all six measurement moments. However, with Server Side calls it is mandatory to send a unique identifier in the parameters, otherwise Squeezely will not know to whom the data should be linked in their system.
The image below shows a Server Side call after a successful donation. This call is sent ‘underwater’ to Squeezely when a payment is successfully completed.
Squeezely has a tool that allows you to check whether Server Side API calls are coming in properly. It can be found at: https://app.squeezely.tech/data/events.
Google Tag Manager
Google Tag Manager (GTM) is a tool from Google that allows you as an online marketer, entrepreneur or social media specialist to become less dependent on your developers or an external agency. By means of Google Tag Manager you ensure that you can make useful tags such as Google Analytics or the Meta Pixel work without having to ask your web builder to place the tags in the code of your website.
In Measurements you have the option to make Client Side and Server Side calls for GTM. Client Side calls are not available for the events After a webhook call from Findockv2 and After a successful payment. The Client Side calls use the datalayer.push() function. The data can then be read by the GTM pixel on your website:
<!-- Google Tag Manager -->
<script>(function(w,d,s,l,i){w[l]=w[l]||[];w[l].push({' gtm.start':
new Date().getTime(),event:'gtm.js'});var f=d.getElementsByTagName(s)[0],
j=d.createElement(s),dl=l!='dataLayer'?'&l='+l:'';j.async=true;j.src=
'https://www.googletagmanager.com/gtm.js?id='+i+dl;f.parentNode.insertBefore(j,f);
})(window,document,'script','dataLayer','UNIQUE_ID');</script>
<!-- End Google Tag Manager -->
In the above code, replace UNIQUE_ID with your own Google Tag Manager ID.
Server Side calls are only available if a value is entered in the CampaignSuite settings for the field GTM SST URL (Google Tag Manager Server Side Tracking URL). This URL (also called Tag Manager server container) can be created in Google Tag Manager. Read here to learn more about how to create a Tag Manager server container. When you fill in the Measurement ID field with the ID from GTM, it will automatically be included in the Server Side calls in the parameter tid.
Client Side
When a Client Side call is made via the Google Tag Manager provider, CampaignSuite automatically detects whether it is an E-commerce Measurement call or not. We do this based on the mapping of the Price parameter of the product. If this parameter is mapped, the datalayer.push() will have an e-commerce syntax. In all other cases it will be a simple version of a datalayer.push(). Below are 2 examples of a simple and an e-commerce Client Side call.
It is only possible to make Server Side calls if there is a Tag Managa server container has been created and set up. This container can be accessed via a separate URL (for example: https://sst.testwebsite.nl/g/collect) which must be set in the CampaignSuite settings under GTM SST URL.
The parameters mapped in the block of Google Tag Manager at Measurements will be sent in the URL that CampaignSuite calls via a GET request. Check out this page to see which parameters are supported .
The example below shows a Server Side call upon successful payment:
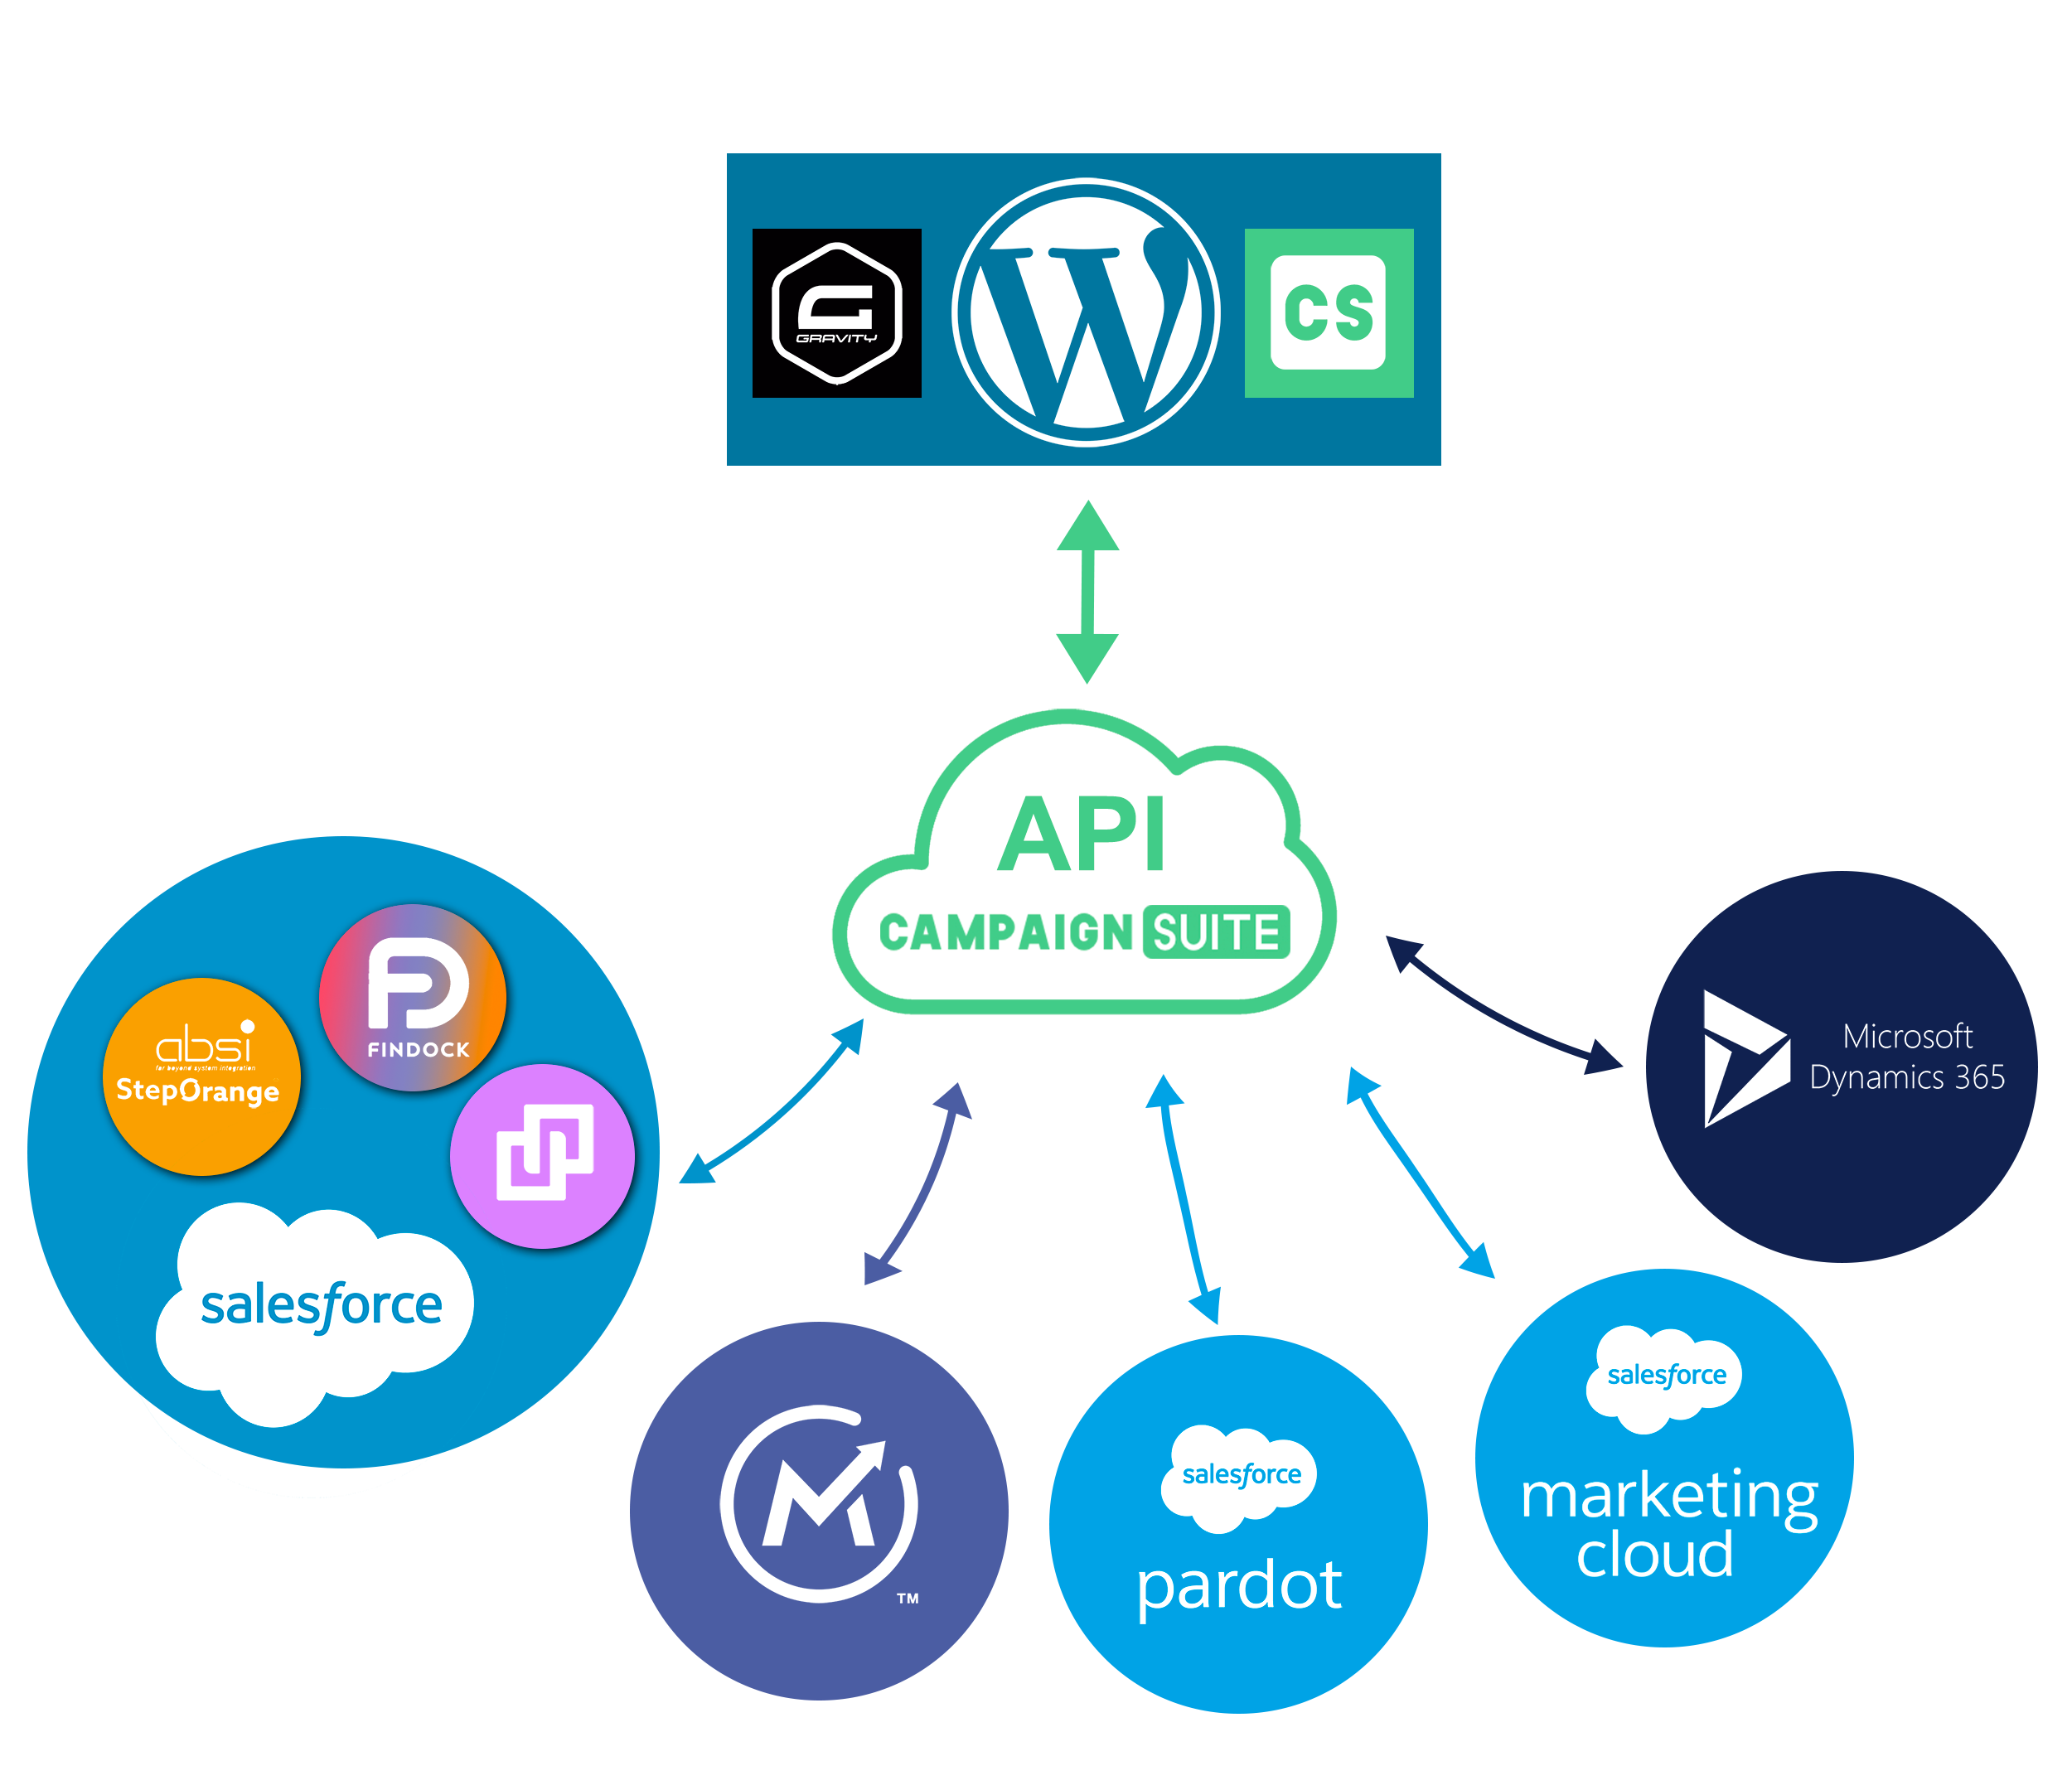
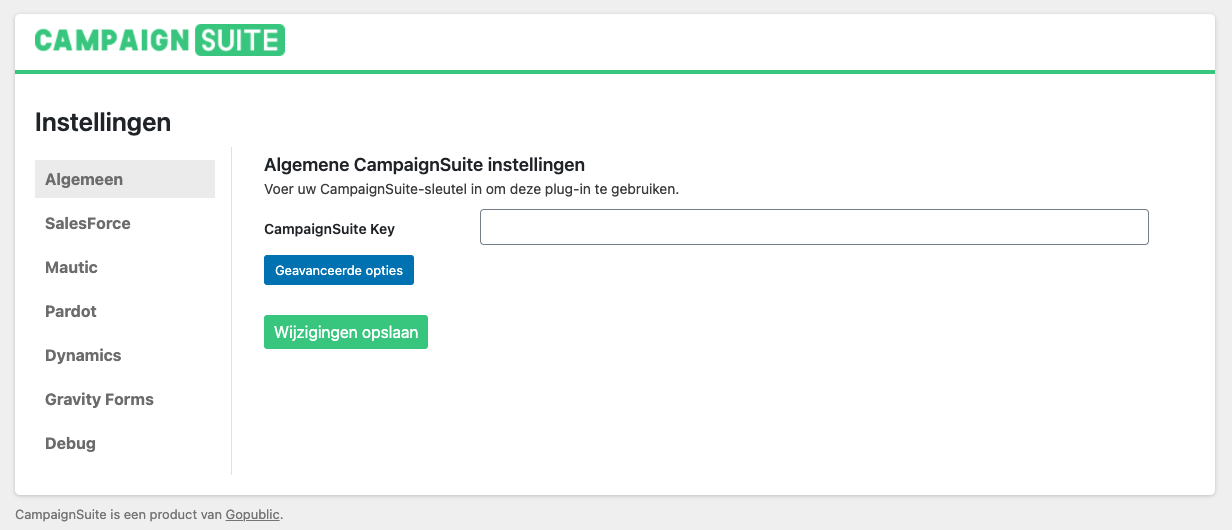
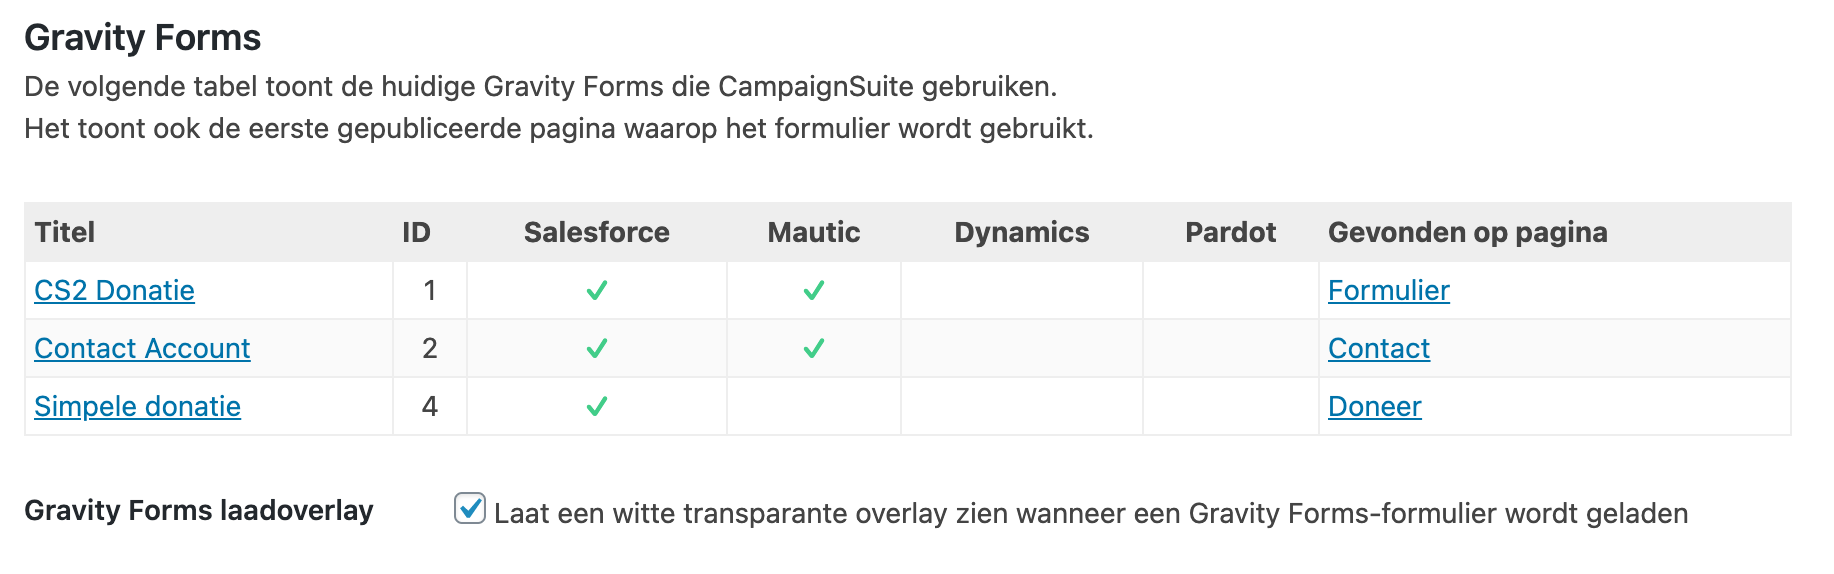
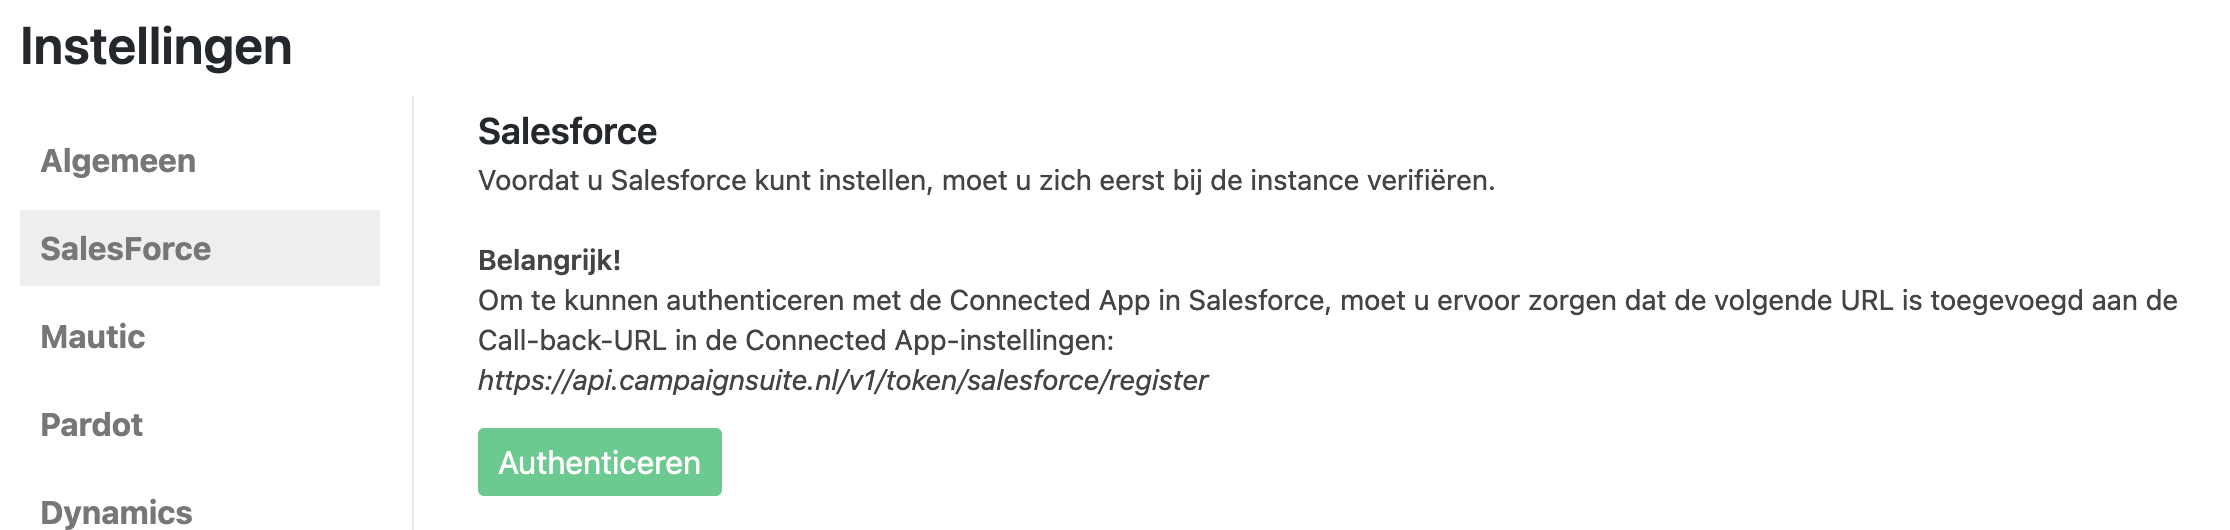

 Wanneer CampaignSuite is geactiveerd verschijnt er een extra blok met velden bij het bewerken van een formulier: CampaignSuite velden. Dit zijn velden die specifiek gemaakt zijn voor formulieren met een betalingsoptie. De velden waaruit gekozen kan worden zijn:

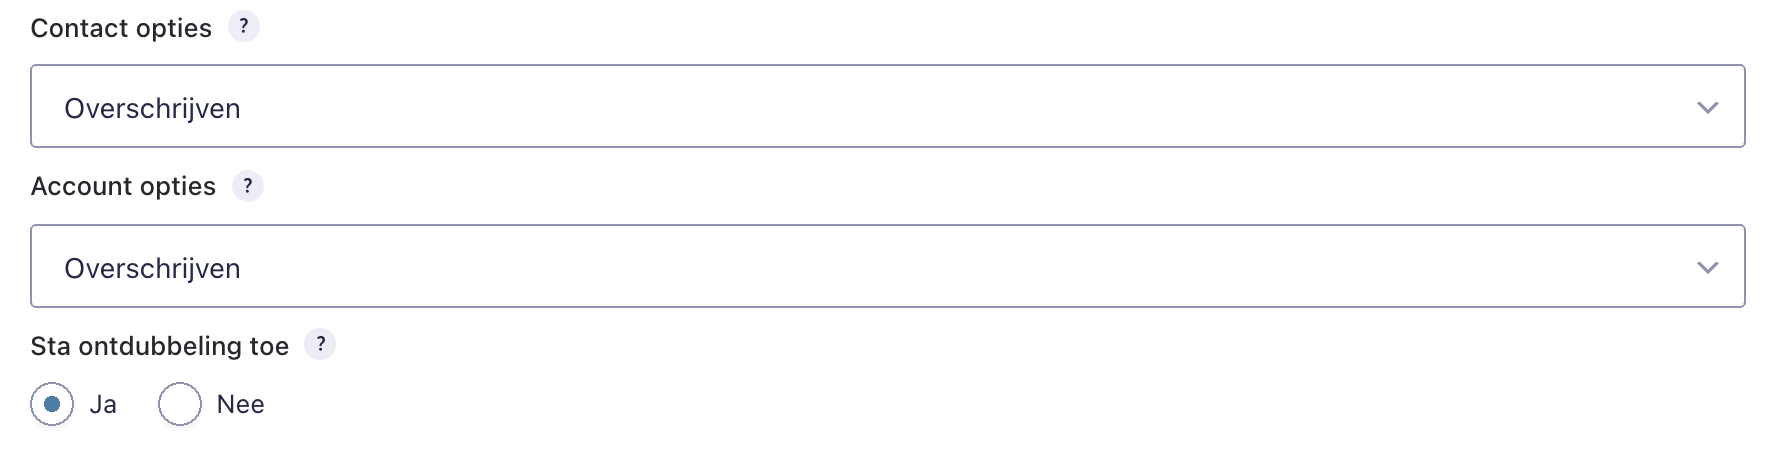
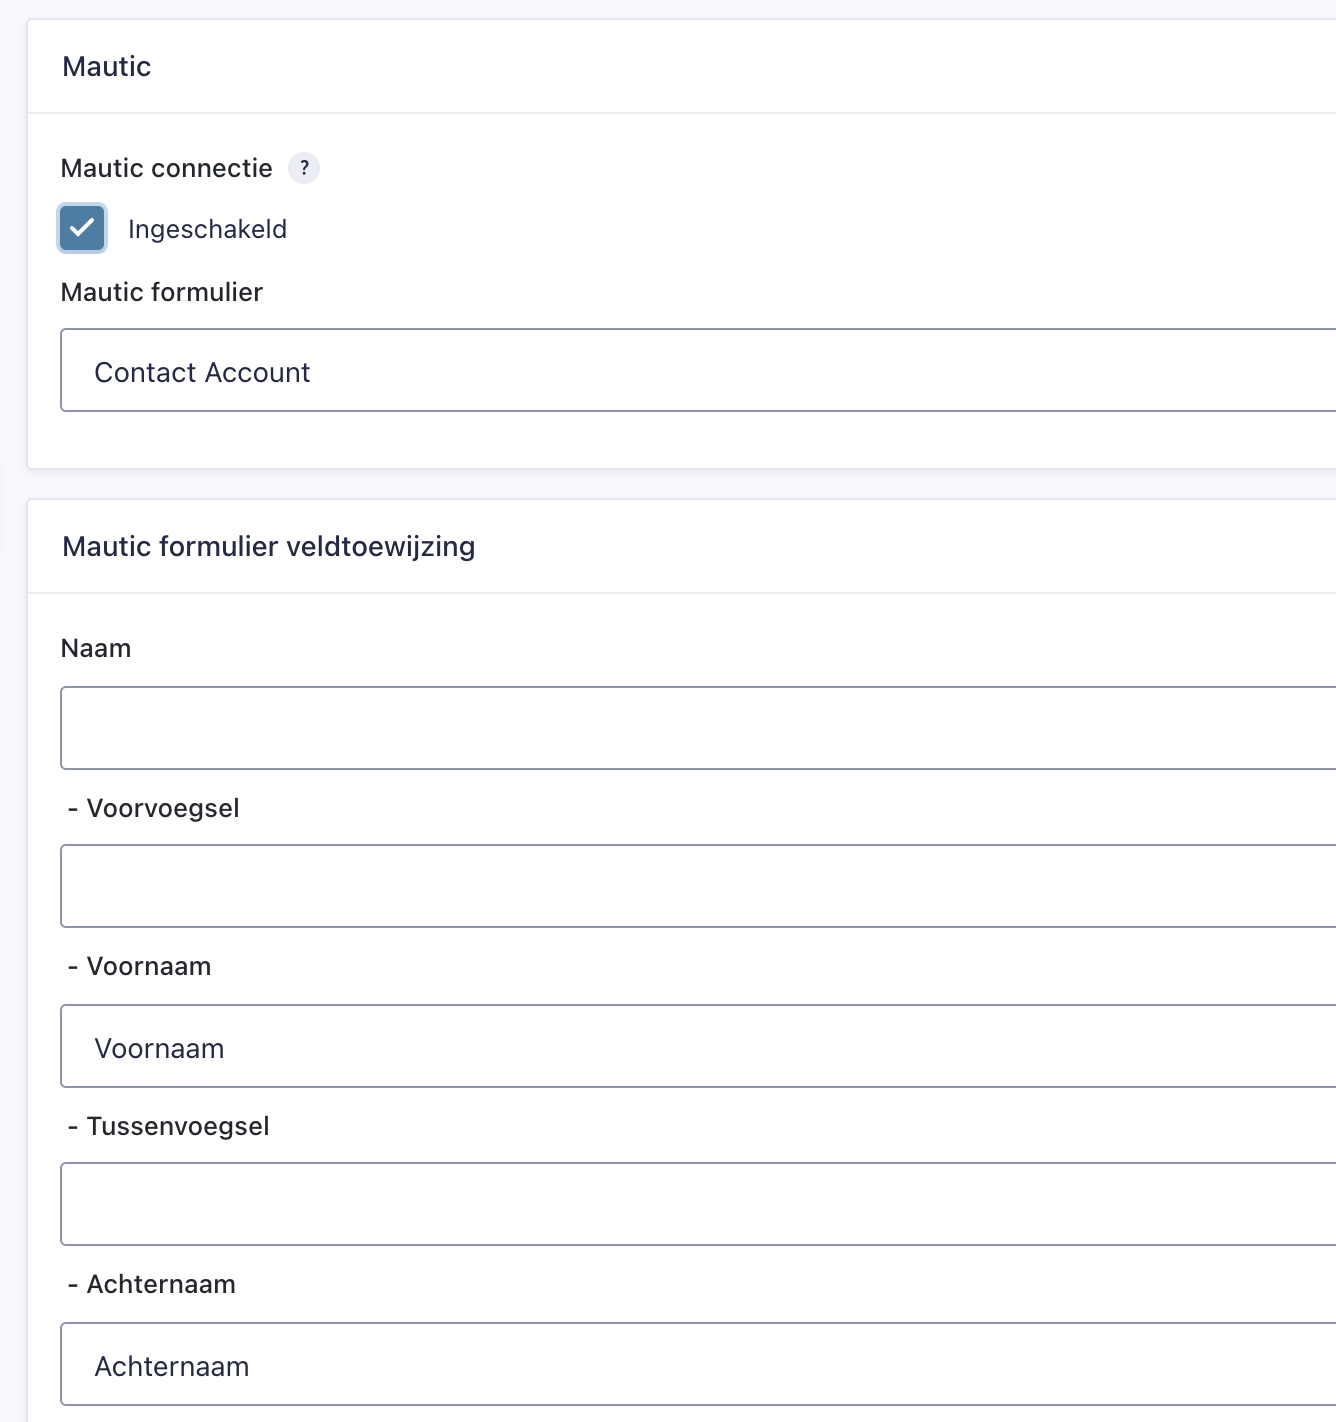

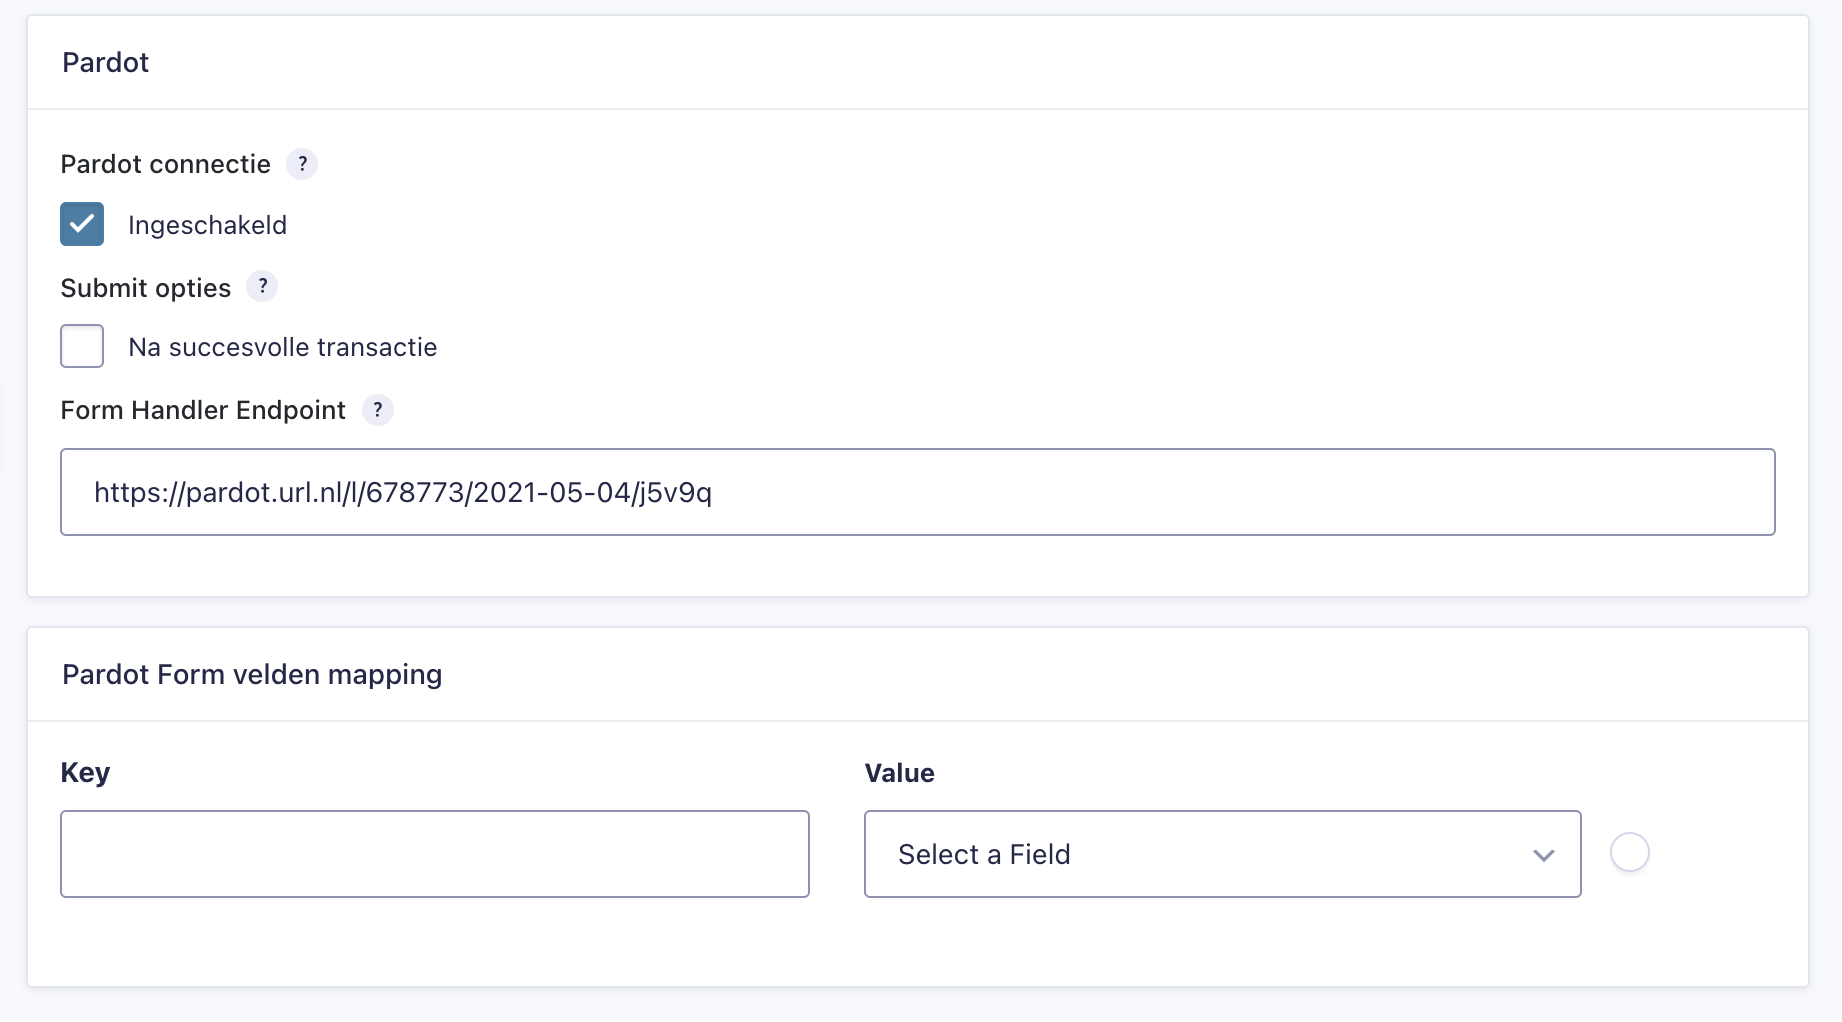
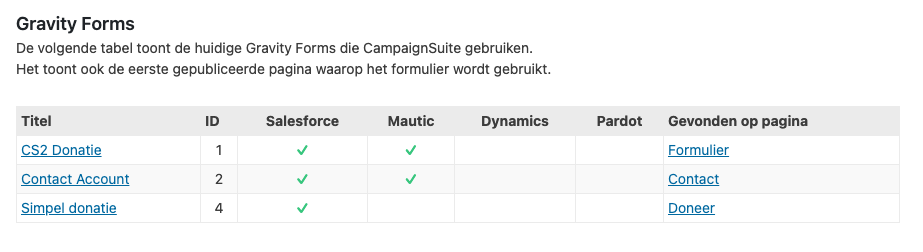

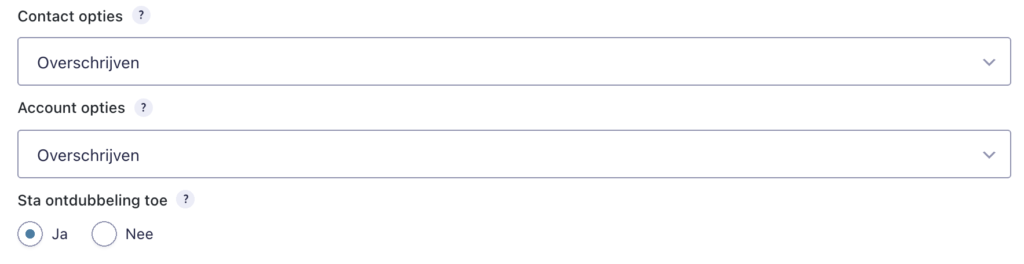

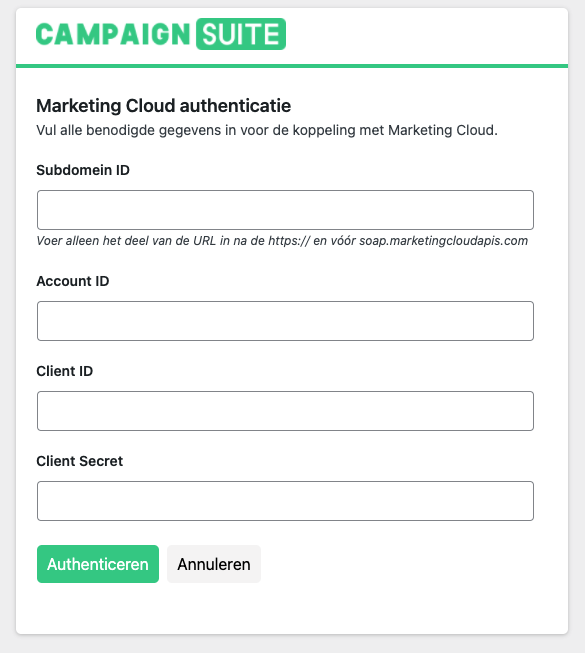
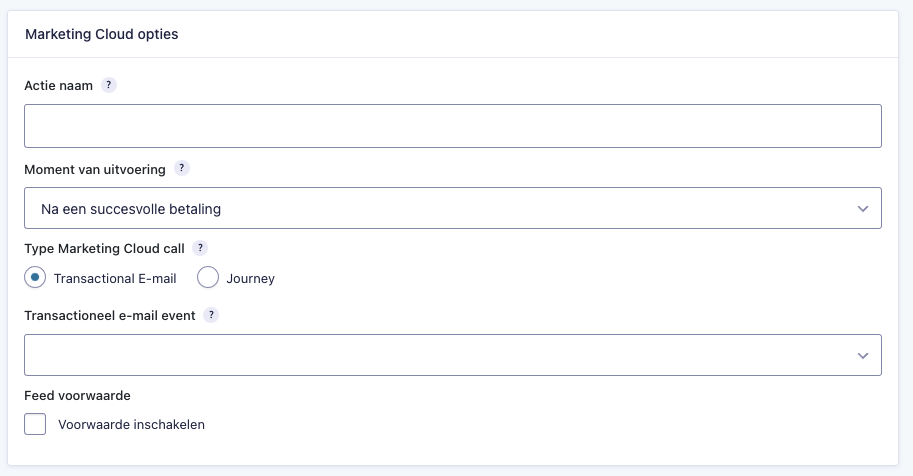
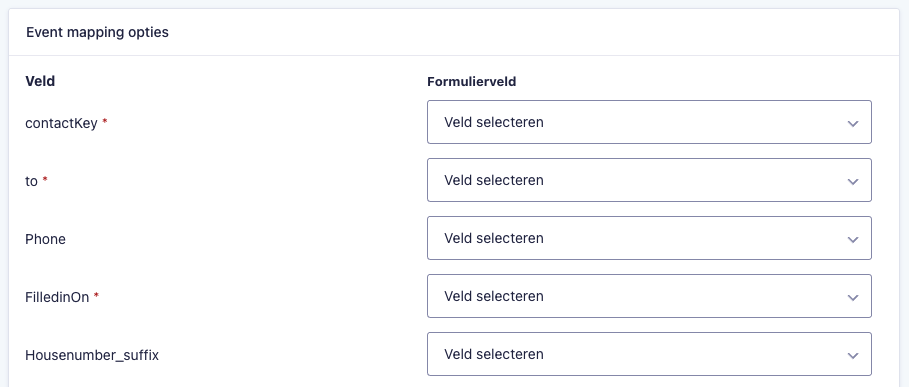
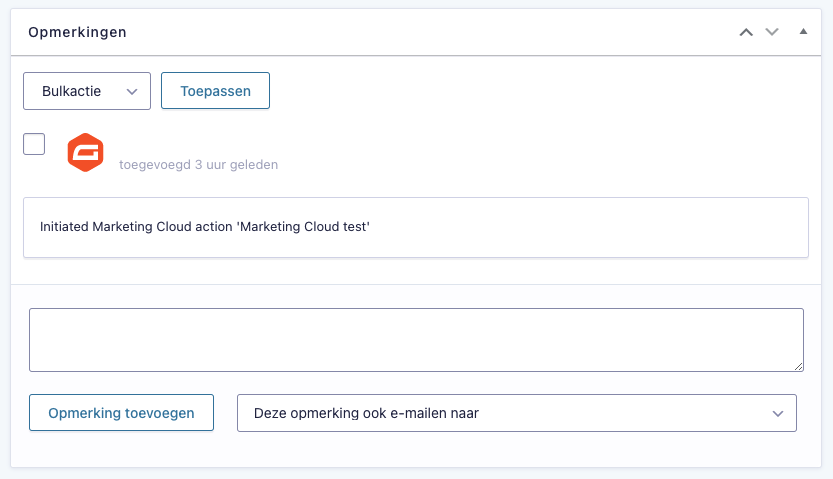
 Gravity Forms is een zeer uitgebreide plugin voor Wordpress om formulieren mee te maken. Het is daarom dat wij gekozen hebben om deze plugin te gebruiken voor CampaignSuite. Gravity Forms heeft ook zeer veel mogelijkheden om uit te breiden. Met name de Actions en Filters zorgen ervoor dat je als developer op veel manieren de werking van de plugin kunt beïnvloeden.
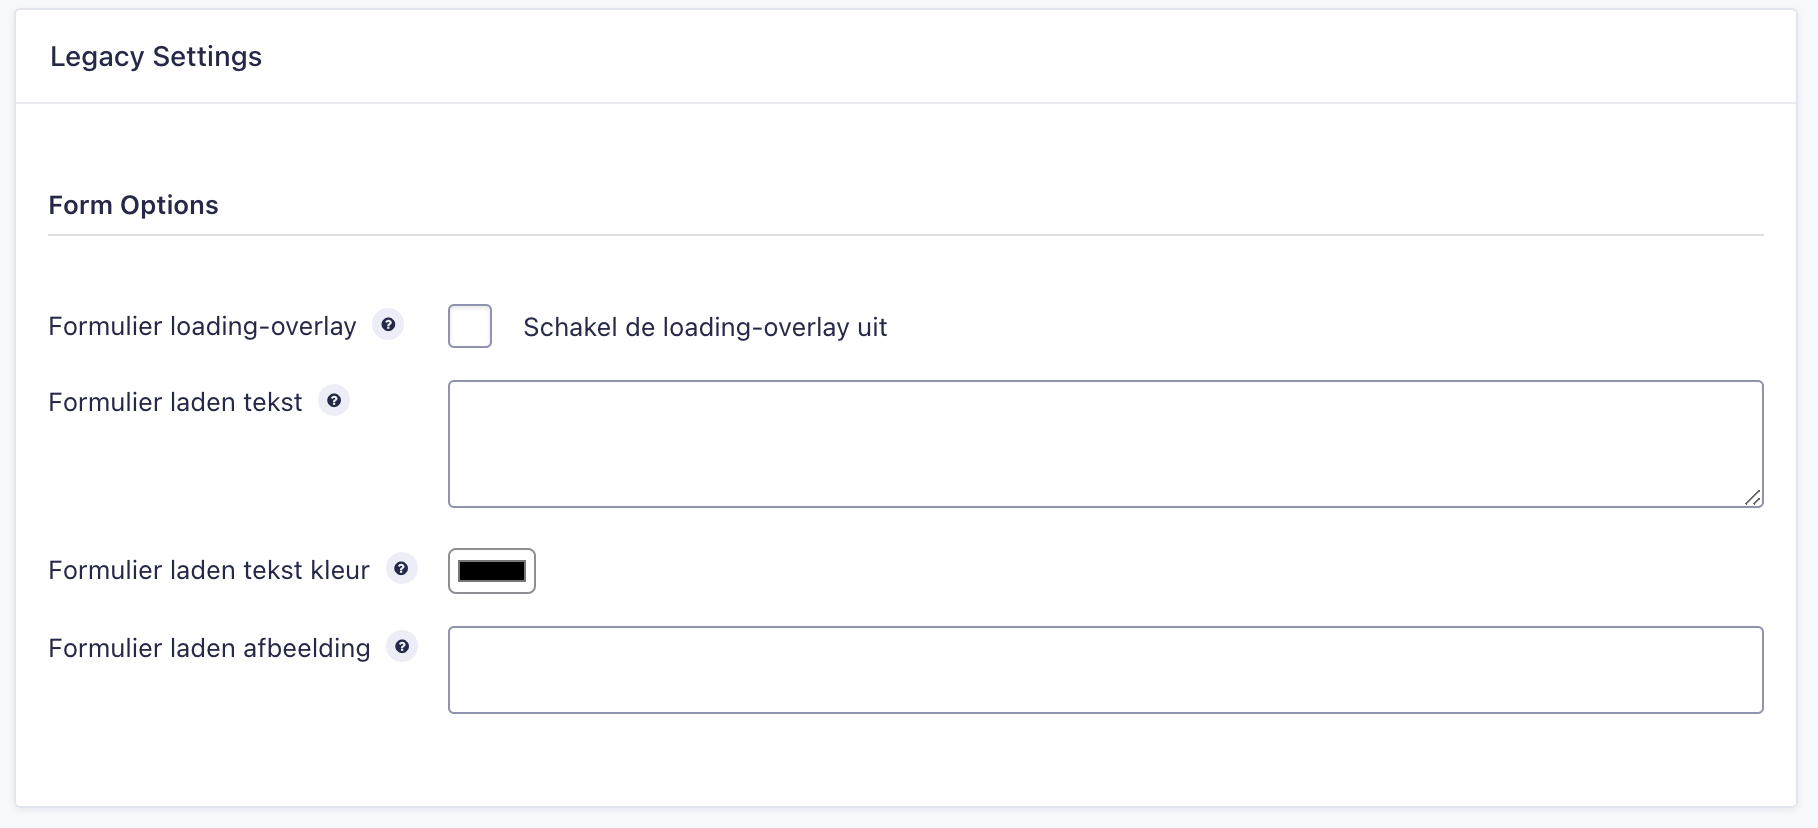

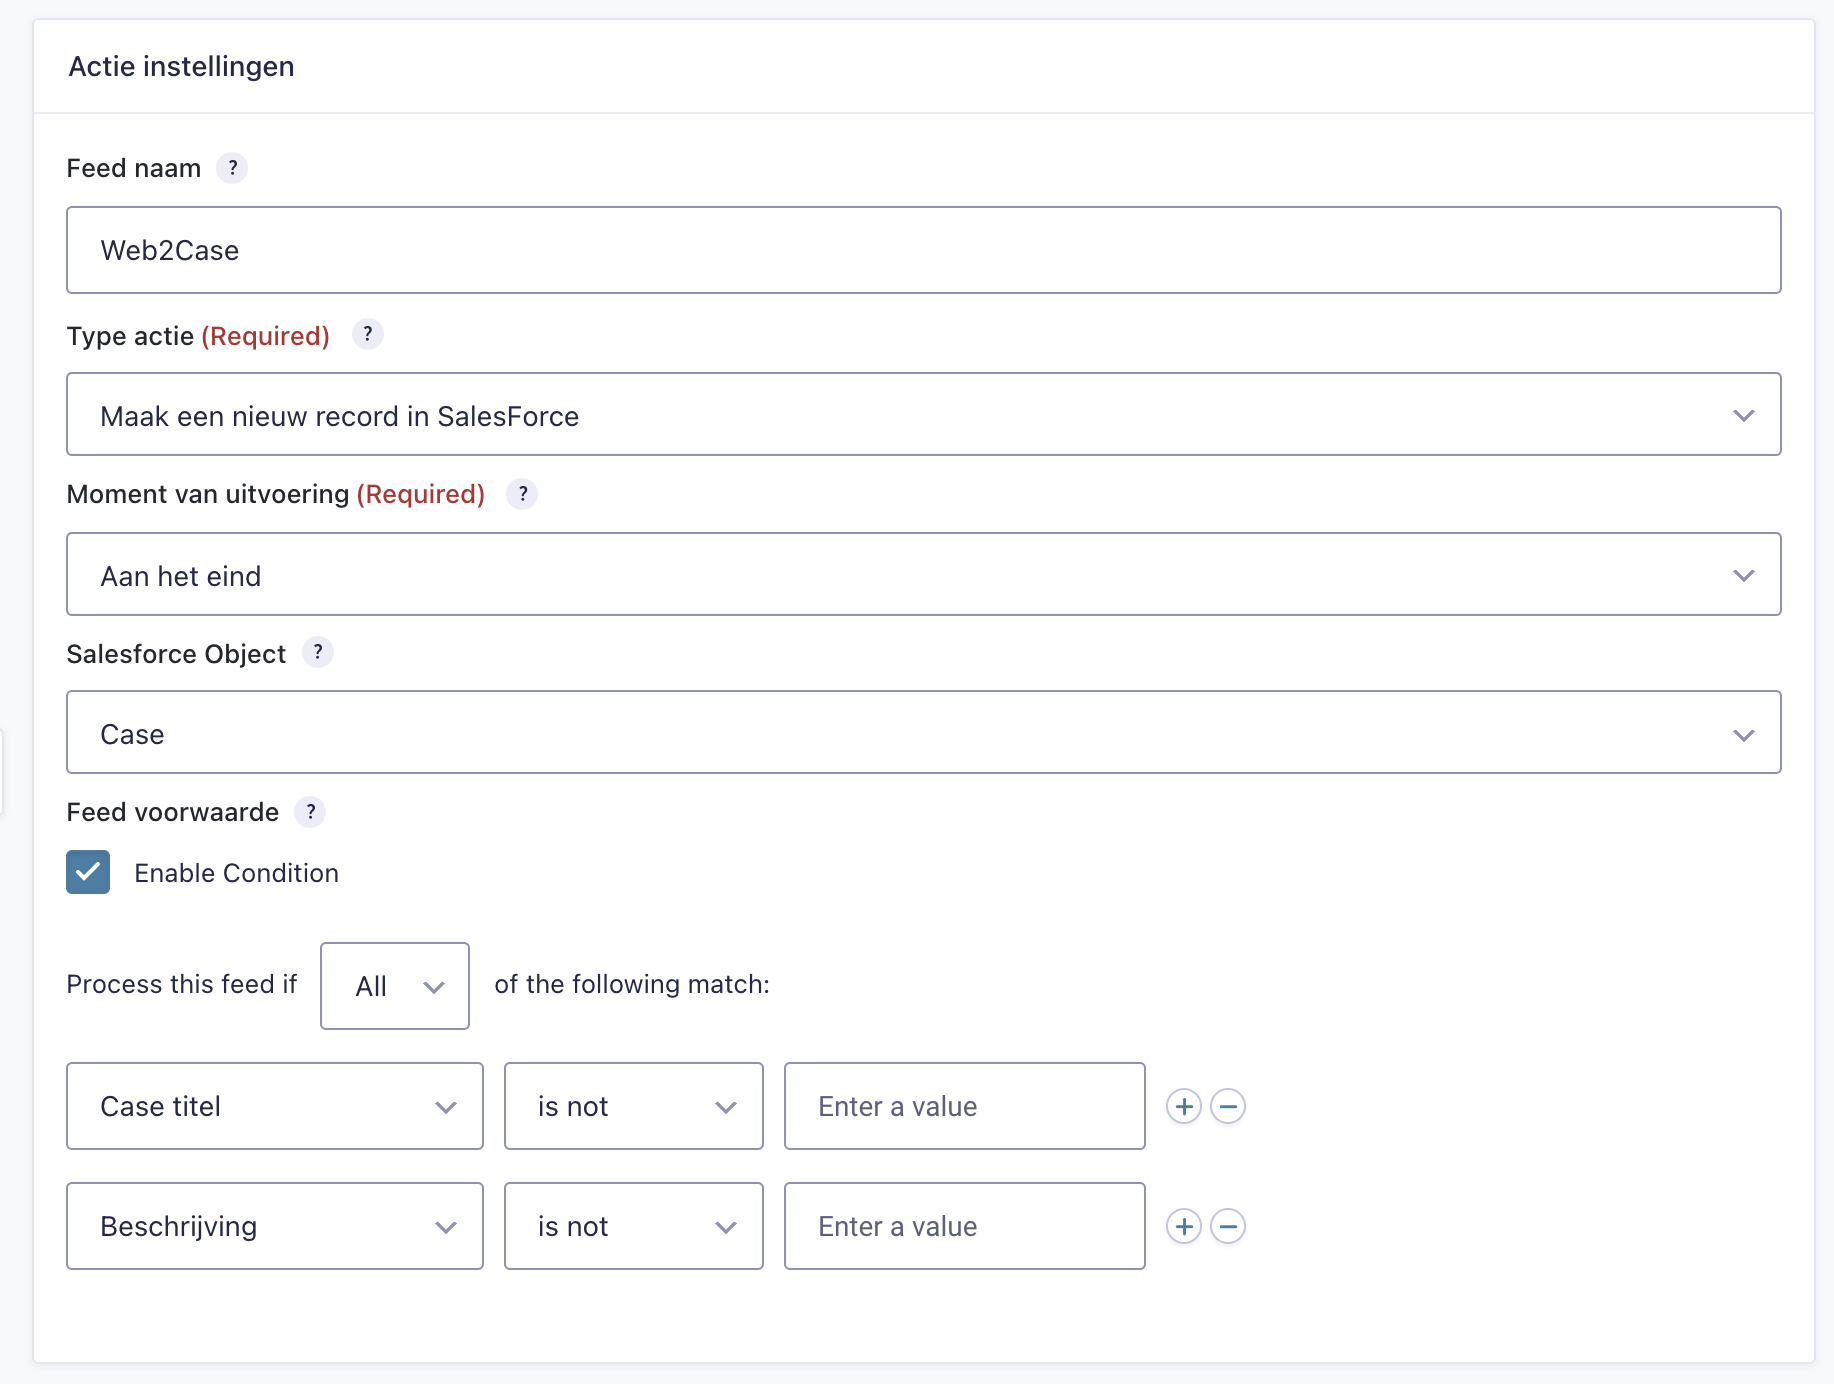
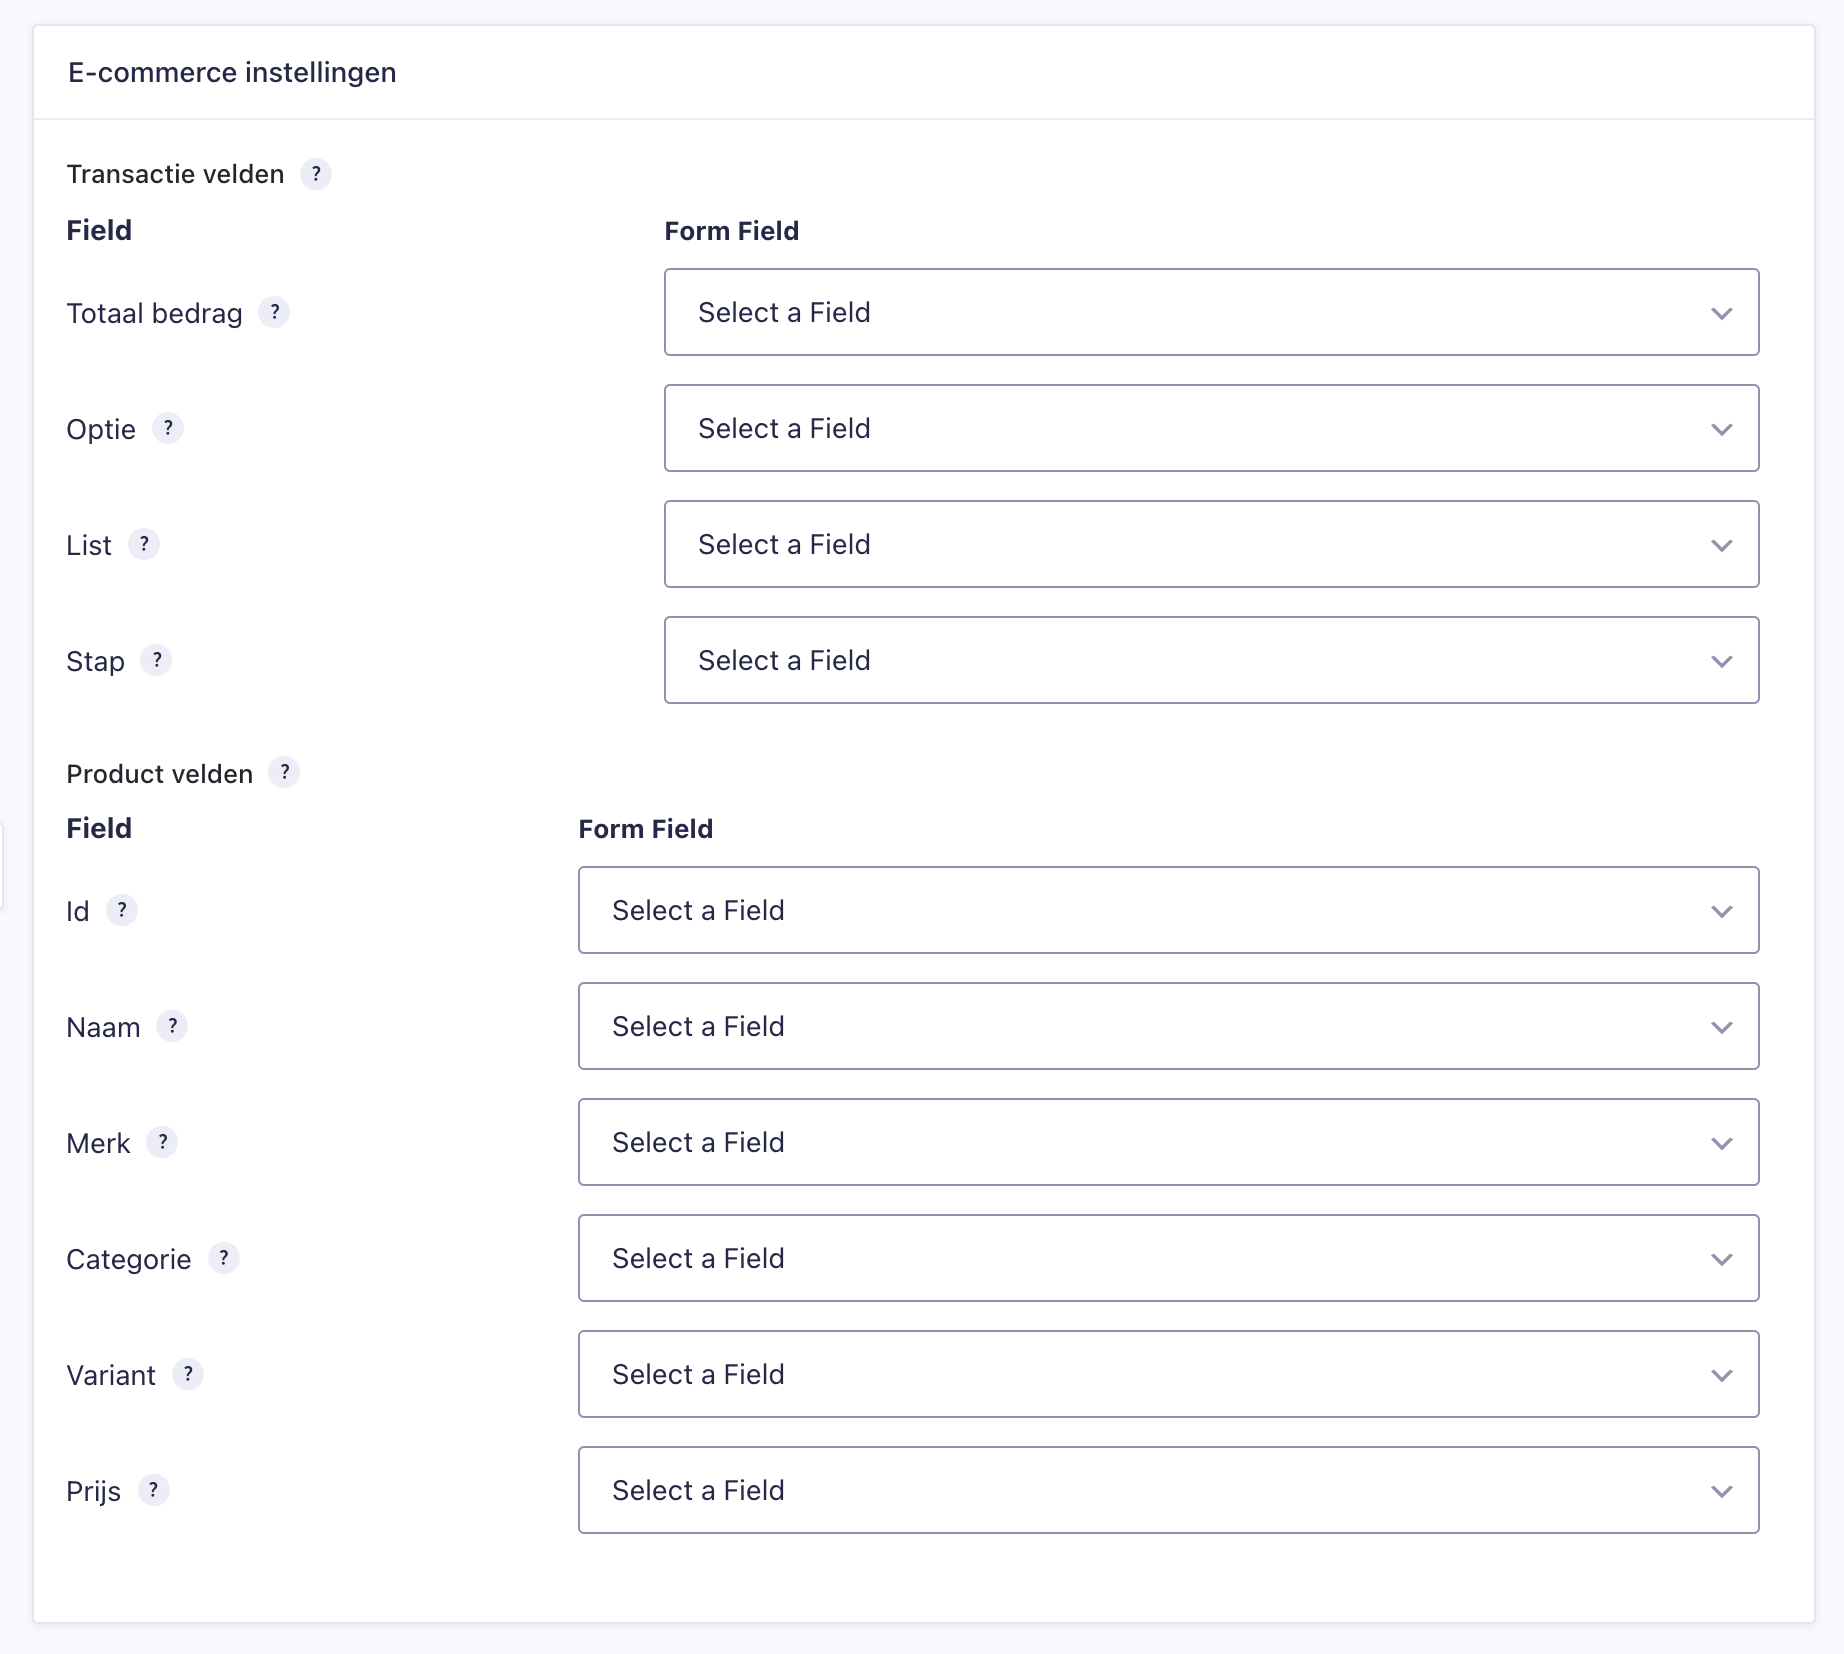

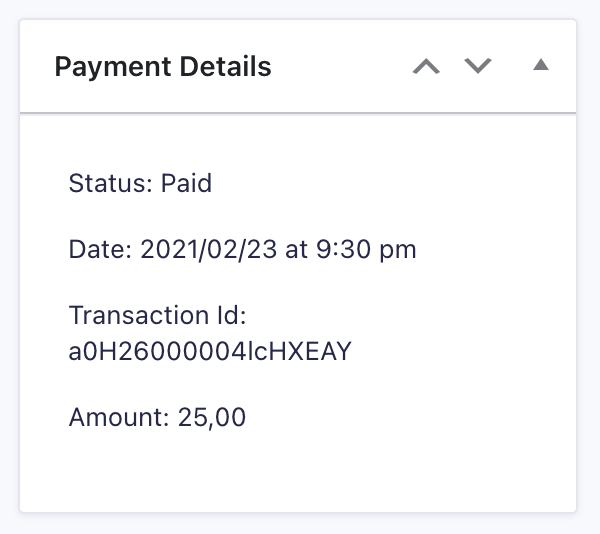
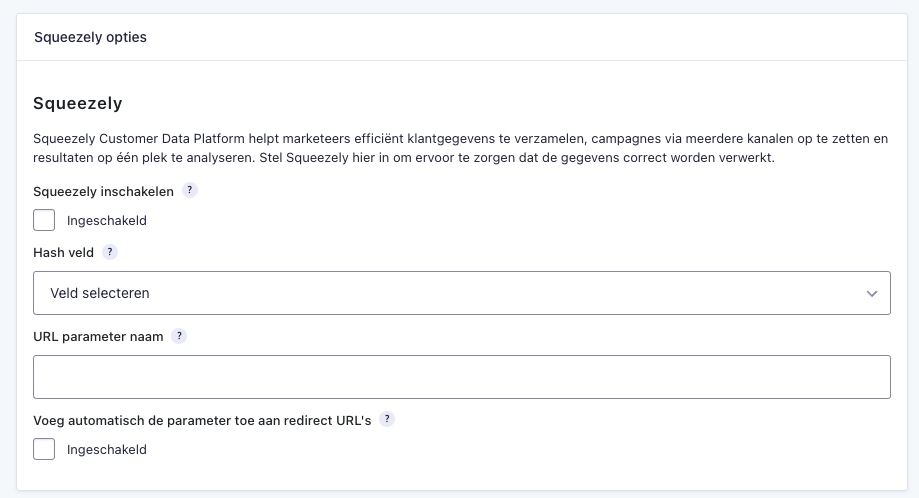
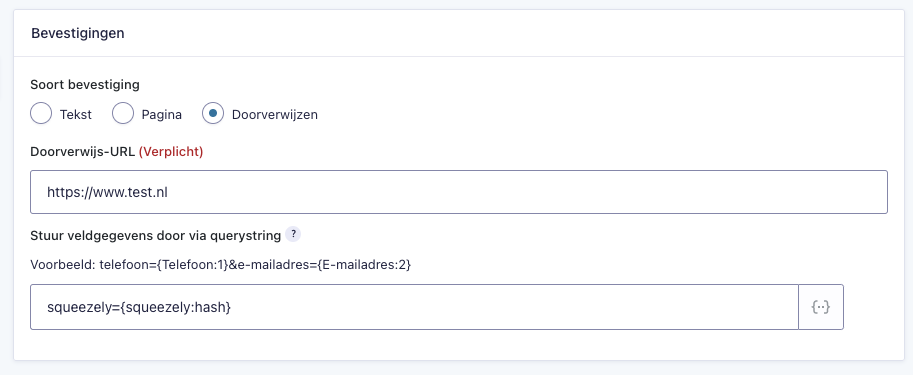
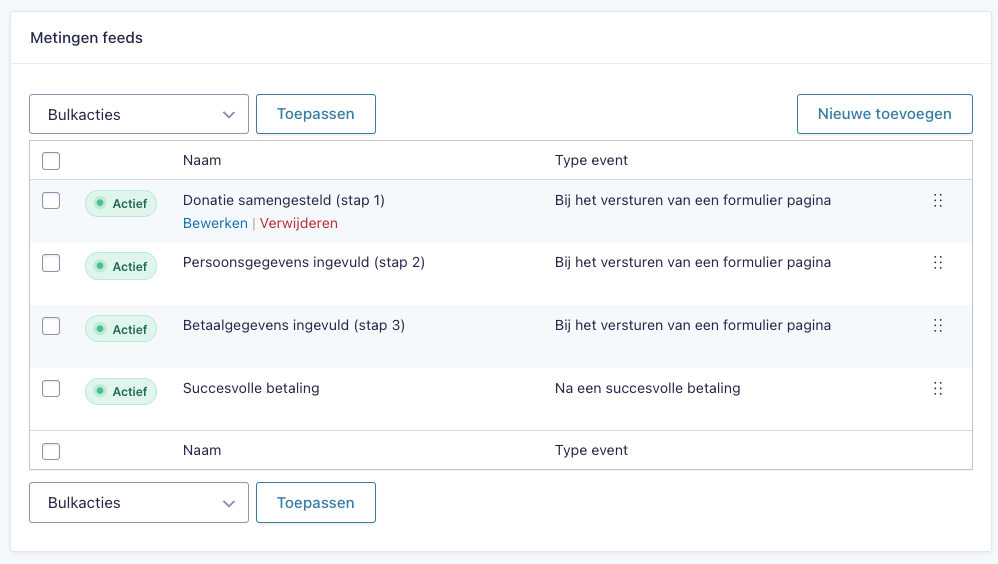
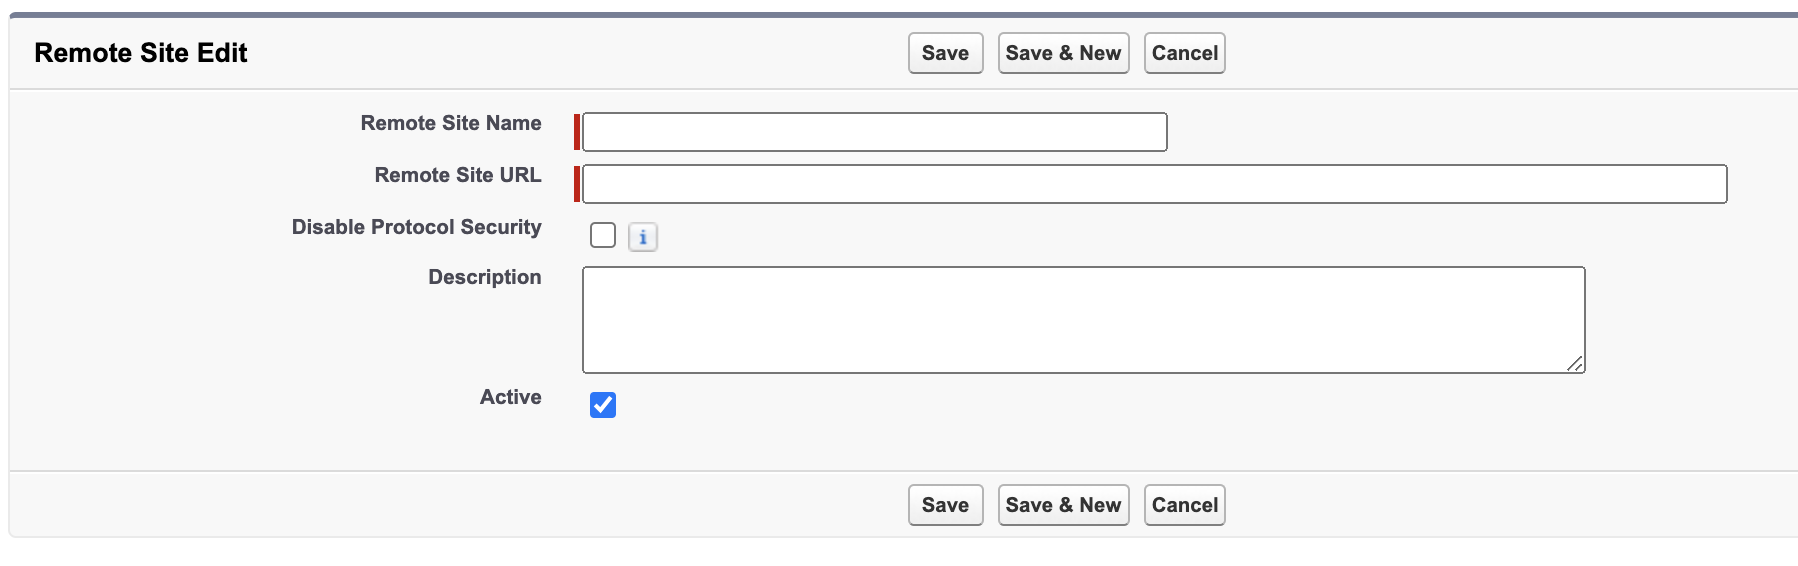
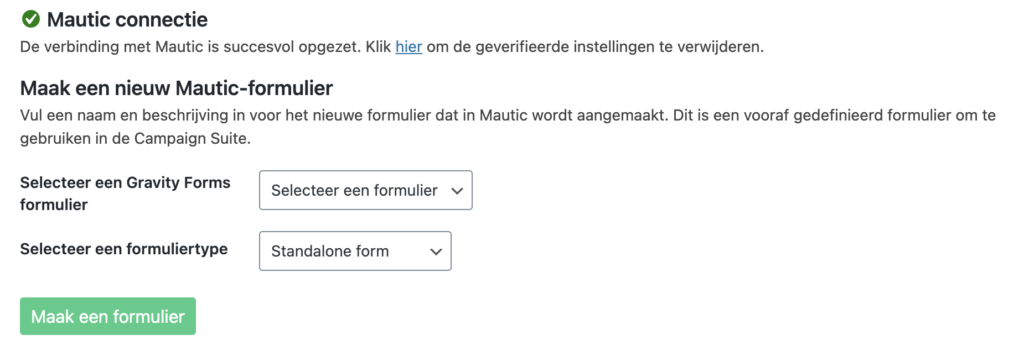
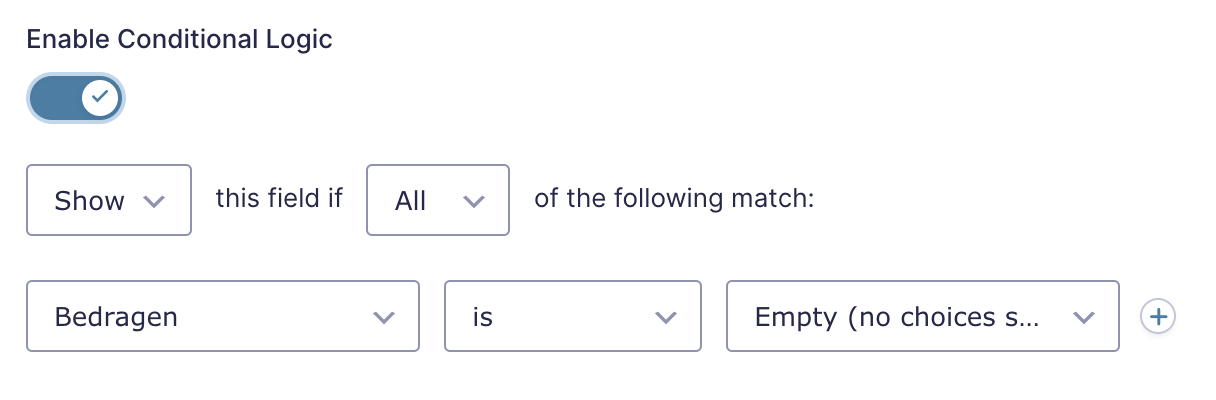
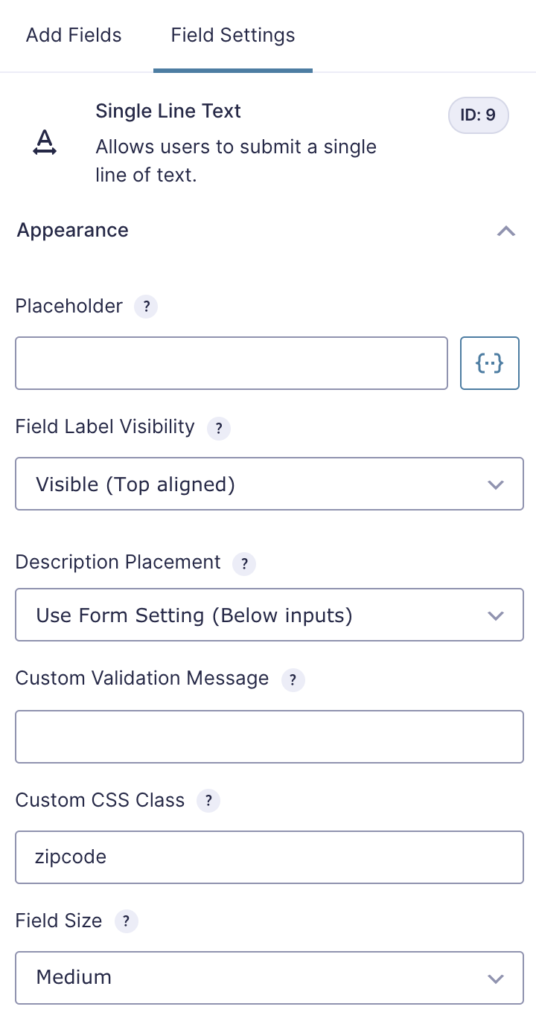
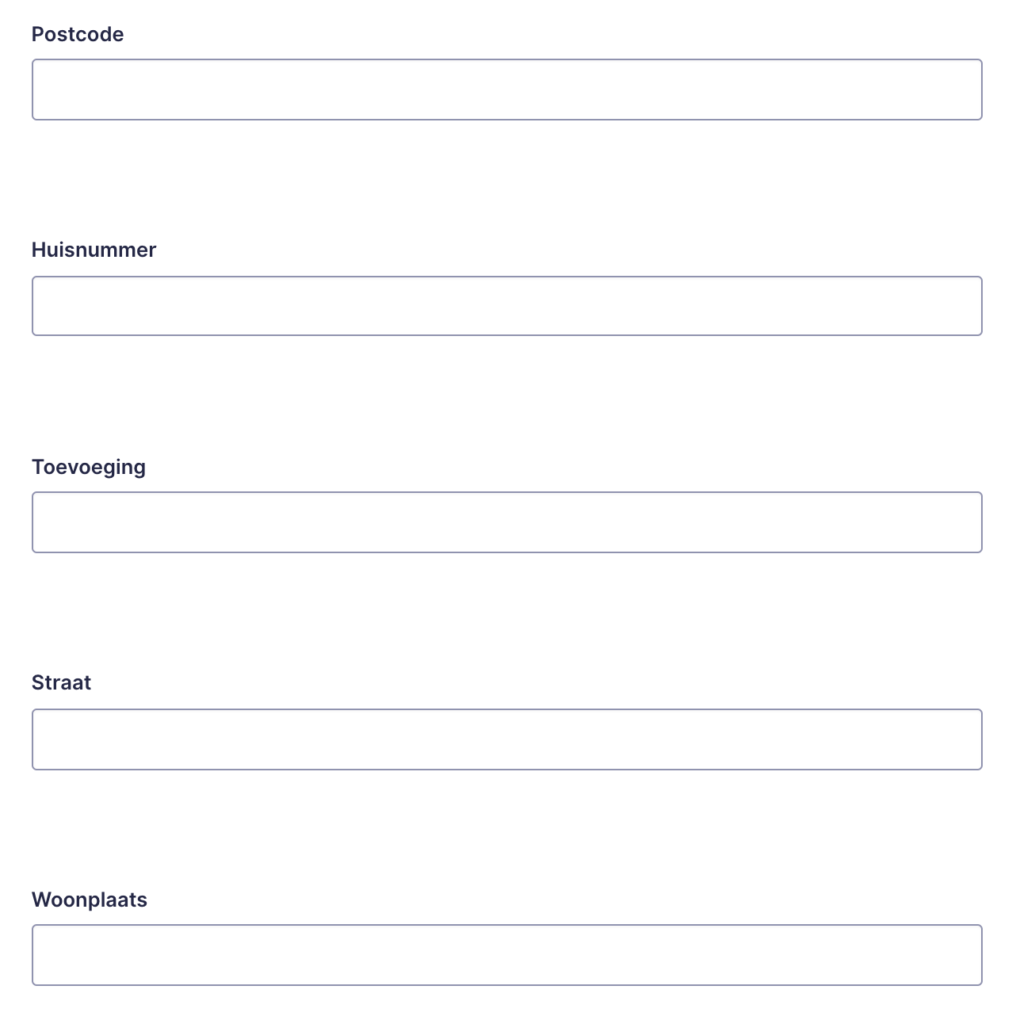


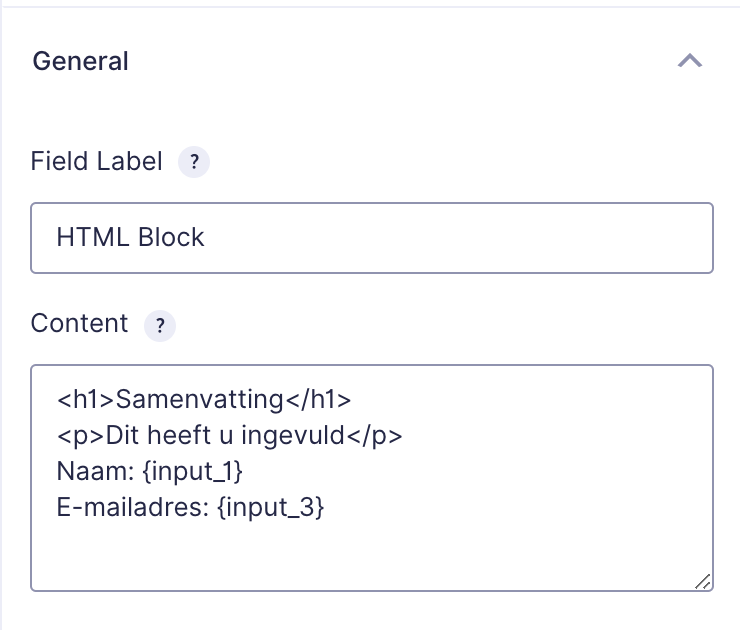
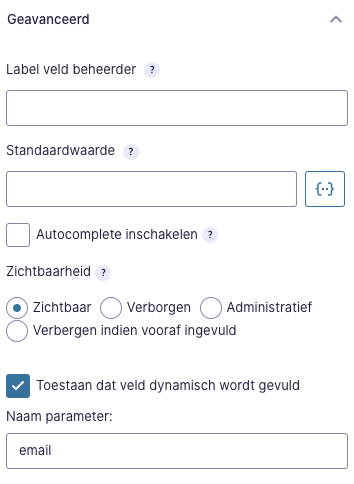 Hiermee is nu aangegeven dat het veld wordt verborgen als de waarde vooraf is ingevuld. Dat geldt ook voor de Gravity Forms optie Toestaan dat veld dynamisch wordt gevuld.
Wanneer u dit instelt zal het veld ook worden verborgen als daarvan de waarde in de URL is meegegeven.
Hiermee is nu aangegeven dat het veld wordt verborgen als de waarde vooraf is ingevuld. Dat geldt ook voor de Gravity Forms optie Toestaan dat veld dynamisch wordt gevuld.
Wanneer u dit instelt zal het veld ook worden verborgen als daarvan de waarde in de URL is meegegeven.