Edit a form
Articles
CampaignSuite fields
 When CampaignSuite is activated, an extra block of fields will appear when editing a form: CampaignSuite fields . These are fields that are made specifically for forms with a payment option. The fields to choose from are:
- Frequency
This field generates a radio field with the different pay frequencies. If you drag this field into your form, you then have the option to check or uncheck options. In this way it is possible, for example, to only show One-time and Monthly. It is also possible to add own frequencies (if these are supported by the third party party responsible for the payments). - Amount options
This is a predefined field with 3 amounts to choose from. It is important that the value of the field is a number (without a currency sign). You are free to change these amounts or add new amounts. - Total amount
With a financial form it is important to have one field where the final amount will be entered. Use the Total amount field to capture multiple Amount options fields with conditional logic. This Total amount field is hidden but will always be filled with an amount that is chosen or filled in with an Other option . - Payment method
This field generates a radio field with different payment methods from which a donor can choose. Here you can check or uncheck options to display in your form.
Conditional logic
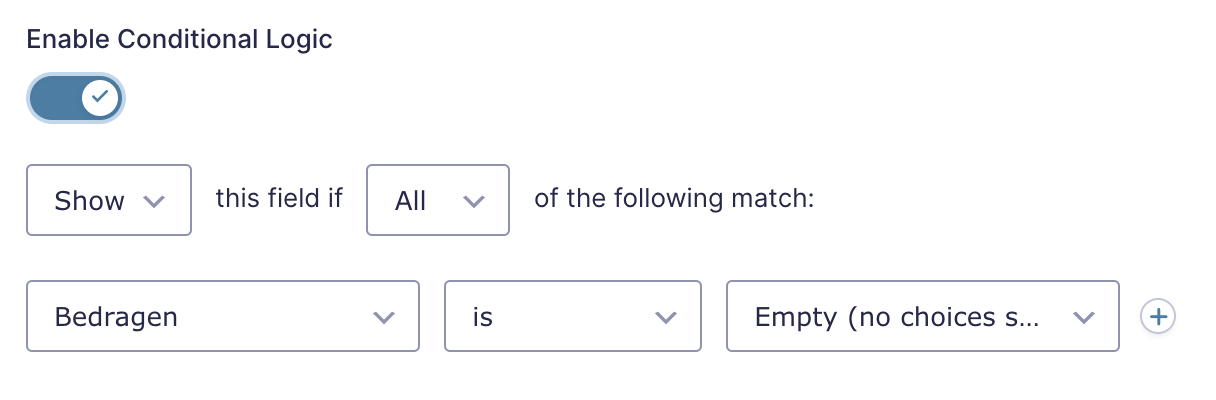
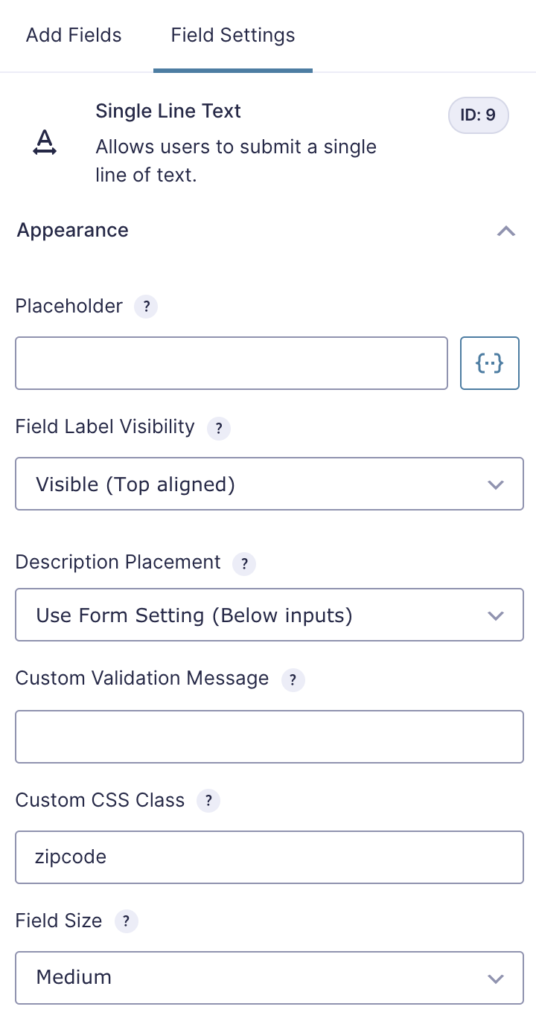
Zipcode checker
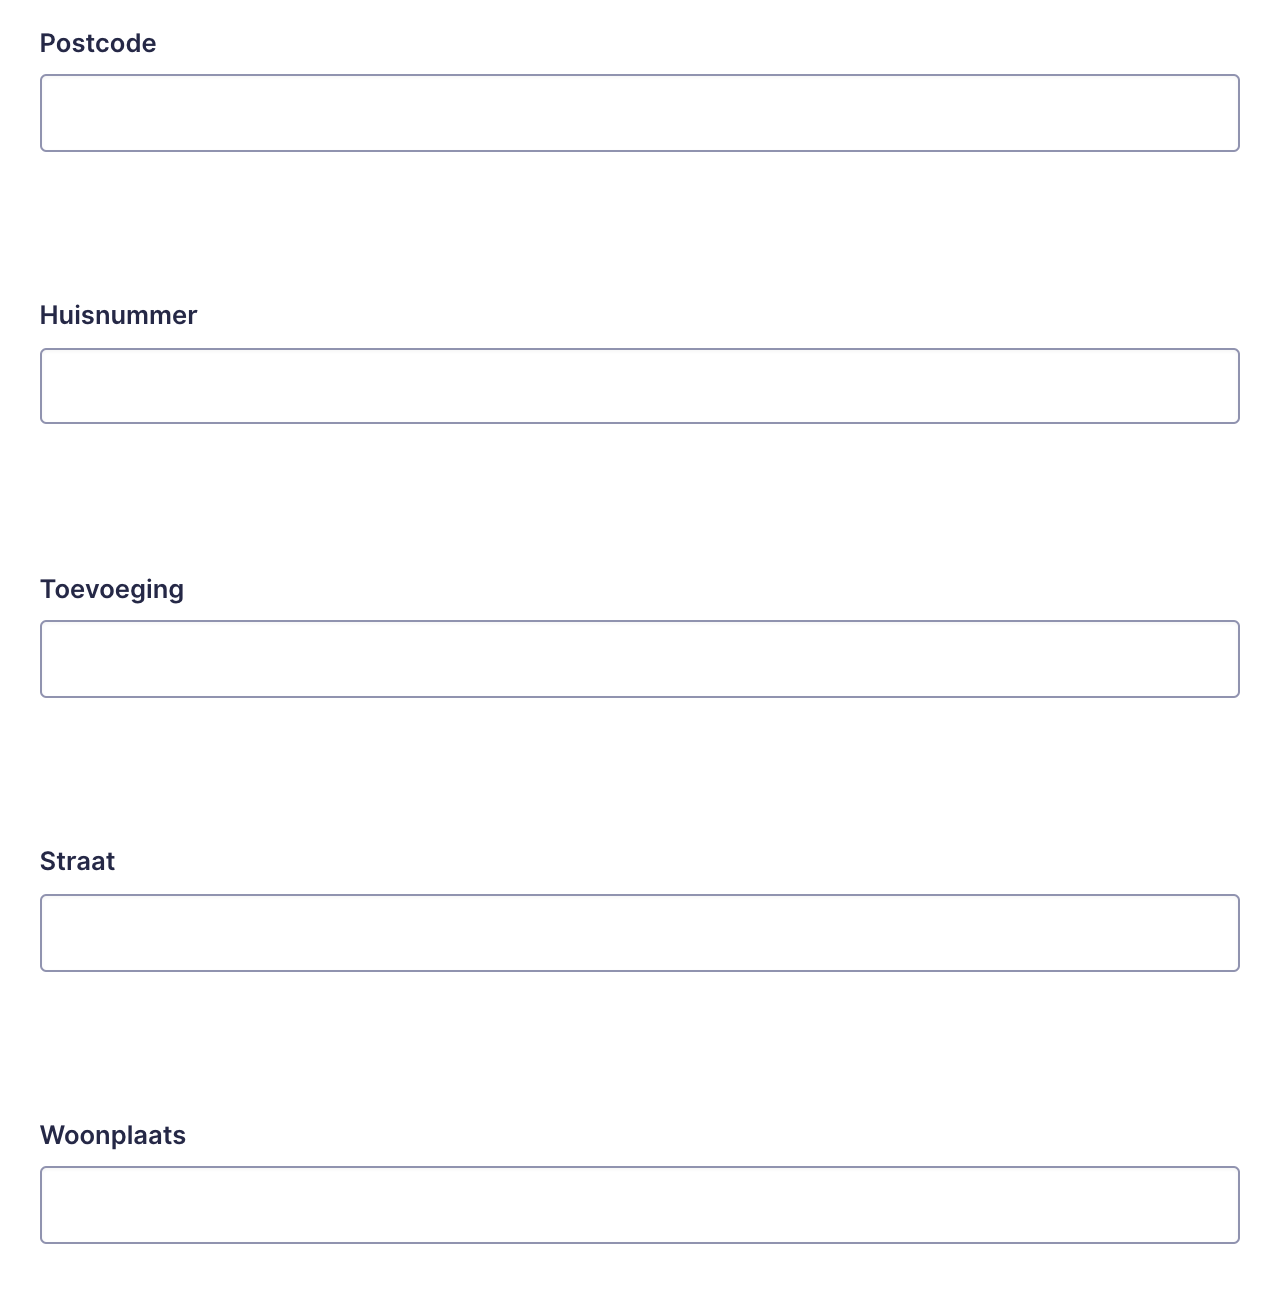
Suppose your form contains the fields as in the image on the right.
To set the Zipcode checker to this, you must set predefined CSS-class on each field:
– zipcode
– housenumber
– addon
– street
– city
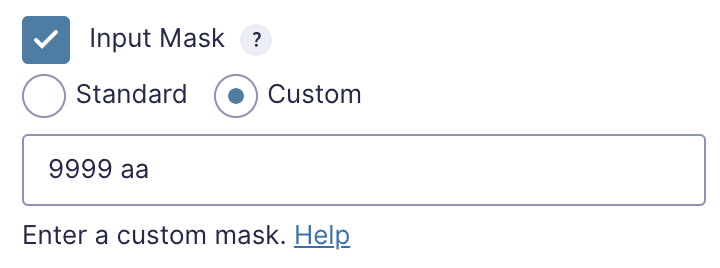
Set this in the field in the Appearance tab:

Mask input
Prefill HTML and textarea

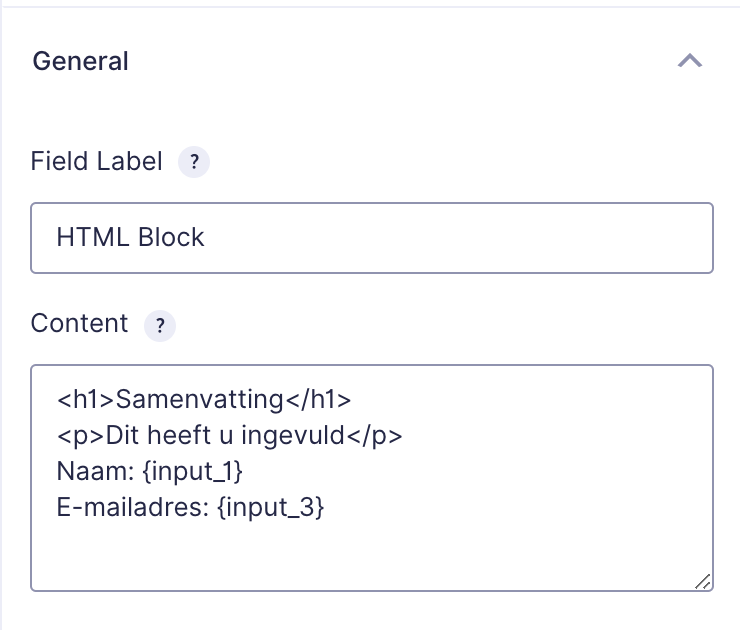
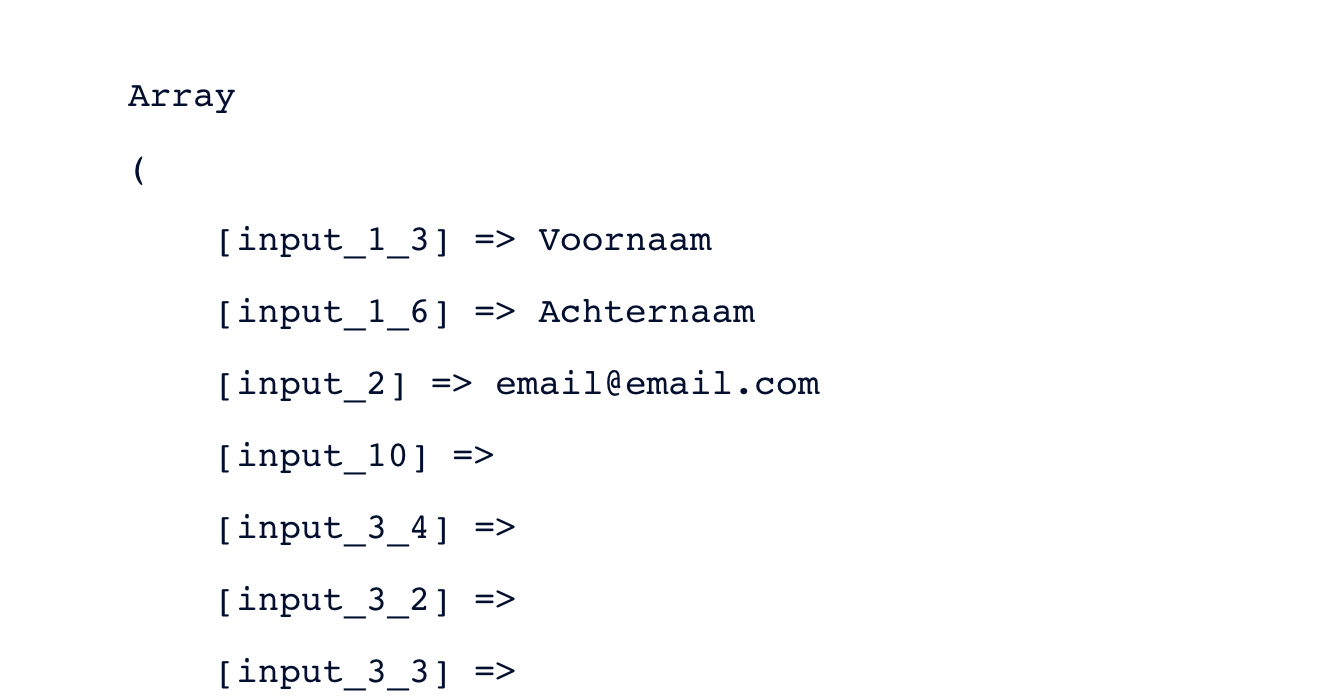
Hide prefilled fields
With each Gravity Forms field you can choose to hide it if its value is pre-filled. Follow the steps below to set this up for a field:
- Edit a form
- Click on a field
- Click in the right column on the tab Advanced
- Click the option Hide if pre-filled
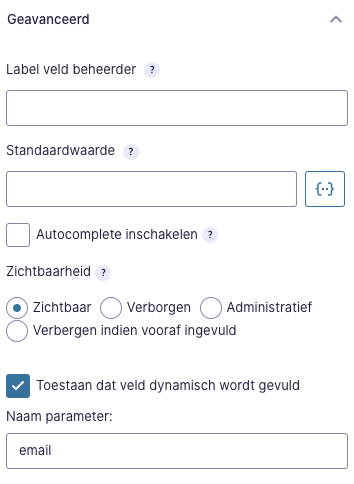
This now indicates that the field will be hidden if the value is pre-filled. This also applies to the Gravity Forms option Allow field to be filled dynamically.
When you set this, the field will also be hidden if its value is given in the URL.
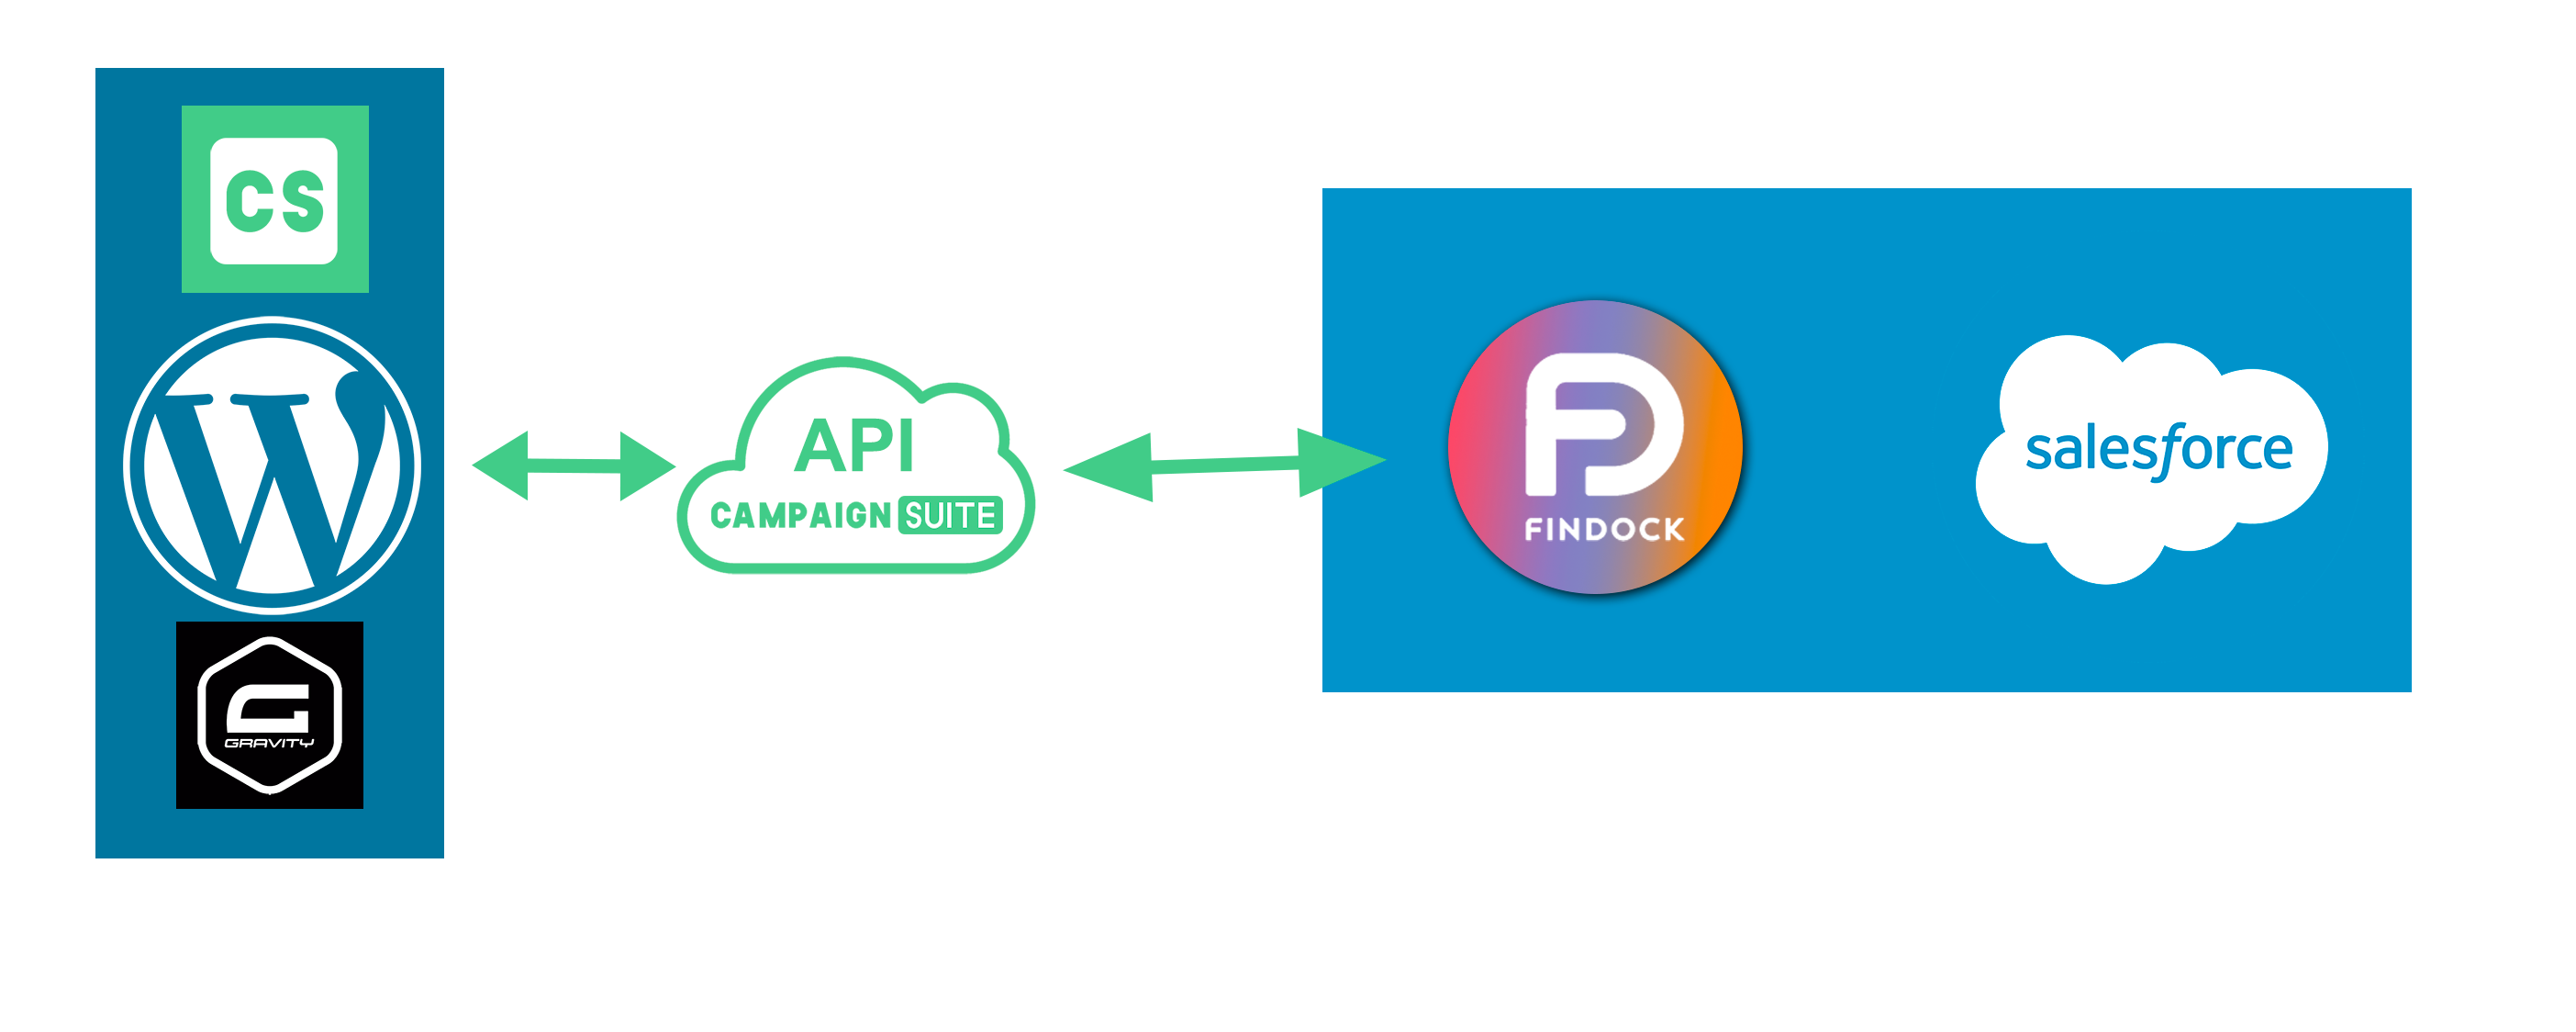
Marketing Cloud and Salesforce
This function also works if the value of the fields is filled in by data from Marketing Cloud or Salesforce
Form settings
Notifications

Salesforce
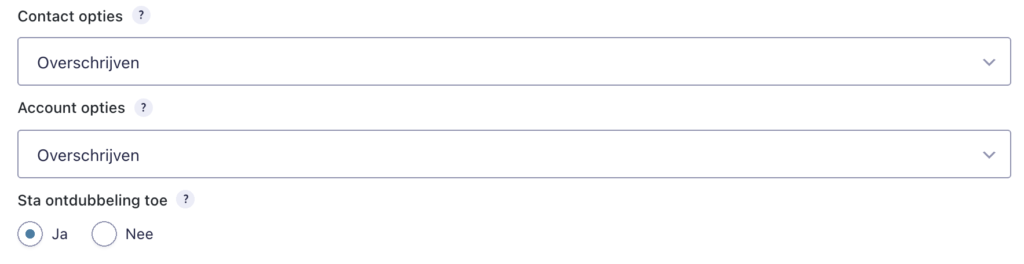
- Creating a CampaignMember object
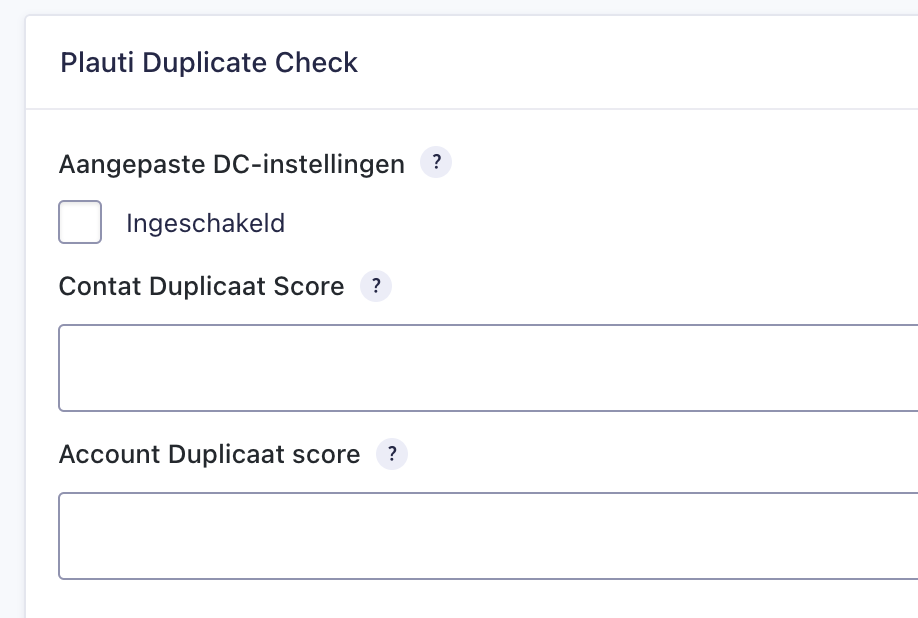
- Set Plauti Duplicate Check options
- Link payment fields for a transaction to Converse or Findock
- Synchronization of CampaignMember objects or Memberships
- Folders of Contact and Account fields
Articles
Connect to Salesforce


Payment fields
Converse


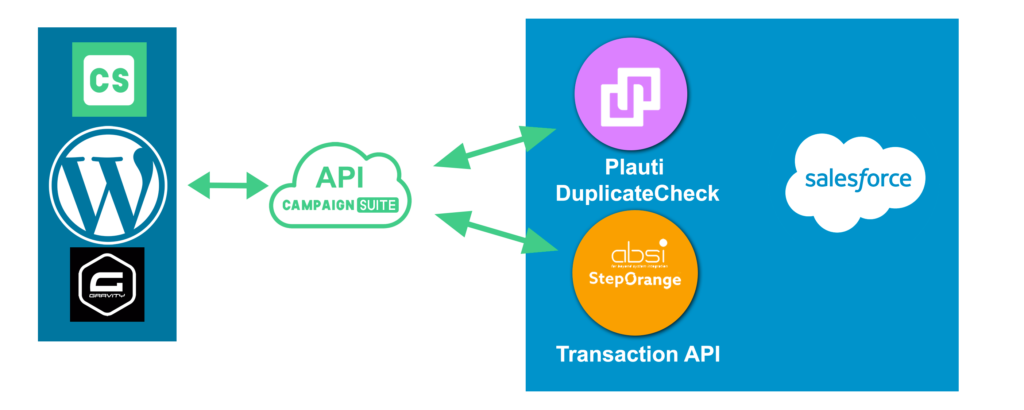
Findock v1 and v2
Plauti Duplicate check
Synchronisation fields
Salesforce objecten
Prefilling based on ContactID
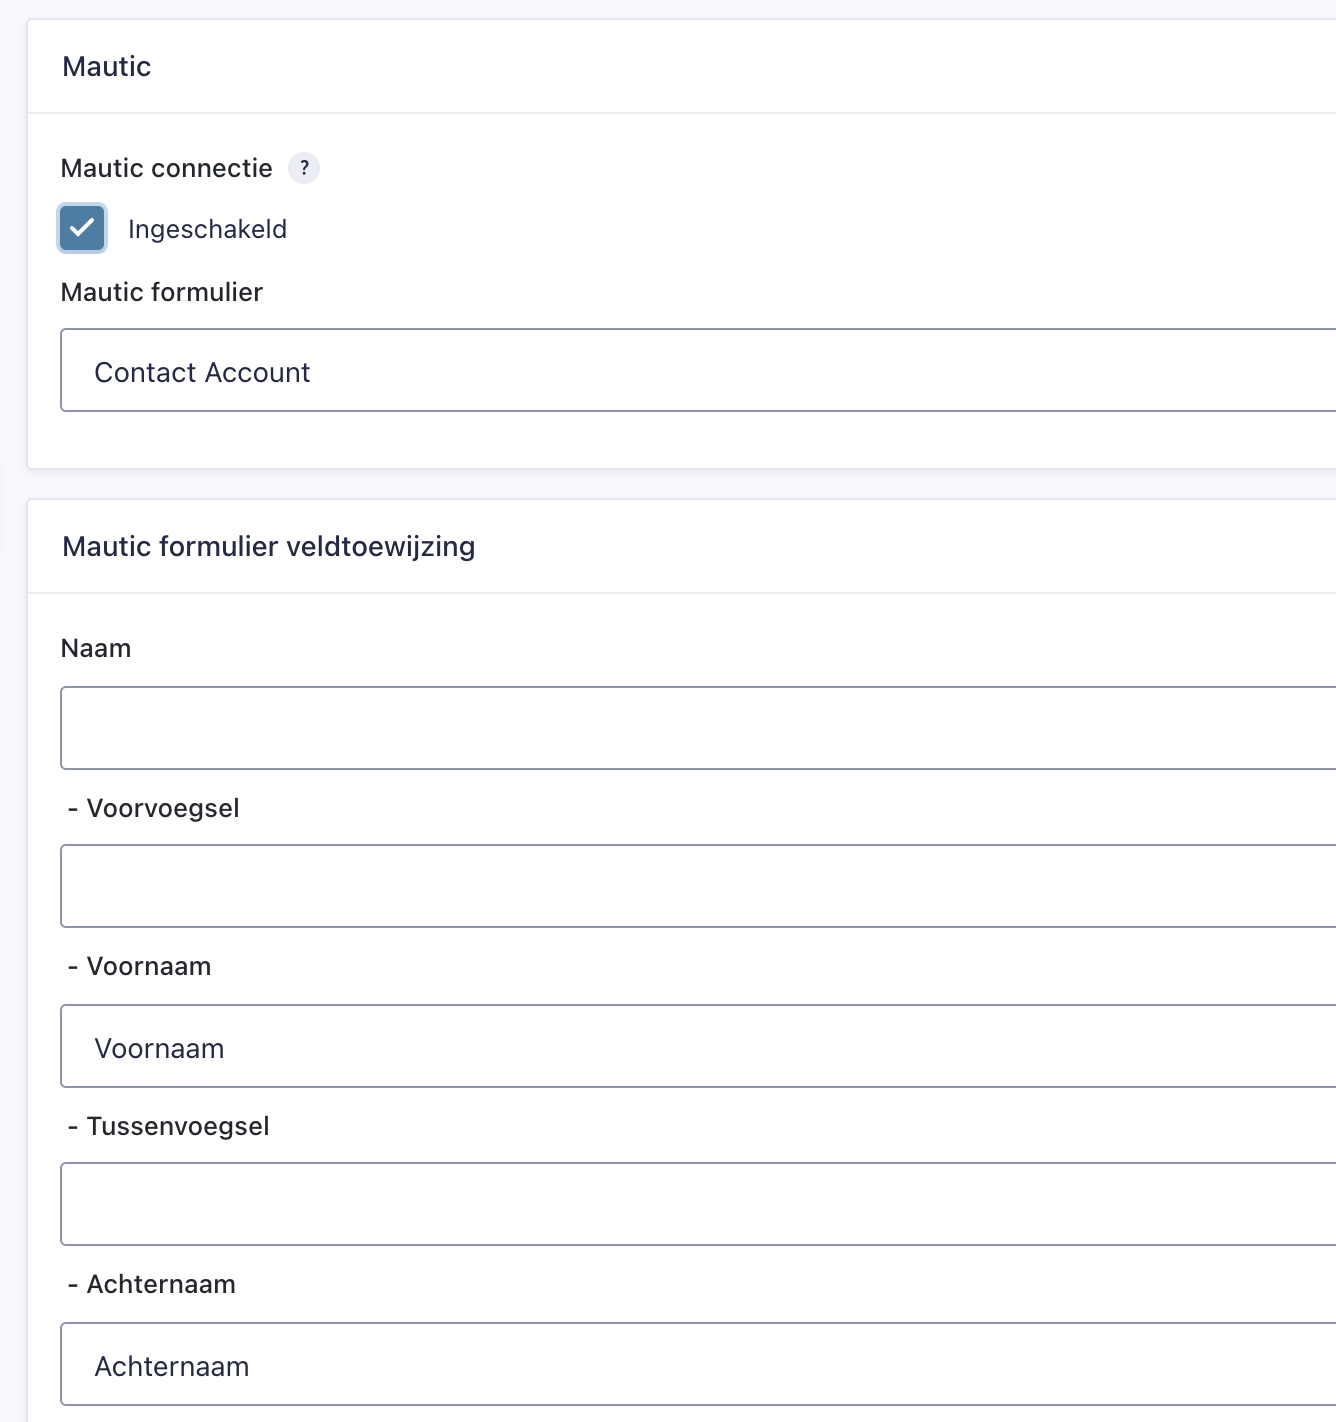
Mautic
Articles
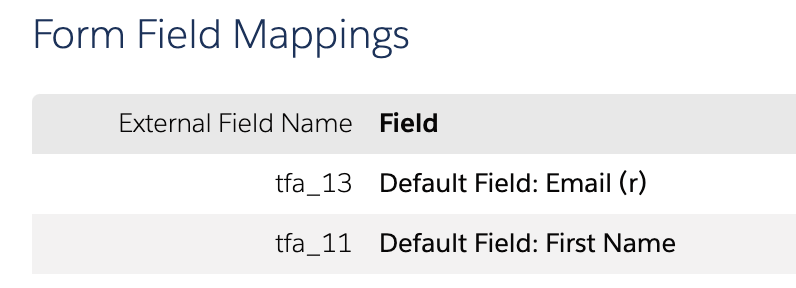
Connect fields

Pardot
Articles
Pardot form
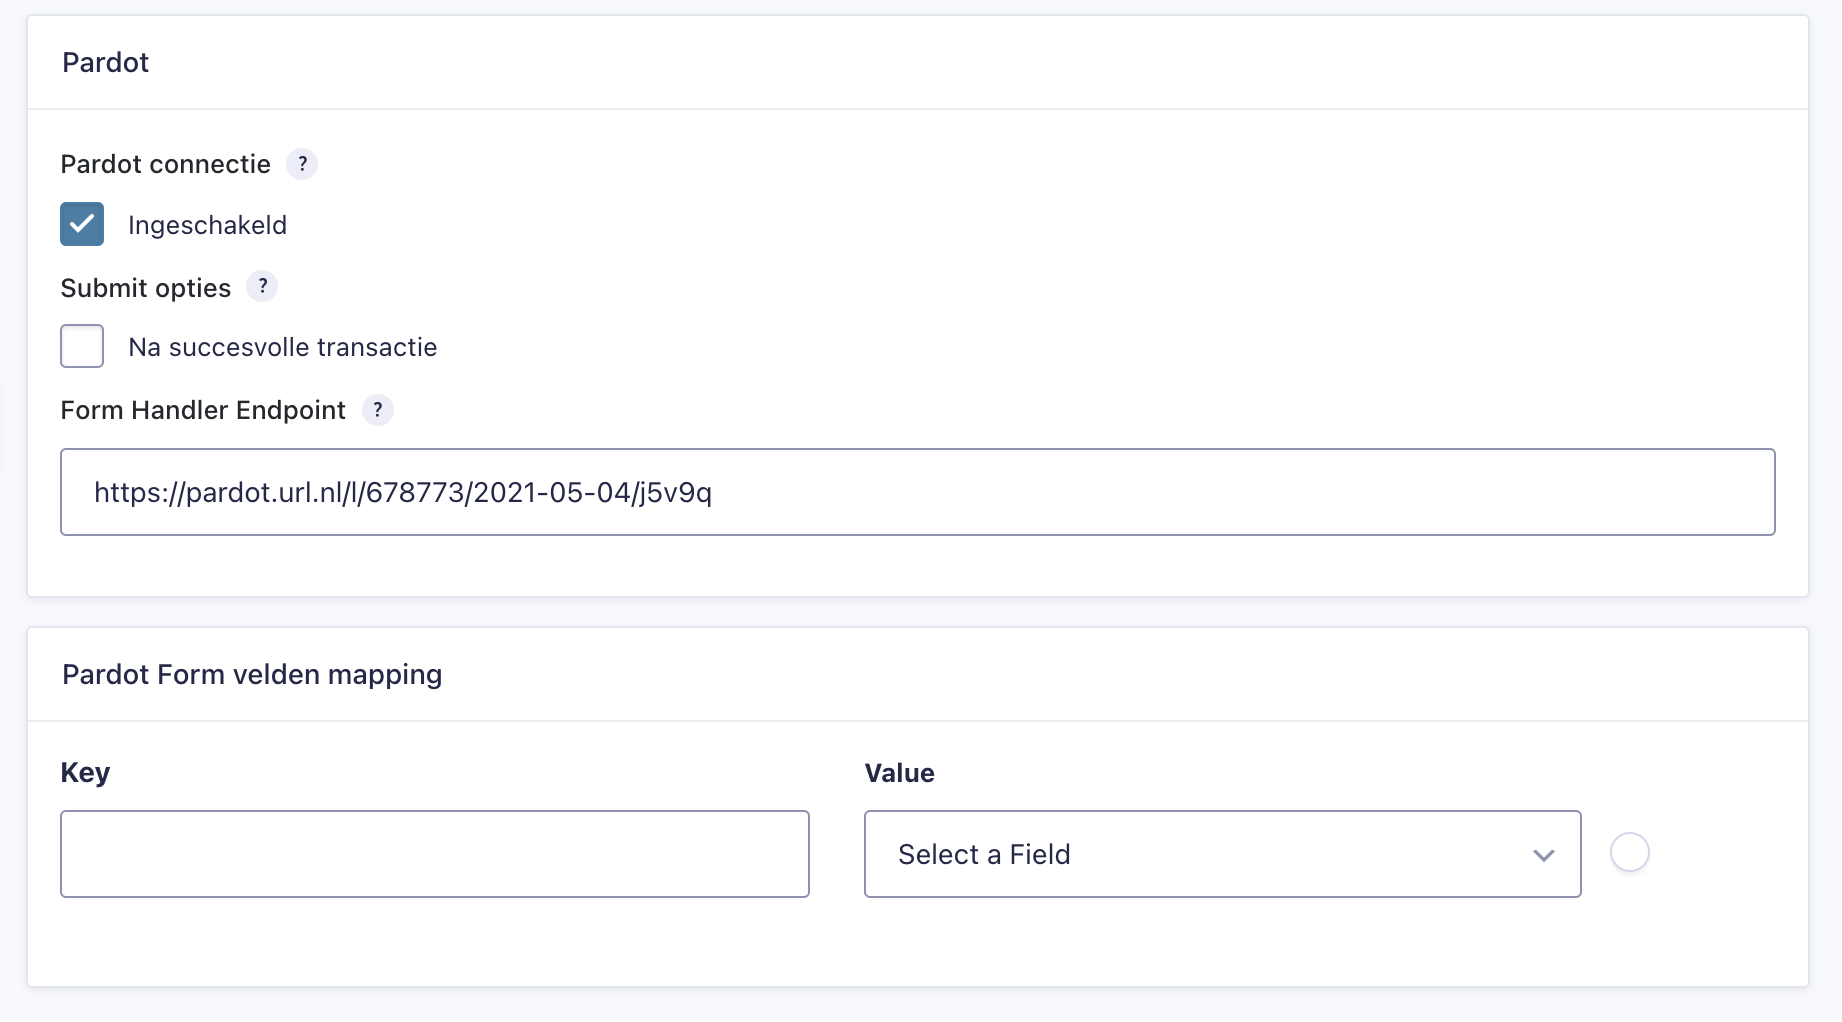
Pardot Form Handler
Marketing Cloud
![]() Once a connection has been established with Marketing Cloud, various functions will be displayed in Gravity Forms. Some examples of these features are:
Once a connection has been established with Marketing Cloud, various functions will be displayed in Gravity Forms. Some examples of these features are:
- Creating Marketing Cloud feed actions for Transactional emails and journeys.
- Use prefill options on fields.
- Set up dynamic content for Marketing Cloud emails.
- Being able to set Prefill variables with Gravity Forms confirmations.
All parts will be covered in the articles below.
Articles
Marketing Cloud feed actions
To send Gravity Forms submission to Marketing Cloud, Feed actions must be set up. It is possible to set multiple actions at different times during a submission based on the conditional logic.
Follow the steps below to create a link between a form and Marketing Cloud:
- Go to Settings of the Gravity Forms form and click on the tab Marketing Cloud.
- Click on the button Add new to add a new action.
The screen below will then appear: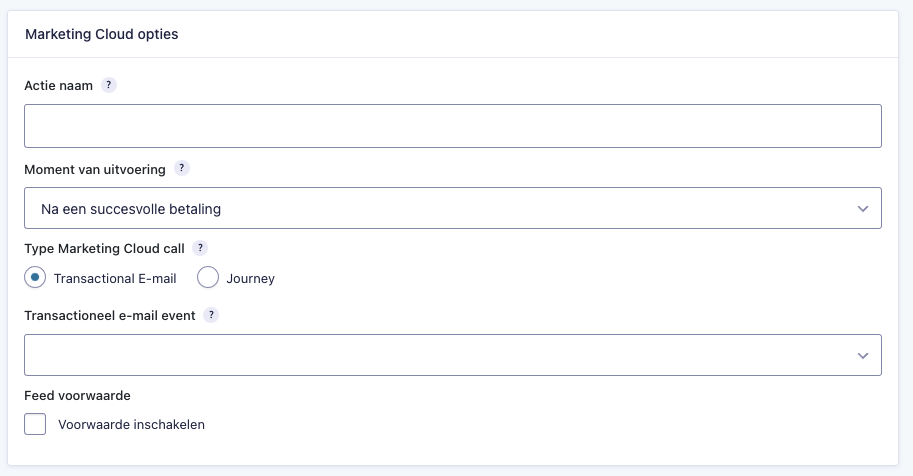
- Enter a recognizable name for this Feed action in the Action name field.
- Choose a moment of execution for the action. A Marketing Cloud Feed action can be executed at 3 different moments:
- Immediately after filling out the form
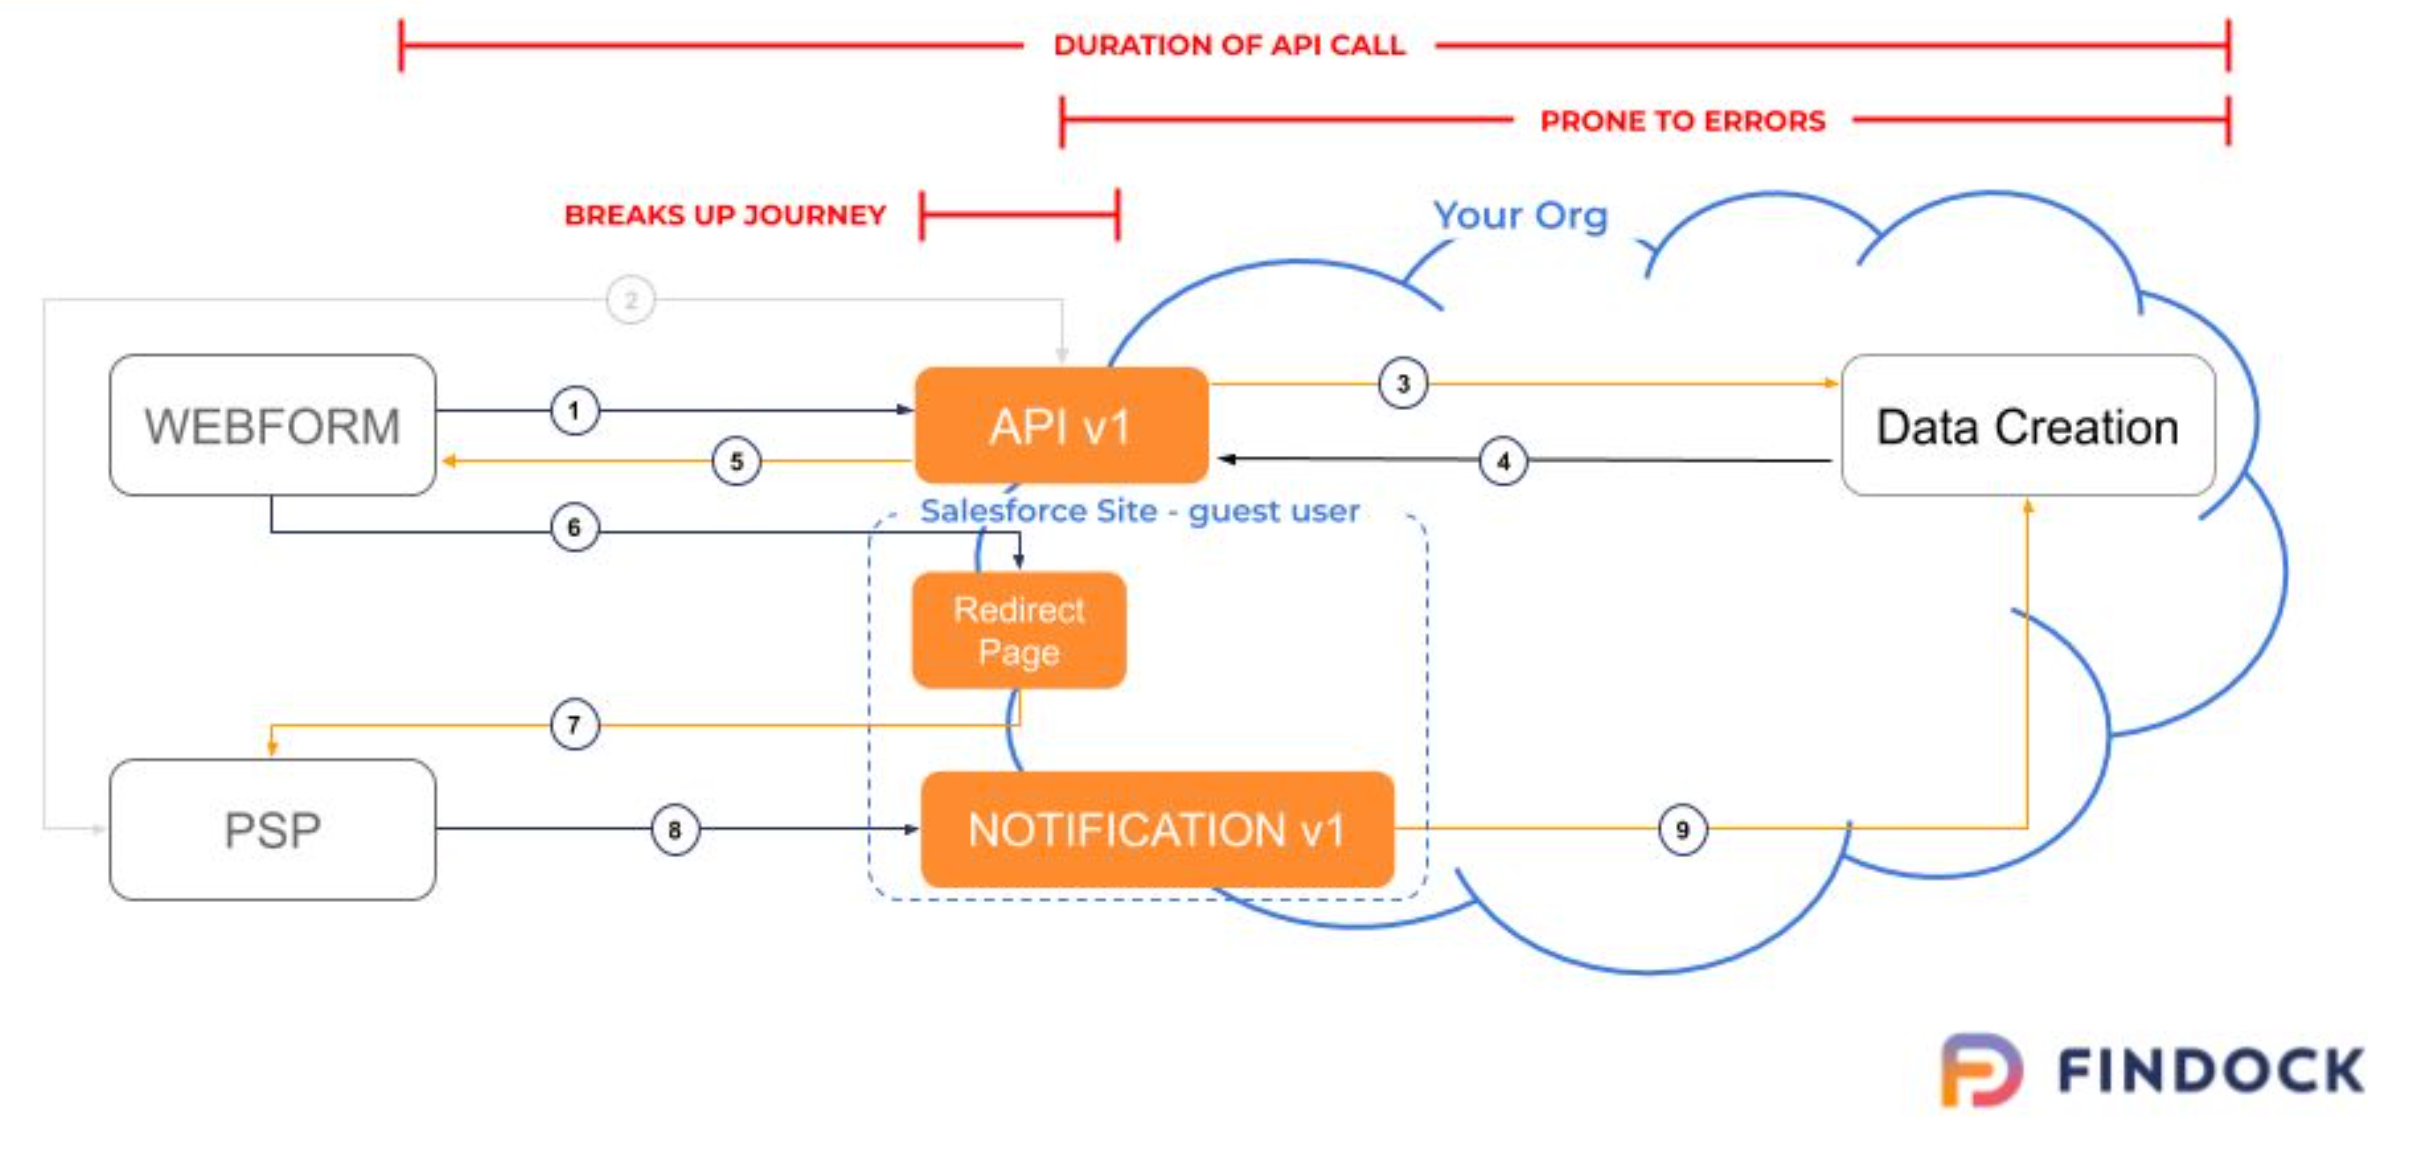
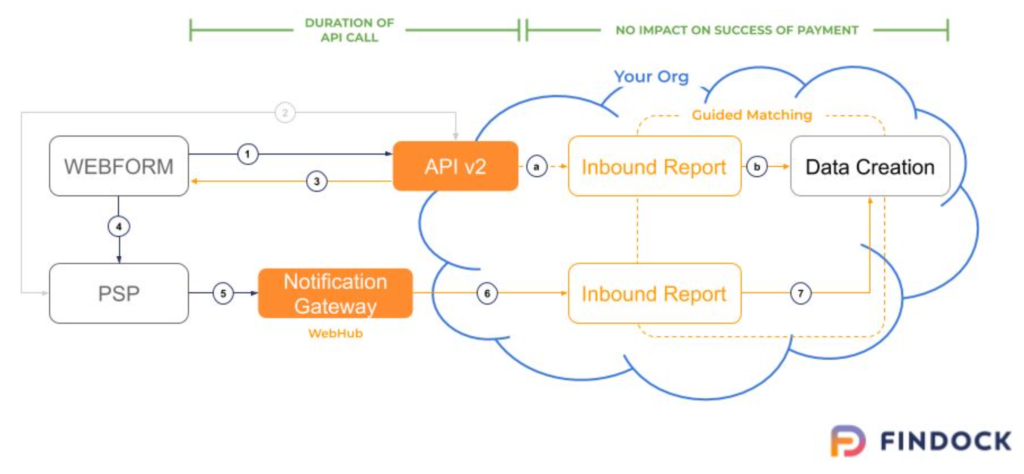
This is the moment right after a new Gravity Forms submission is created. This action takes place in the visitor’s browser. - After a matched Findock v2 Webhook call (e.g. Contact/Account found)
Findock v2 notifies the website underwater through a Webhook when it has created or found a Contact and Account. If you choose this moment, a call will be sent to Marketing Cloud at that moment. This happens asynchronously with the Gravity Forms submission. - After a successful payment
Findock v2 notifies the website underwater through a Webhook when a transaction has been successfully completed in Salesforce. Choose this moment if you only want a call to go to Marketing Cloud if the payment is successful.
- Immediately after filling out the form
- Choose the type of Marketing Cloud call
- Once you have selected a call type, a dropdown will appear with a list of all events currently available in Marketing Cloud. Please select an event to continue.
- At Feed condition you have the option to set conditions for the action. For example, you will not execute an action until a certain field is filled out in the form.
- Click on Save Settings to save everything.
If a Data Extensions is found for the selected event, a list of all available Data Extension fields will appear after saving:
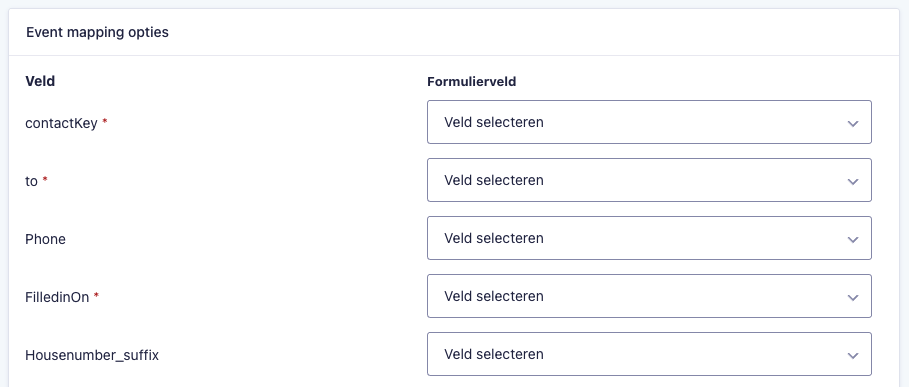
Finally, link the correct Data Extension fields to the Gravity Forms fields. Fields with a red asterisk (*) must be mapped otherwise an error will occur at the API call.
Submissions
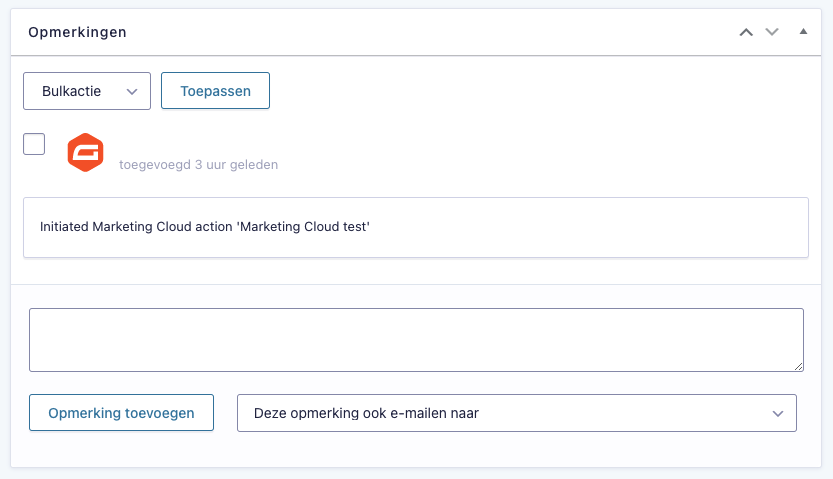
Notes are saved on submissions when Marketing Cloud API calls are made. This way you can always see which actions have taken place with certain submissions:
Prefilling fields
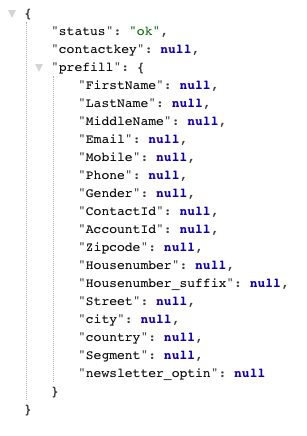
CampaignSuite offers the possibility to prefill Gravity Forms fields with Contact data from Marketing Cloud. To use this functionality it is necessary that a specific Cloud Page exists in Marketing Cloud. This page generates a JSON containing the available fields to retrieve.
An example of such a JSON is:
In the general CampaignSuite settings, the Endpoint can be set for this Cloud Page (Prefill page Endpoint). In addition, it is also possible to overwrite this URL per form.
Follow these steps to prefill fields with Marketing Cloud data:
- Go to the Settings of a form and click on the tab MC Prefill.
- Click on the first checkbox to enable prefilling for this form.
- Then set all parameters needed in the URL of the page to retrieve a record in Marketing Cloud.
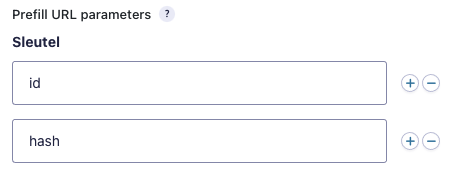
For example, in this image there are 2 parameters set. The URL of the page where the form will be placed on could look like this:
https://www.test.nl/formulier-pagina?id=5847&hash=fjd837hjd93 - Specify whether to hide the form if no record can be found in Marketing Cloud based on the specified parameters and their value. You can also type a message to be shown instead of the form if it is hidden.
- It is possible to overwrite the default Prefill Endpoint with another one. Add it to the field Custom prefill URL.
Map fields
As a final step, it is necessary to link fields from Marketing Cloud to your Gravity Forms fields. In this way you determine which data should be placed in which field.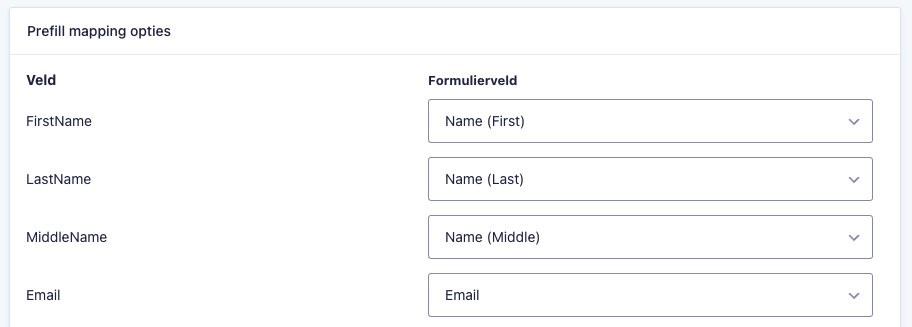
Personalize confirmations
When you use the prefill option, these fields can also be used for form confirmations (such as confirmation text or redirect URL).
Confirmation text
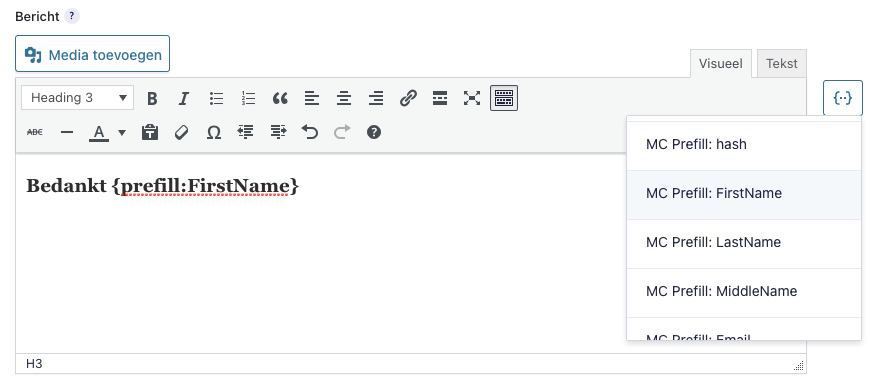
All Marketing Cloud Prefill fields can be used in the confirmation message. To do this, click on the curly brackets to the right of the editor and select one of the prefill fields.
Redirect page or URL
It is also possible to use the prefill fields in a querystring: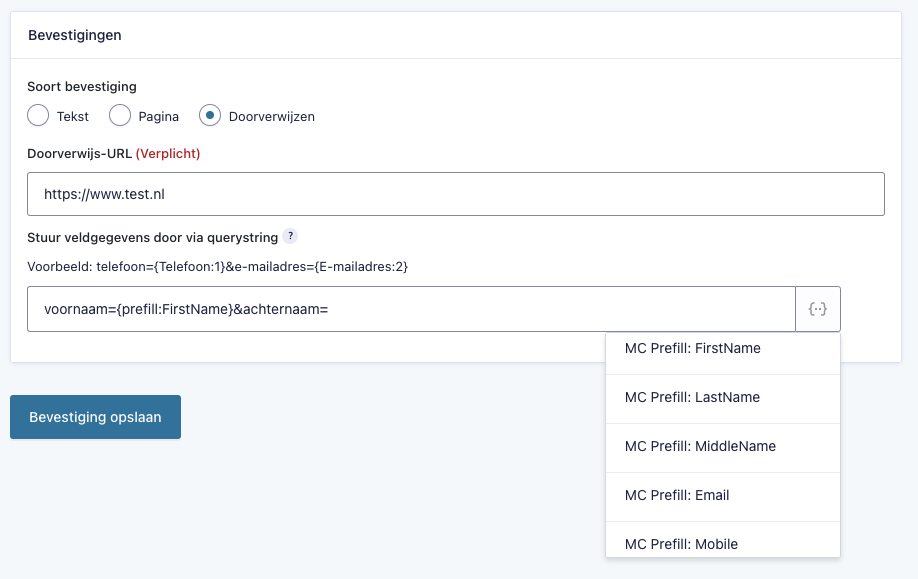
Dynamic content in emails
Marketing Cloud can send emails in a Transactional Email event. In these emails it is technically possible to use dynamic content that can be set in the form. However, it is necessary that you have set up this technical solution in Marketing Cloud. If you are interested in this feature, please contact us.
Follow the steps below to set up dynamic content for Marketing Cloud Emails: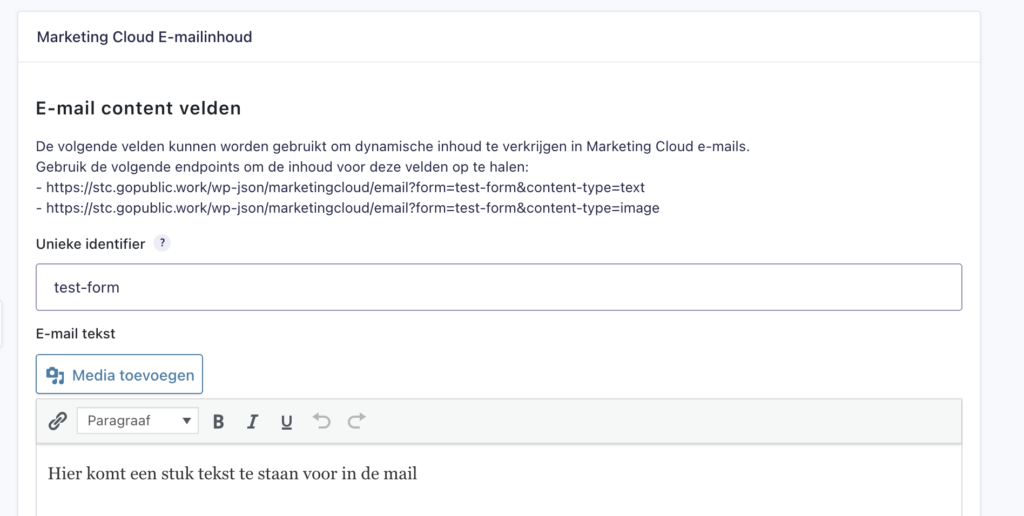
- Go to the Settings of the form and click on the MC Email Content tab.
- Enter a unique identifier for the connection between Marketing Cloud and CampaignSuite. This value cannot contain spaces, only lowercase letters. Later it is also possible to map this identifier to a Marketing Cloud field with a Feed action.
- Enter the text to be placed in the email.
- You can also choose an image that can be used in the email.
- Click on Save Settings to save everything
Technically it is now possible to use this dynamic content in emails from Marketing Cloud via the Endpoints shown in this tab.
Mapping of unique identifier
When you have entered a unique identifier you can map this field to a Data Extension field in the Marketing Cloud Feed actions:

So this feature provides the way to dynamically populate the content of an email from Marketing Cloud with information from the form very dynamically.
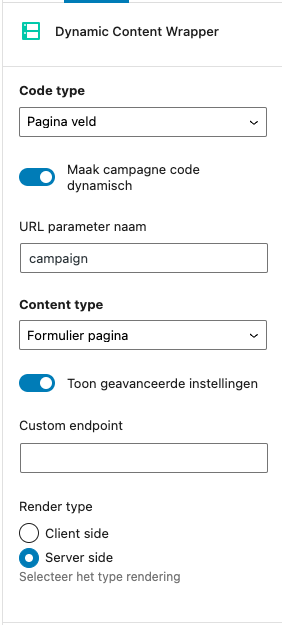
Gutenberg Dynamic Content
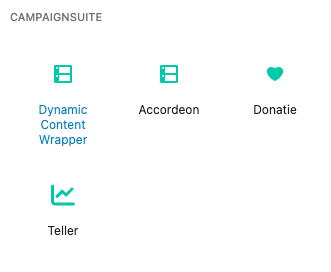
If a connection with Marketing Cloud has been set up, it is also possible to place Dynamic Content from a Marketing Cloud Page on a page in the website. This is done using a wrapper block called Dynamic Content Wrapper.
This block has different settings in the right column:
Code type
Dynamic content must always be retrieved based on a campaign code. This value can be sent to Marketing Cloud in several ways:
Page field
The code will be retrieved from the Campaign Code field below the block CampaignSuite page settings
Custom
The code can be entered manually on the Dynamic Content Wrapper block.
Make campaign code dynamic
It is also possible to extract the code from the URL of the page. Check this option and enter the parameter name from the URL containing the campaign code.
Content type
There are currently 3 content types available for dynamic content:
Form page
This is content that can often be found on a campaign page.
Thank you page
This is content that can be displayed on the thank you page after a donation
Next best action
This is content that can be used for possible next best actions from a donor.
Show advanced settings
Under advanced settings it is possible to set a custom endpoint. This endpoint will then overrule the default endpoint in CampaignSuite settings.
It is also possible to choose whether this dynamic block should be rendered Client side or Server side.
Client side
By default, the texts are and images loaded into a Dynamic Content Wrapper via javascript. To ensure that the visitor does not see a jump in the content, the entire content of the page will first be hidden. As soon as all dynamic content has been loaded, the page will become visible.
Server side
With this option, the server will first make a call to Marketing Cloud to fetch the dynamic content. Then all content will be replaced in the blocks. Eventually the complete page will be loaded.
The main difference between Server and Client side is the fact that with Server side the page ‘keeps loading’ until all content has been replaced. At the Client side, the page has finished loading and the visitor will see a white page for a short time (maximum 1 second). Also, cache plugins can prevent Server side pages from being populated dynamically.
Elements with dynamic content
The following Gutenberg blocks within a wrapper can contain dynamic content:
– Header
– Paragraph
– Image
– Cover image
– Button
As soon as one of the above fields is placed in a Dynamic Content Wrapper block, the following option appears in the right column:
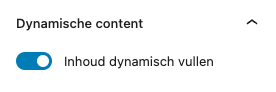
Check this option to specify that the content of the original block should be replaced with content from Marketing Cloud. If no dynamic content can be retrieved from Marketing Cloud, the original content will remain intact.
Feed actions
CS E-commerce
Entries

You can also filter the entries on the fields in the form. CampaignSuite also offers the option to filter by payment status. So this way you can get a list of all successful payments. The first column is always clickable to go to the detailed view of the entry.
Comments
When you are in the detailed view of an entry, you will find a block with Comments in the left column below the fields. At various times during the creation of the entry (sending a form), CampaignSuite may add a comment to the entry. Some examples of this are:
- Salesforce call initiated
- Salesforce payment completed successfully
- Status Mautic form entry changed to: ‘Collected’
Even if an unexpected error occurs, it will be found here in the comments.
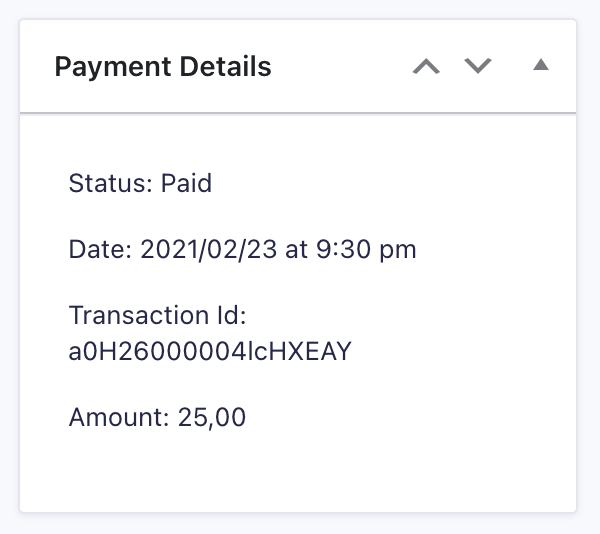
Payment details
When a transaction has taken place, you will find its status in the right column under the heading Payment details.
Salesforce and Mautic
All information related to Salesforce or Mautic is also shown in this column.
Squeezely
Squeezely Customer Data Platform helps marketers efficiently collect customer data, build multi-channel campaigns, and analyze results in one place. CampaignSuite offers a possibility to generate parameters that can be used for Squeezely.
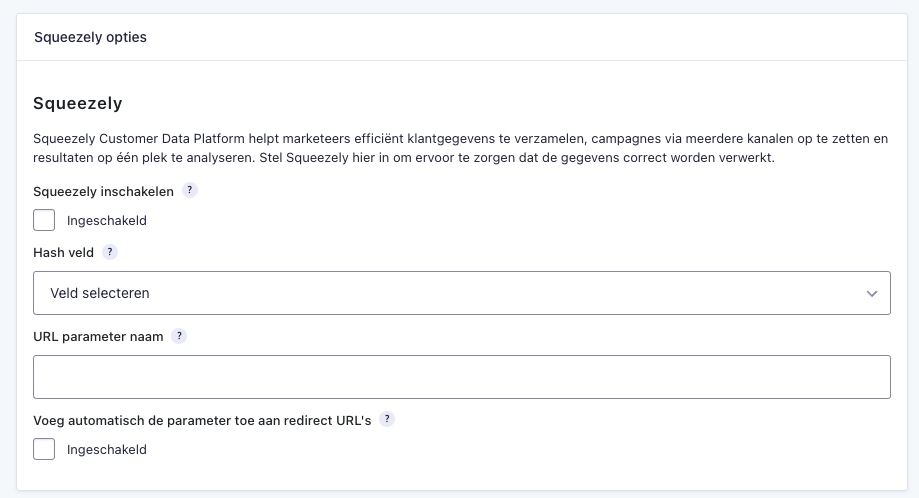
- Go to the Settings of a form and click on the tab Squeezely.
- Enable the Squeezely functionality to use the feature.
- Select a field from the form to calculate the hash used in Squeezely (often this is an email field, for example)
- Enter a parameter name which can be used by CampaignSuite to automatically append to URL. Think, for example, of a Success URL for an iDeal payment via Findock.
- Optionally indicate whether all redirect URLs in this form should be auto-completed with the name of the parameter and the value of the hash field.
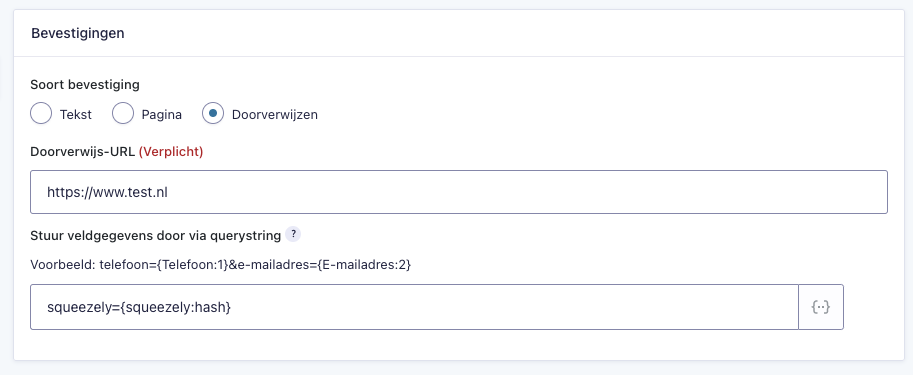
Manually adding parameter
It is possible to manually add the Squeezely parameter to form confirmations if you have enabled and set up the functionality. That might look like this:
Measurement
CampaignSuite contains a very extensive system for setting measurements on forms. Think for example of Client Side and Server Side events at certain moments in a form. These moments can be, for example, when you switch pages in a form or when a successful payment has taken place.
There are a total of 6 moments when you can determine that something needs to be measured by one of the four providers (Facebook, Google Analytics 4, Squeezely or Google Tag Manager). It is possible to create multiple actions per form.
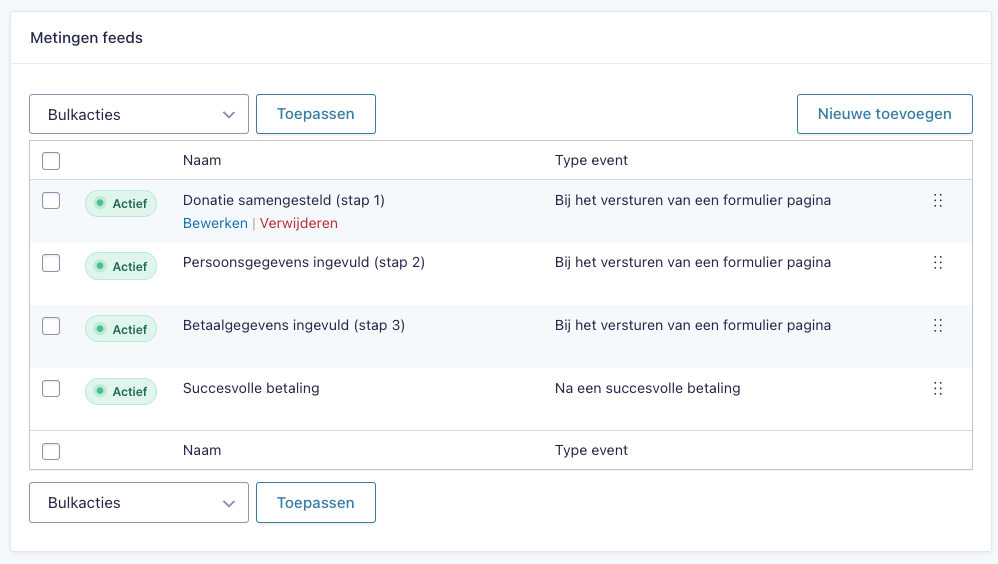
Check out the articles below to learn more about measurement options.
Create new measurement
To create a new measurement moment, open a form in WordPress and go to Settings -> Measurements. Then click the Add new button.
This will open a new window with the following options:
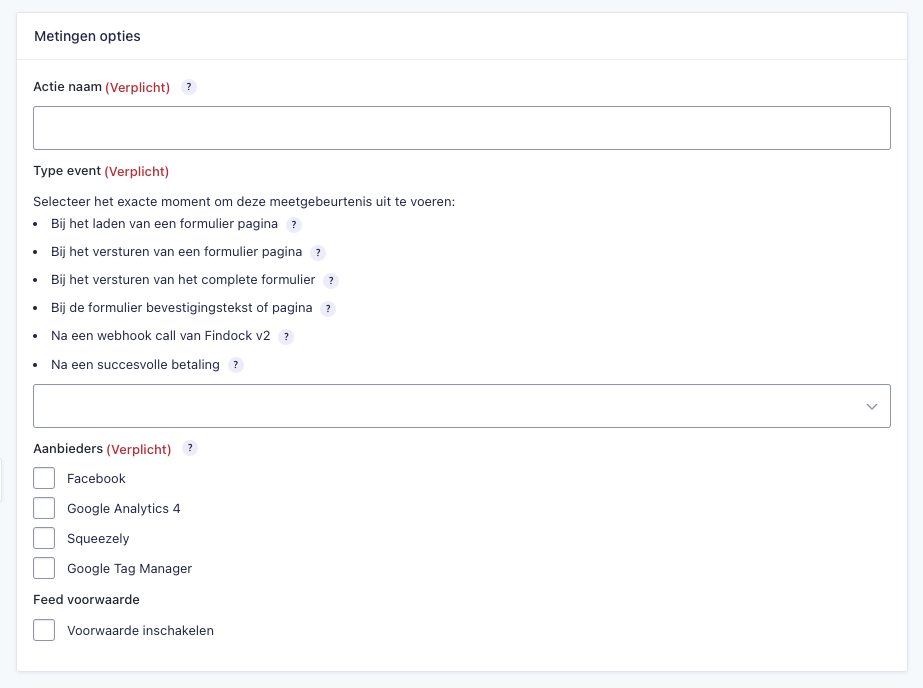
Action name
Enter a recognizable name within the system here. This name will not be displayed on the website or in a measurement value.
Type of event
Choose here from one of the six moments at which the measurement should take place. An event can make a Client Side call, a Server Side call, or both. The moments you can choose from are:
- On form page load
This is the moment a Gravity Forms page is loaded. This is not the WordPress page the form is loaded on, but the page/step inside the Gravity Form. - On form page submit
This is the moment a Gravity Forms page/step is submitted. The moment you press on the next or submit button, this event is triggered. - On complete form submit
This is the moment a Gravity Forms form is submitted. This event will only trigger after the last page when your form consists of several pages. - On form confirmation text or page
This event is triggered when a visitor ends up on the confirmation text or the confirmation page. When you redirect to an internal page, this trigger will be executed when the WordPress page is loaded. When you redirect to an external URL, this trigger will fire on the event: ‘On complete form submit’. - On Findock v2 webhook call
This event is triggered on a webhook call from Findock v2.0. This is also called the ‘Matched’ webhook and is fired when a Payment Intent is processed. - After a successful payment
This event is triggered when a payment in Gravity Forms is set to successful.
Providers
Choose here which providers you want to have something measured on the specified event. The options here are:
- Facebook
This is the Facebook Conversion API. The Conversions API is designed to create a direct connection between your marketing data and the systems that help you optimize ad targeting, reduce cost per action, and measure results on Meta technologies. This provider only has the ability to perform Server Side calls. To use this provider, you need to enter a Pixel ID and an Access token in the CampaignSuite settings. - Google Analytics 4
GA4 can create Client Side and Server Side calls. The Client Side calls use the datalayer.push() and the gtag() functions. The Server Side calls use the GA4 Measurement Protocol. E-commerce calls can also be made with this. To use the GA4 Measurement Protocol you must enter a Measurement ID and API secret in the CampaignSuite settings. - Squeezely
With Squeezely you can create the most advanced buyer journeys and personalization applications out-of-the-box. You work on the basis of flawless data and you can set it up entirely to your own liking. This provider can make Client Side and Server Side calls. The Client Side calls use a datalayer.push() function. The Server Side calls are sent directly to Squeezely’s API. To use this, you must enter an Account ID and API key in the CampaignSuite settings. - Google Tag Manager
This provider supports Client Side calls and Server Side calls. The Client Side calls use the datalayer.push() function. The Server Side calls are only available if a GTM SST URL is entered in the CampaignSuite settings. This URL must be a link to a Google Tag Manager container that can capture the various parameters in GTM.
Feed condition
It is also possible to make this Feed action conditional. This means that the feed will only be executed if certain conditions are met.
When all settings are done, click on Refresh to display the mapping of the chosen providers. This mapping is necessary to let the system know which data can be found where in the form. Look further at the article Mapping to discover the possibilities.
Mapping
As soon as an event type has been chosen and one or more providers have been selected, a block will appear for each provider with options to map fields. In fact, here you are going to set which parameters should have which values in the Client Side or Server Side call.
Each block contains an option to place the call Client Side or Server Side. If one of these options is not visible, it is not supported by the provider in combination with the selected event.
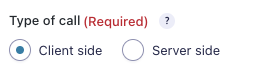
Client Side
It executes script code in the visitor’s browser. In the case of CampaignSuite, this is always a Javascript code.
Server Side
Executes script code on the server. This has the advantage that Server Side calls can also be performed if the visitor has not been on the website for a long time, such as with successful payments. These are then executed ‘under water’ on the server.
In addition, each block has the ability to map parameters. The left column shows the available parameter values (this can vary per provider) and the right column shows all available form fields and various other values that can be used.
Open input fields
Both columns have the option of showing an open input field. In this field you can enter your own value instead of the value from one of the indicated options.
In the left column this is the last option in the dropdown called Add Custom Key and in the right column it is the last option in the dropdown called Add Custom Value.

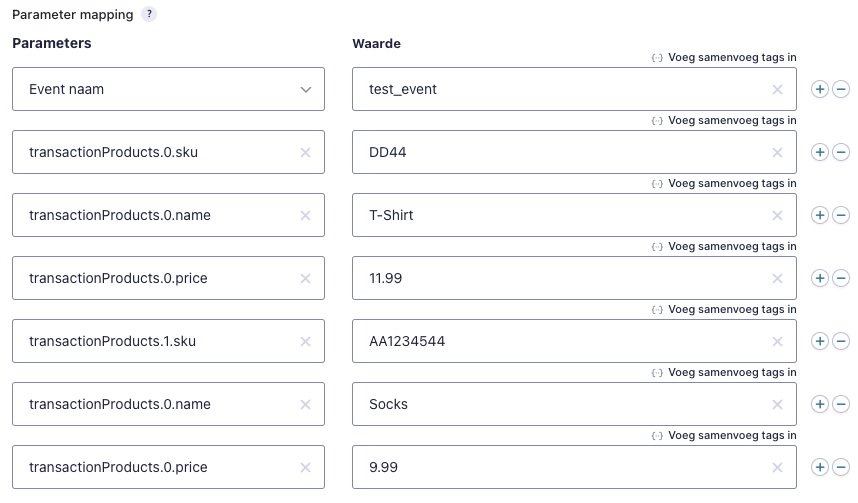
Nesting key values
In some cases, arrays (collections) must be used in, for example, Client Side calls. The image below shows an example of such a collection:
<script>
window.dataLayer = window.dataLayer || [];
dataLayer.push({
  'event': 'test_event',
  'transactionProducts': [
    {
      'sku': 'DD44',
      'name': 'T-Shirt',
      'price': 11.99
    },
    {
      'sku': 'AA1243544',
      'name': 'Socks'
      'price': 9.99
    }
  ]
});
</script>
It is clear here that transactionProducts is a collection of products. This can be done by linking keys with a period. It then looks like this in the mapping of a measurement:
![]() The provider Facebook gives you the ability to only make Server Side API calls to the Facebook Conversion API. This can be done at any of the six available event moments. Click here to get more information about the Facebook Conversion API.
The provider Facebook gives you the ability to only make Server Side API calls to the Facebook Conversion API. This can be done at any of the six available event moments. Click here to get more information about the Facebook Conversion API.
To use the Facebook provider in Measurements you must have entered a Pixel ID and an Access token in the CampaignSuite settings. Without these two values it is not possible to use this provider. More information about setting up a Pixel can be found at this page.
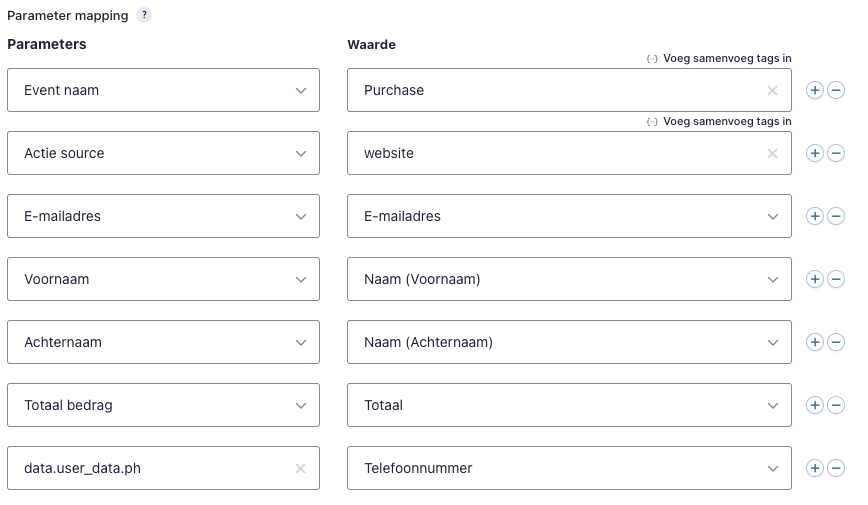
The Facebook Conversion API works on the basis of events. CampaignSuite will create a JSON based on the mapping made in the Feed action, which will be sent via a POST request to Facebook’s API. See the example below of the mapping in CampaignSuite and the JSON sent to Facebook.
Example of mapping:
JSON being generated:
{
   "data": [
      {
         "event_name": "Purchase",
         "event_time" "1666081911",
         "event_id": "1_346",
         "event_source_url": "https://www.examplewebsite.nl/doneer",
         "action_source": "site",
         "user_data": {
            "client_ip_address": "1.1.1.1",
            "client_user_agent": "Mozilla/5.0 (Macintosh; Intel Mac OS X 10_15_7) AppleWebKit/537.36 (KHTML, like Gecko)",
            "em": "309a0a5c3e211326ae75ca18196d301a9bdbd1a882a4d2569511033da23f0abd",
            "fn": "254aa248acb47dd654ca3ea53f48c2c26d641d23d7e2e93a1ec56258df7674c4",
            "ln": "eeacc9d4cf711ce63f7d247062f52ca2fe4be1a1a8aef231fe23e75e7bdca60c",
            "ph": "191d48a770670b9ae8f59dbb16c64c583f92d1922a2a440b26e36bf6e3970bf0"
         },
         "custom_data": {
            "value": 100.2,
            "currency": "EUR",
            "form_id": "1",
            "entry_id": "346"
         }
      }
   ]
}- event_id
The event_id parameter is automatically filled with a combination of the form ID and the entry ID (1_346). - action_source
The parameter action_source will be automatically filled with the value website provided it is not mapped with its own value. - event_time
The parameter event_time is filled by default with the date and time of submission in the form. - custom_data.currency
The parameter < strong>custom_data.currency is filled by default with the event type After a successful payment.
Custom parameters
In addition to the predefined parameters, it is also possible to send parameters yourself. Click here for a list of the available parameters for Facebook.
For example, to add a city field to user_data you must enter as key value: data.user_data.ct. This will then automatically in the JSON.
In the example above, the phone number field custom has been added.
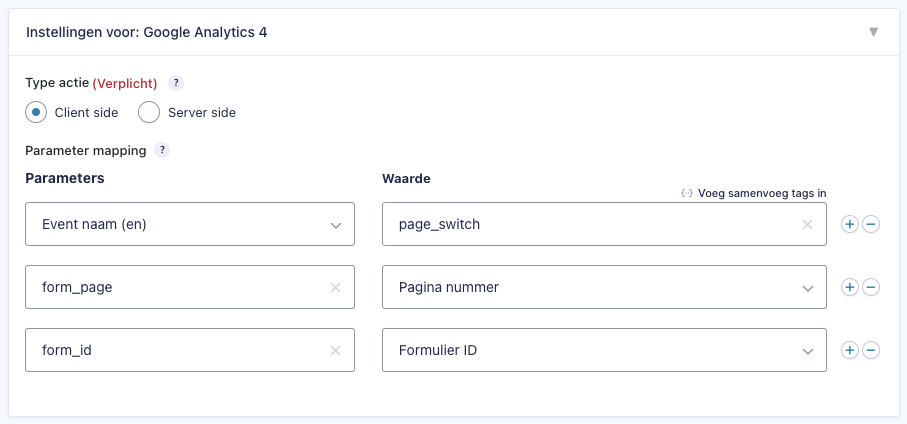
Google Analytics 4
![]() With the provider Google Analytics 4 (GA4) it is possible to perform Client Side and Server Side calls. This is possible for all six different event types. Only with the event types After a webhook call from Findock v2 and After a successful payment a Server Side call can be performed and not Client Side.
With the provider Google Analytics 4 (GA4) it is possible to perform Client Side and Server Side calls. This is possible for all six different event types. Only with the event types After a webhook call from Findock v2 and After a successful payment a Server Side call can be performed and not Client Side.
Client Side
We recommend using the Client Side calls in GA4 if you don’t have Google Tag Manager. When you use the Client Side call, CampaignSuite executes javascript functions by means of gtag(); This requires that Google Tag is installed on the website:
<!-- Google tag (gtag.js) -->
<script async src="https://www.googletagmanager.com/gtag/js?id=GA_TRACKING_ID"></script>
<script>
  window.dataLayer = window.dataLayer || [];
  function gtag(){window.dataLayer.push(arguments);}
  gtag('js', newDate());
  gtag('config', 'GA_TRACKING_ID');
</script>
In the above code, replace GA_TRACKING_ID with your own tracking ID from Google Analytics.
When CampaignSuite executes a Client Side GA4 call, a javascript code will be executed in the visitor’s browser.
Read here more about the code we use for this. The calls to GA4 use events. An example of a simple page change in Gravity Forms might look like this:
Example of mapping:
Javascript example
<script type="text/javascript">
  if (window.gtag == undefined) {
    window.gtag = function() {
      window.dataLayer = window.dataLayer || [];
      dataLayer.push(arguments);
    };
  }
  gtag('event', 'page_switch', {
    'form_page': 1,
    'form_id': 4
  });
</script>
The above code uses the Javascript function gtag().
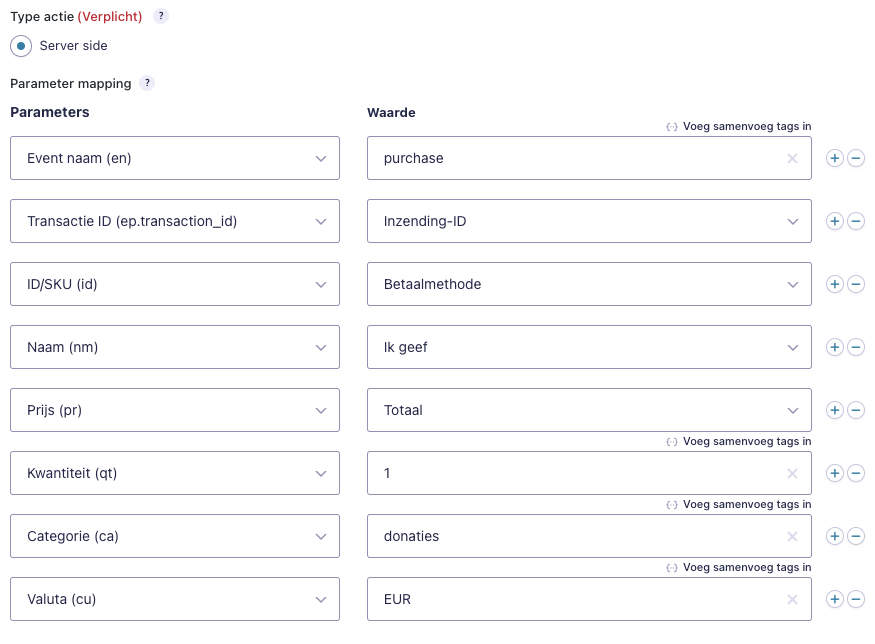
Server Side
Technically it is possible to have a Server Side call made to GA4 for all six event types. This is only available if a Measurement ID and an API secret are entered in the CampaignSuite settings. These can be found in the admin section of your Google Analytics account -> Account Settings -> Data Streams. Click on the stream and copy the Measurement ID here. The value of the API secret can be found under the heading Measurement Protocol API secrets.
GA4’s Server Side calls use the Measurement Protocol API from Google. This API also works on the basis of sending events via a POST request to an endpoint (https://www.google-analytics.com/mp/collect).
The images below show an example of a GA4 Server Side call upon a successful payment in CampaignSuite:
Example of mapping:
POST request example
{
  "client_id": "278327074.1665398324",
  "non_personalized_ads": false,
  "events": [
    {
      "name": "purchase",
      "params": {
        "items":
[
           {
             "item_id": "Ideal",
             "item_name": "One time",
             "quantity": 1,
             "item_category": "donations",
             "price": 25
           }
         ],
         "currency": "EUR",
         "transaction_id": "346",
         "value": 25
       }
     }
   ]
}- client_id
This parameter is automatically populated with a Google Analytics Client ID if it is set in the website with a pixel
Event builder
Google has a handy tool with which you can build an event to test whether it is a valid call. It can be found at: https://ga- dev-tools.web.app/ga4/event-builder/
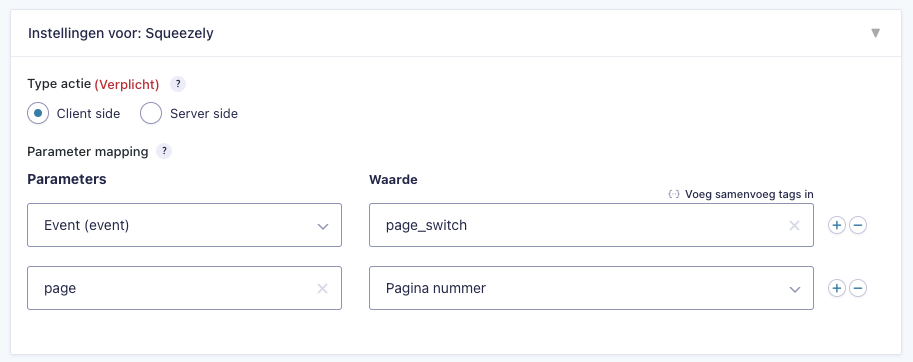
Squeezely
![]() With Squeezely you can create the most advanced buyer journeys and personalization applications out-of-the-box. You work on the basis of flawless data and can arrange everything entirely according to your own insight. This tool uses both a tracking pixel on your website or can shoot events via their API. CampaignSuite offers this option in Measurements. Squeezely works on the basis of events. Every measure you set in CampaignSuite must be an event.
With Squeezely you can create the most advanced buyer journeys and personalization applications out-of-the-box. You work on the basis of flawless data and can arrange everything entirely according to your own insight. This tool uses both a tracking pixel on your website or can shoot events via their API. CampaignSuite offers this option in Measurements. Squeezely works on the basis of events. Every measure you set in CampaignSuite must be an event.
To use the Server Side calls via the Squeezely provider you must enter an Account ID and an API key in the CampaignSuite settings. Squeezely’s Client Side calls work with a datalayer.push() and will only work if the Squeezely pixel is installed on the website:
<script type="text/javascript">
  (function(s,q,z,l,y){s._sqzl=s._sqzl||[];l=q.createElement('script'),
  y=q.getElementsByTagName('script')[0];l.async=1;l.type='text/javascript';
  l.defer=true;l.src=z;y.parentNode.insertBefore(l,y)})
  (window,document,'https://squeezely.tech/tracker/<YOUR_IDENTIFIER>/sqzl.js');
</script>
More information on how to use the API can be found on the Squeezely documentation page.
Client Side
The image below shows a simple example of a page switch in a Gravity Forms form:
Example of the mapping:
Example of the Javascript code being executed:
<script type="text/javascript">
  window._sqzl = window._sqzl || [];
  window._sqzl.push({
    "event" : "page_switch",
    "page" : 1
  });
</script>
Because the Squeezely pixel is loaded into the website, this event will be captured in Squeezely.
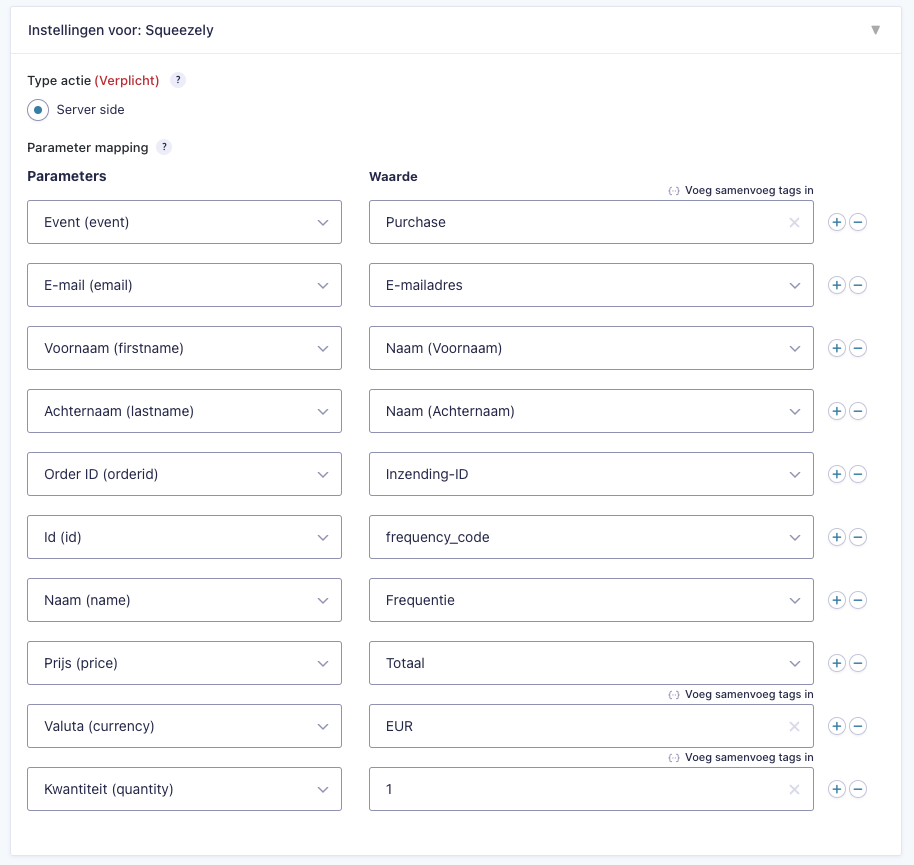
Server Side
Server Side calls can be set in all six measurement moments. However, with Server Side calls it is mandatory to send a unique identifier in the parameters, otherwise Squeezely will not know to whom the data should be linked in their system.
The image below shows a Server Side call after a successful donation. This call is sent ‘underwater’ to Squeezely when a payment is successfully completed.
Example of the mapping:
Example of code for API call:
[
  "events" => [
    [
      "event" => "Purchase",
      "email" => "test@test.nl",
      "firstname" => "Test",
      "lastname" => "Test,
      "orderid" => 346,
      "products" => [
        [
          "id" => "single",
          "name" => "One time",
          "price" => 25,
          "quantity" => 1
        ]
      ]
    ]
  ]
];
Debugging tool
Squeezely has a tool that allows you to check whether Server Side API calls are coming in properly. It can be found at: https://app.squeezely.tech/data/events.
Google Tag Manager
![]() Google Tag Manager (GTM) is a tool from Google that allows you as an online marketer, entrepreneur or social media specialist to become less dependent on your developers or an external agency. By means of Google Tag Manager you ensure that you can make useful tags such as Google Analytics or the Meta Pixel work without having to ask your web builder to place the tags in the code of your website.
Google Tag Manager (GTM) is a tool from Google that allows you as an online marketer, entrepreneur or social media specialist to become less dependent on your developers or an external agency. By means of Google Tag Manager you ensure that you can make useful tags such as Google Analytics or the Meta Pixel work without having to ask your web builder to place the tags in the code of your website.
In Measurements you have the option to make Client Side and Server Side calls for GTM. Client Side calls are not available for the events After a webhook call from Findock v2 and After a successful payment. The Client Side calls use the datalayer.push() function. The data can then be read by the GTM pixel on your website:
<!-- Google Tag Manager -->
<script>(function(w,d,s,l,i){w[l]=w[l]||[];w[l].push({' gtm.start':
new Date().getTime(),event:'gtm.js'});var f=d.getElementsByTagName(s)[0],
j=d.createElement(s),dl=l!='dataLayer'?'&l='+l:'';j.async=true;j.src=
'https://www.googletagmanager.com/gtm.js?id='+i+dl;f.parentNode.insertBefore(j,f);
})(window,document,'script','dataLayer','UNIQUE_ID');</script>
<!-- End Google Tag Manager -->
In the above code, replace UNIQUE_ID with your own Google Tag Manager ID.
Server Side calls are only available if a value is entered in the CampaignSuite settings for the field GTM SST URL (Google Tag Manager Server Side Tracking URL). This URL (also called Tag Manager server container) can be created in Google Tag Manager. Read here to learn more about how to create a Tag Manager server container. When you fill in the Measurement ID field with the ID from GTM, it will automatically be included in the Server Side calls in the parameter tid.
Client Side
When a Client Side call is made via the Google Tag Manager provider, CampaignSuite automatically detects whether it is an E-commerce Measurement call or not. We do this based on the mapping of the Price parameter of the product. If this parameter is mapped, the datalayer.push() will have an e-commerce syntax. In all other cases it will be a simple version of a datalayer.push(). Below are 2 examples of a simple and an e-commerce Client Side call.
Example of the mapping (simple):
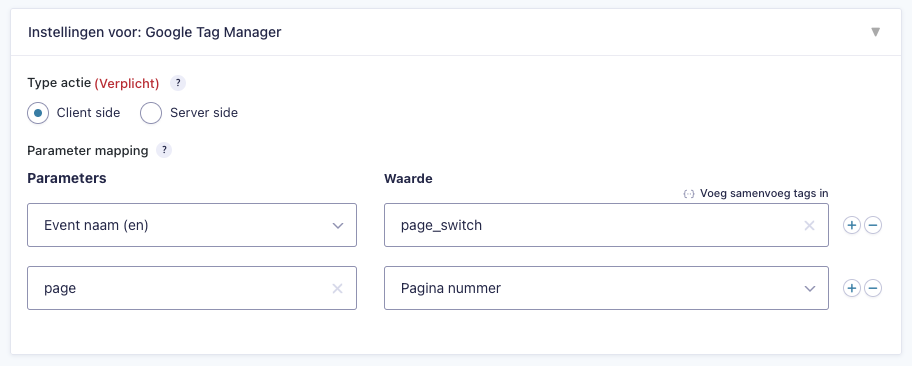
Example of the datalayer.push() Javascript code:
<script type='text/javascript'>
  dataLayer.push({
    event: "page_switch",
    page: "1"
  });
</script>
Example of the mapping (e-commerce):
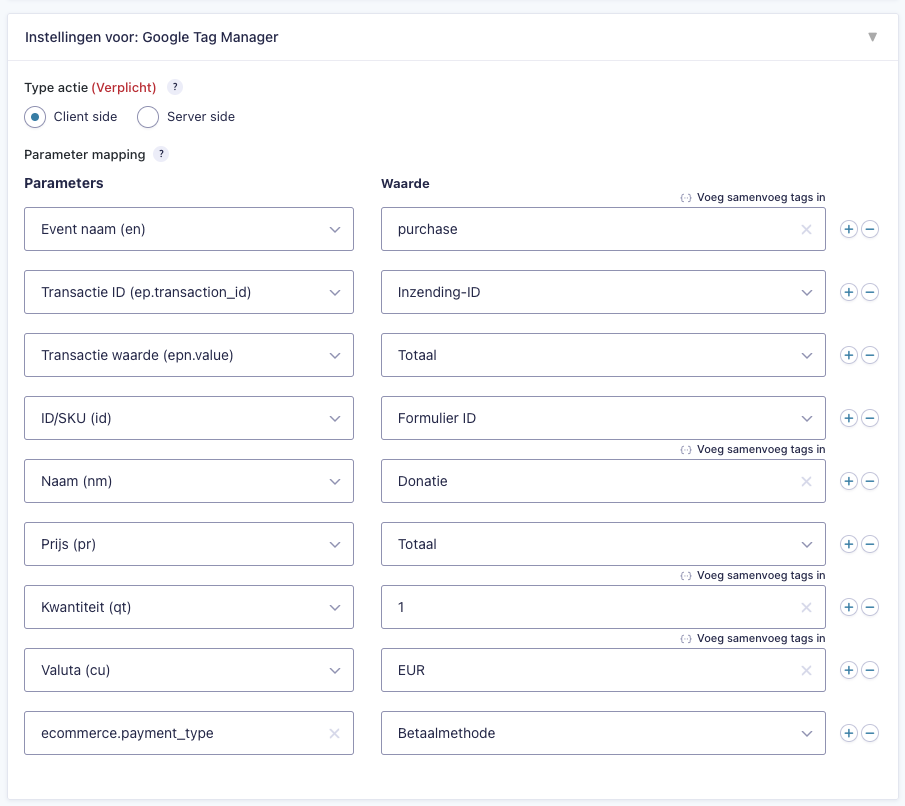
Example of the datalayer.push() Javascript code:
<script type='text/javascript'>
  dataLayer.push({ ecommerce: null });
  dataLayer.push({
    event: "purchase",
    transaction_id: "349",
    e-commerce: {
      value: 12.45,
      payment_type: "Ideal",
      items: [
        {
          item_id: "1",
          item_name: "Donation",
          price: 12.45,
          quantity: 1
        }
      ]
    }
  });
</script>
Server Side
It is only possible to make Server Side calls if there is a Tag Managa server container has been created and set up. This container can be accessed via a separate URL (for example: https://sst.testwebsite.nl/g/collect) which must be set in the CampaignSuite settings under GTM SST URL.
The parameters mapped in the block of Google Tag Manager at Measurements will be sent in the URL that CampaignSuite calls via a GET request. Check out this page to see which parameters are supported .
The example below shows a Server Side call upon successful payment:
Example of the mapping:
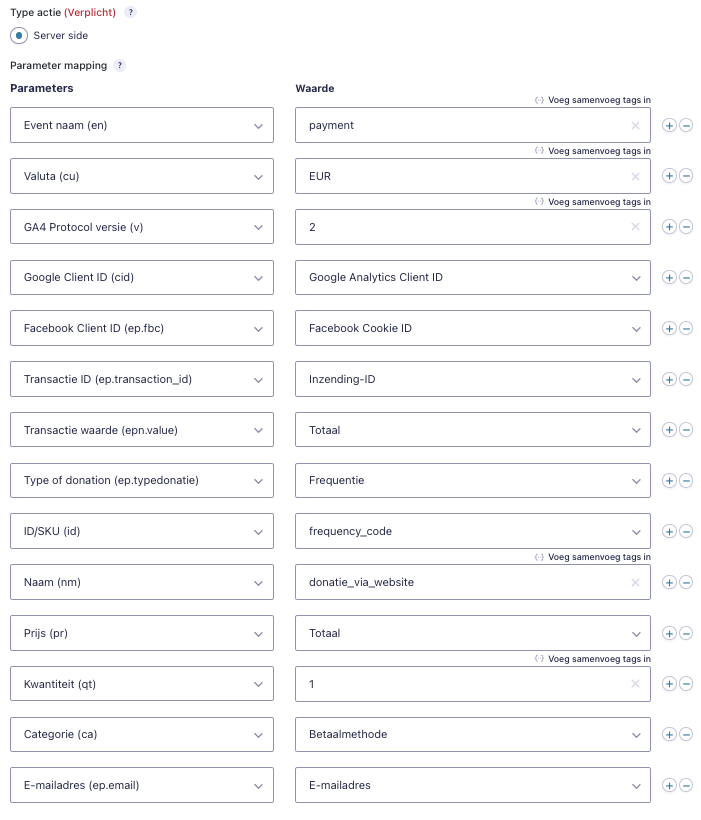
GET request URL being executed:
https://sst.testwebsite.nl/g/collect?v=2&cid=278327074.1665398324&tid=G-AB1CDEFG23& en=payment&cu=EUR&ep.fbc=undefined&ep.transaction_id=346&epn.value=100&ep.typedonatie=One-time&ep.email=test@test.nl&pr1=idonce_0~nmdonatie_via_website~ pr100~qt1~caIdealAll product fields are merged and all individual parameters are pasted after the URL. In this way a Server Side call is made for Google Tag Manager.